
Price Drop Alert: Corsair MP700 Elite PCIe 5.0 SSD Hits Lowest Price Yet on Amazon

Price Drop Alert: Corsair MP700 Elite PCIe 5.0 SSD Hits Lowest Price Yet on Amazon

If you’ve been holding off on upgrading to next-generation PCIe Gen 5 storage because of sky-high launch pricing, now might be the time to make your move. The Corsair MP700 Elite 2TB PCIe 5.0 NVMe SSD has dropped to an all-time low price of $699.99 on Amazon—marking a massive price cut for one of the most accessible Gen 5 flagships on the market.

While PCIe 5.0 SSDs initially debuted as ultra-expensive, niche components for extreme enthusiasts, deals like this are finally bringing 10,000+ MB/s speeds into realistic territory for modern gaming rigs and high-end workstation builds.

Here is a breakdown of what the MP700 Elite brings to the table, how its thermals hold up, and what you need to check in your system before pulling the trigger.

The Performance Breakdown: Is PCIe Gen 5 Worth It?

The Corsair MP700 Elite sits in a strategic “sweet spot” for PCIe 5.0 storage. Rather than pushing ultra-hot 14,000 MB/s limits that require massive active dual-fan coolers, Corsair tuned the MP700 Elite for balanced performance and thermal efficiency.

Key Specs at a Glance:

  • Sequential Read Speed: Up to 10,000 MB/s

  • Sequential Write Speed: Up to 8,500 MB/s

  • Interface: PCIe Gen 5.0 x4 (NVMe 2.0)

  • NAND Flash: 3D TLC NAND

  • Form Factor: M.2 2280

To put those numbers into perspective, the MP700 Elite delivers roughly 40% faster sequential throughput than top-tier PCIe Gen 4 drives (like the Samsung 990 PRO or WD Black SN850X). For heavy video editors handling raw 8K timelines, 3D animators shuffling multi-gigabyte asset libraries, or gamers preparing for heavy DirectStorage titles, the bandwidth bump is substantial.

Thermal Reality: Do You Need a Heatsink?

Gen 5 controllers are notorious for running much hotter than older Gen 3 and Gen 4 silicon.

While the MP700 Elite is more power-efficient than first-generation Phison E26 drives, you cannot run this SSD completely bare under sustained workloads.

[ Bare Gen 5 SSD ]  ──( Sustained Writes )──> Spikes past 75°C ──> Thermal Throttling / Slowdown
[ Motherboard Heatsink ] ──> Maintains ~58°C - 65°C ──> Stable 10,000 MB/s Performance

If you buy the non-heatsink version on sale, ensure your motherboard’s primary M.2 slot includes a built-in heavy aluminum heat shield with a high-quality thermal pad. Running a Gen 5 drive without adequate cooling will cause the controller to rapidly hit its thermal ceiling, triggering performance throttling down to SATA-like speeds to save itself from cooking.

Hardware Checklist Before You Buy

Before hitting “Add to Cart,” verify that your PC platform is actually equipped to utilize a PCIe 5.0 drive:

  1. Motherboard Support: Ensure your CPU and motherboard natively support PCIe 5.0 on the primary M.2 slot (such as Intel Z790/Z890 or AMD AM5 X670E/X870E platforms).

  2. PCIe Lane Allocation: Double-check your motherboard manual to ensure occupying the Gen 5 M.2 slot doesn’t split your primary graphics card slot down from x16 to x8 mode.

  3. Backwards Compatibility: While the MP700 Elite will physically work in older PCIe 4.0 slots, it will be hard-capped at Gen 4 speeds (~7,400 MB/s), completely defeating the purpose of paying extra for a Gen 5 drive.

How to Verify Your Drive Upon Arrival

Whenever you score a major deal on high-end storage, always verify the hardware the moment it arrives:

  • Check the Telemetry in CrystalDiskInfo: Open CrystalDiskInfo and check the Transfer Mode line. It should read PCIe 5.0 x4 | PCIe 5.0 x4. If it shows PCIe 4.0 or x2, your drive is trapped in a secondary or lane-shared slot.

  • Audit Active Thermals: Run a quick benchmark using CrystalDiskMark while monitoring the Temperature badge in CrystalDiskInfo. If the badge turns red or breaches 70°C, adjust your PC case airflow or upgrade your M.2 heatsink.

At $699.99 for 2TB of Gen 5 performance, the Corsair MP700 Elite is one of the most compelling high-speed storage upgrades available today—just make sure your cooling setup is ready to handle the speed!
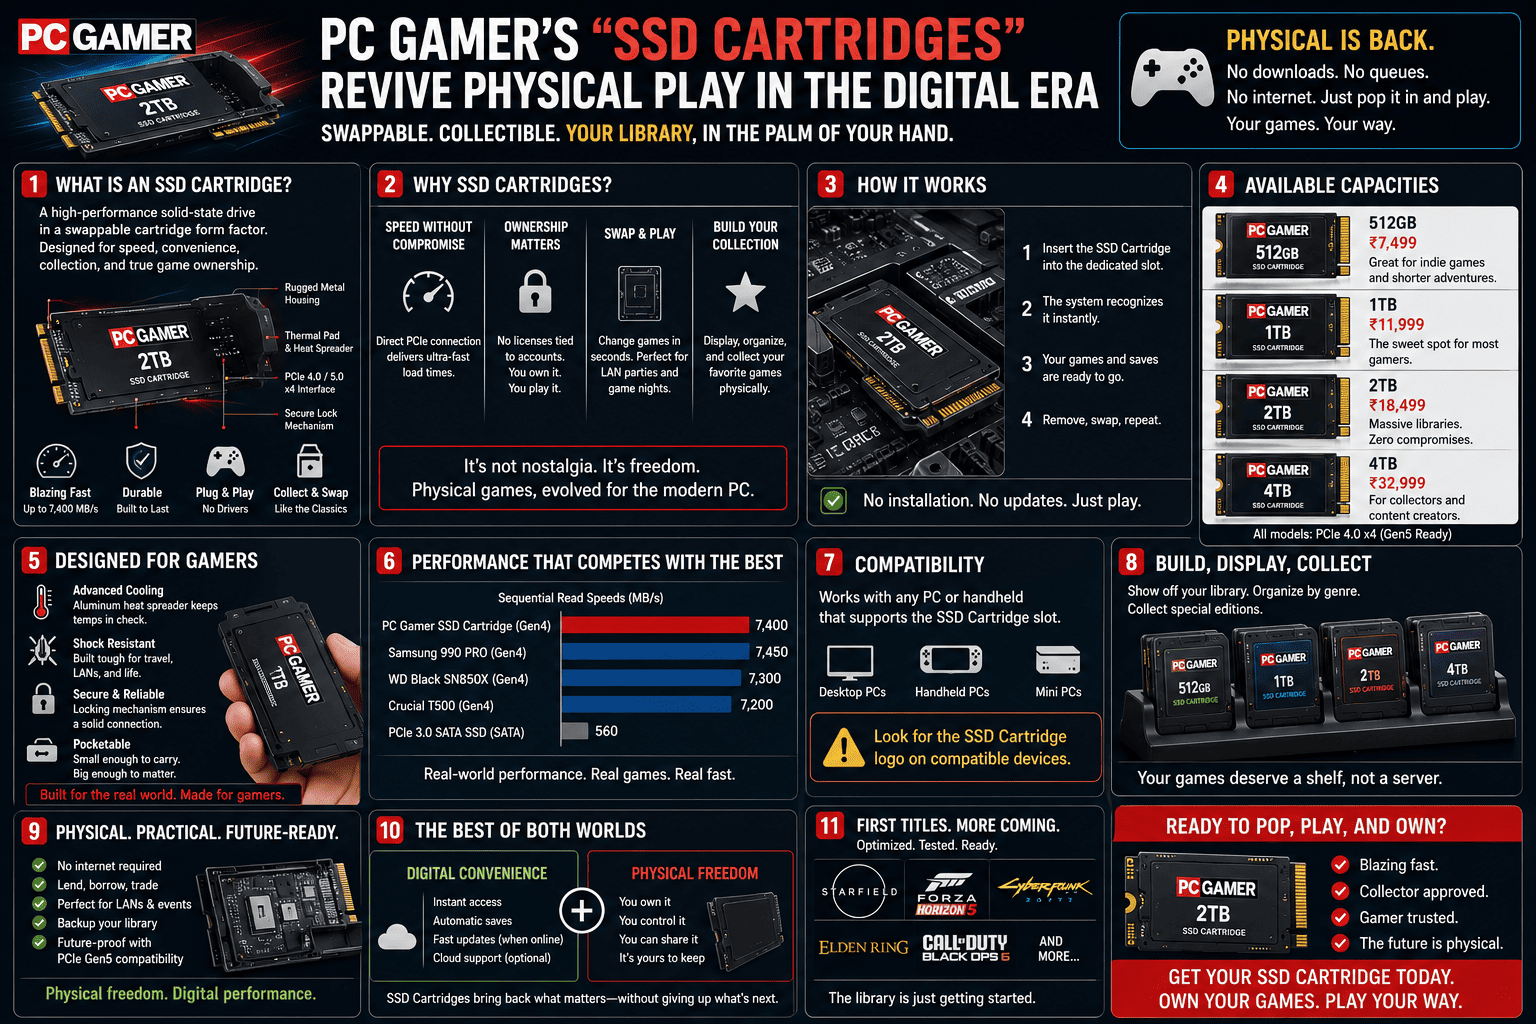
PC Gamer’s “SSD Cartridges” Revive Physical Play in the Digital Era

PC Gamer’s “SSD Cartridges” Revive Physical Play in the Digital Era

As physical media continues its slow fade from store shelves, the gaming world finds itself at a strange crossroads. Digital storefronts offer convenience, but they leave players with a distinct sense of ghost ownership—you pay full price for a title, but you are ultimately licensing a digital file that can be patched, altered, or delisted overnight.

Enter the DIY PC hardware community. A viral project posted by Redditor Jibril-sama on r/pcmasterrace has captured the imagination of gamers everywhere: Steam Game Cartridges built from cheap, repurposed 2.5-inch SATA SSDs.

By housing inexpensive 128GB solid-state drives inside custom 3D-printed shells with printed box art, this project recreates the tactile joy of grabbing a physical cartridge, clicking it into a dock, and watching a game load on screen.

While it isn’t true DRM-free game preservation, it is a brilliant exercise in storage engineering. Let’s break down how this custom cartridge system works under the hood, the performance trade-offs of using older SATA drives, and what it takes to maintain SSD health when treating drives like Game Boy carts.

How the “Steam Cartridge” System Works Under the Hood

The appeal of a traditional console cartridge is immediate plug-and-play access. You insert the media, the system reads the chip, and the title launches without menus or setup friction.

Recreating that seamless experience on a desktop PC requires bridging the physical hardware link with background operating system scripts. Here is how the developer made it happen on a Linux-based setup:

[ Insert 2.5" SATA SSD ] ──> [ USB/SATA Dock ] ──> [ OS udev Event Detected ]
                                                          │
[ Launch Game / Navigate Page ] <── [ Steam URL Protocol ] <── [ Systemd Daemon Executable ]
  1. The Physical Handshake: The 2.5-inch SSD is slotted into a top-loading USB-to-SATA desktop dock.

  2. Event Detection (udev): The operating system immediately recognizes the new block device hitting the SATA controller bus.

  3. Daemon Execution (systemd): A custom background script checks the newly mounted drive’s root folder for a specific, trusted startup file.

  4. Steam Navigation: Using Valve’s native Steam URL Protocol (e.g., steam://run/[app_id]), the script automatically commands Steam to navigate directly to the game’s library page or launch the title instantly.

The Technical Bottlenecks: Can a SATA Cartridge Keep Up?

Using cheap $8 bulk-purchased 128GB SATA SSDs for individual games is a fun, budget-friendly retro flex, but it introduces several performance variables when applied to modern PC hardware.

1. The SATA III Speed Cap

A standard 2.5-inch SATA III SSD hits a physical speed limit of roughly 550 MB/s. For indie games, older classics, or mid-tier titles, 550 MB/s is more than enough bandwidth to deliver sub-10-second loading screens. However, for modern AAA titles that rely on continuous asset streaming (or DirectStorage frameworks), a SATA drive can create minor texture-pop-in compared to an internal PCIe Gen 4 NVMe drive capable of 7,000 MB/s.

2. Drive Endurance and “Cold Storage” Data Loss

The biggest technical hurdle with treating SSDs like classic plastic cartridges comes down to NAND flash physics:

  • Read-Heavy Usage is Great for Endurance: Games are written to the cartridge once, meaning you consume very few write cycles over the lifetime of the drive. The cell endurance (TBW) is barely touched.

  • The Charge Leakage Risk: Unlike traditional read-only mask ROMs used in old Super Nintendo or Game Boy cartridges, flash memory cells rely on trapped electrical charges inside floating-gate transistors. If an SSD is left unplugged in a drawer without power for several years, those electrical charges can slowly leak, leading to data degradation or corrupted files.

How to Audit & Maintain External “Cartridge” Drives

If you want to build your own physical library out of spare SATA or external NVMe drives, keeping tabs on drive health is essential. You don’t want to plug a cartridge in after two years only to find a corrupted installation.

Here is how to monitor your external drives in CrystalDiskInfo:

  1. Enable USB Search: Open CrystalDiskInfo, navigate to Function > Advanced Feature > Disk Search, and ensure [USB] is checked. This forces the software to query external SATA docks and bridge chips.

  2. Audit S.M.A.R.T. Health Status: Keep an eye on the drive’s health badge. Older bulk-refurbished 2.5-inch drives often come from decommissioned office PCs and may already have high operational hours.

  3. Verify the Read/Write Stats: Check the cumulative Total Host Writes to ensure the drive hasn’t already reached the end of its factory cell endurance rating before you load your game archives onto it.

The Verdict

While a custom SSD cartridge system doesn’t bypass Steam’s underlying account DRM, it brings something invaluable back to the PC gaming experience: tangible, tactile fun. In an era where digital libraries feel increasingly abstract, turning your favorite games into physical, labeled media you can collect on a desk shelf is a fantastic marriage of retro nostalgia and modern PC flexibility.

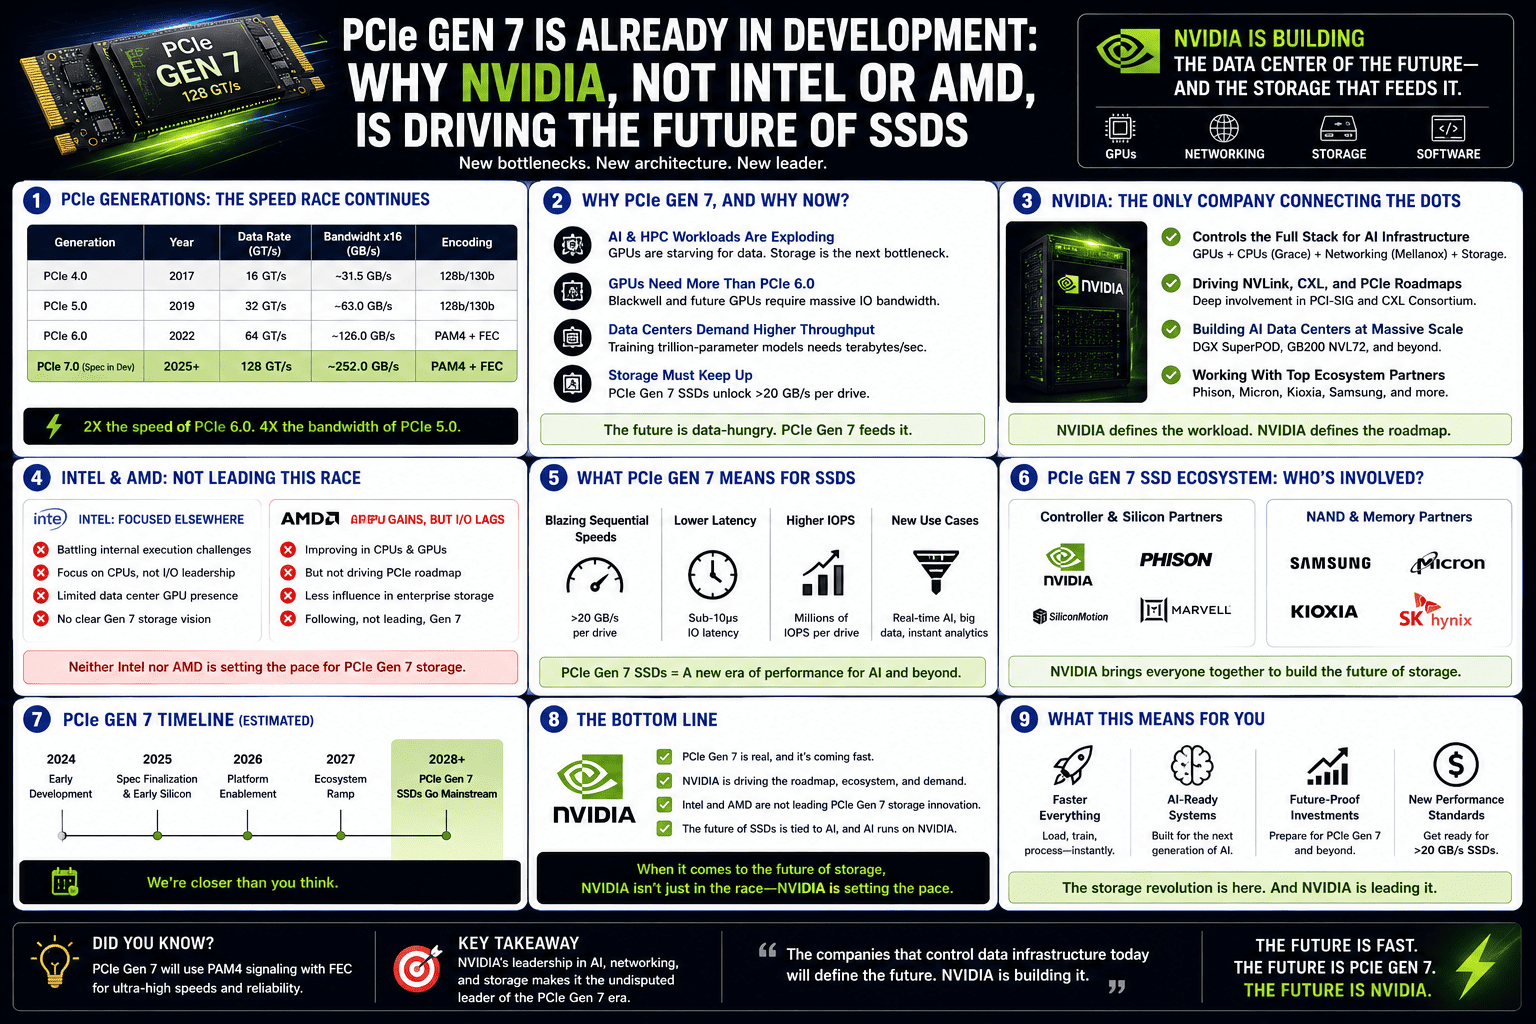
PCIe Gen 7 is Already in Development: Why NVIDIA, Not Intel or AMD, is Driving the Future of SSDs

PCIe Gen 7 is Already in Development: Why NVIDIA, Not Intel or AMD, is Driving the Future of SSDs

Just as consumer PC builders are beginning to adopt PCIe Gen 5 and Gen 6 hardware, the storage industry is already planning its next leap forward.

According to executive statements from Silicon Motion (SMI)—one of the world’s leading independent SSD controller makers—development for PCIe Gen 7 controller architecture is officially underway.

The most surprising revelation isn’t just the sheer speed of Gen 7. It’s who is pushing controller manufacturers to move at this breakneck pace. Silicon Motion revealed that NVIDIA, through its enterprise and AI-driven “Storage Next” initiatives, is currently driving their next-gen consumer and client SSD roadmaps—bypassing traditional desktop CPU heavyweights like AMD and Intel.

Here is what the shift to PCIe Gen 7 and Gen 6 means for the future of consumer storage, hardware thermals, and everyday PC performance.

The Roadmaps: PCIe Gen 5 to Gen 7 Progression

The speed jump across PCIe Express generations is expanding rapidly. However, each doubling of bandwidth presents new thermal and power management challenges for M.2 controllers:

[ PCIe Gen 5 x4 ] ──> ~14.5 GB/s  (Current Flagships / Heavy Cooling Needed)
[ PCIe Gen 6 x4 ] ──> ~25.0 GB/s  (Silicon Motion "Neptune" / PAM4 Encoding)
[ PCIe Gen 7 x4 ] ──> ~60.0 GB/s  (In Active R&D / Target 2028-2030)

1. The Immediate Step: PCIe Gen 6 (Codename: Neptune)

Silicon Motion’s upcoming consumer PCIe 6.0 controller, codenamed Neptune, promises sequential read speeds exceeding 25 GB/s and up to 3.5 million random IOPS.

  • The Secret: Like enterprise Gen 6 drives, Neptune transitions away from traditional NRZ signaling to PAM4 (Pulse Amplitude Modulation 4-Level) data encoding, doubling data transfer rates per clock cycle.

  • The Catch: Pushing 25 GB/s requires pairing the controller with ultra-fast 4800 MT/s 3D NAND flash.

2. The Horizon: PCIe Gen 7 Development

With theoretical bandwidth scaling up to an astonishing 60 GB/s on an x4 M.2 link, PCIe Gen 7 development has already started in Silicon Motion’s engineering labs. Rather than serving casual desktop file transfers, Gen 7 storage is explicitly designed to feed massive, real-time data pipelines for GPU accelerators handling AI inference workloads.

Why NVIDIA is Steering the Storage Wheel

Historically, SSD controller makers synchronized their release roadmaps with Intel and AMD desktop CPU platform cycles. When Intel or AMD introduced a new PCIe standard on their desktop motherboards, controller makers rushed to build compatible consumer drives.

That paradigm has shifted.

With NVIDIA dominating high-performance computing, the GPU—not the CPU—has become the central processor for heavy data streams.

Through initiatives aimed at reducing latency bottlenecks between storage pools and GPU VRAM (such as DirectStorage and GPU-direct memory pipelines), NVIDIA requires storage controllers that can handle deterministic, ultra-low-latency traffic. As a result, Silicon Motion is tuning its future client and enterprise SSD controllers around NVIDIA’s bandwidth requirements first, leaving AMD and Intel to catch up on the platform side later.

The Reality Check: Enterprise Shortages vs. Consumer Timelines

While the theoretical numbers for PCIe Gen 6 and Gen 7 sound impressive, everyday PC builders need to temper their expectations regarding when these drives will actually reach retail shelves.

Factor Enterprise / AI Market Consumer / Desktop Market
NAND Allocation Consuming 70–80% of global NAND wafer output by 2027. Facing tight retail inventory and elevated prices.
Primary Focus 16-channel ultra-dense, liquid-cooled storage arrays. 4-channel and 8-channel power-efficient M.2 drives.
Expected Adoption Active deployment on Gen 6 in 2026–2027. Gen 6 client drives expected 2028–2029.

Because data centers are swallowing up high-layer NAND flash, controller manufacturers are focusing their immediate production on enterprise-grade clients. Consumer implementations of PCIe Gen 6 will likely remain enthusiast-only hardware until manufacturing output stabilizes.

What This Means for Your Current Setup

If you are currently running a clean PCIe Gen 4 or Gen 5 SSD, you don’t need to worry about your hardware becoming obsolete anytime soon:

  1. Random 4K Matters Most: For operating system snappiness and gaming load times, low-queue Random 4K (Q1T1) speeds matter far more than theoretical 25 GB/s sequential bursts.

  2. Thermal Management is Key: As controllers push higher signaling frequencies like PAM4, heat output increases. Ensure your primary M.2 drive is equipped with a solid motherboard heatsink or heat shield.

  3. Monitor Hardware Health: Open CrystalDiskInfo periodically to verify your drive’s Transfer Mode (ensuring it’s running at full x4 speed) and monitor your Temperature badges under load to keep your controller out of the thermal throttling zone.

While PCIe Gen 7 is being forged in enterprise labs to power the next generation of AI hardware, high-quality Gen 4 and Gen 5 NVMe drives will remain the practical sweet spot for consumer PC builds for years to come.

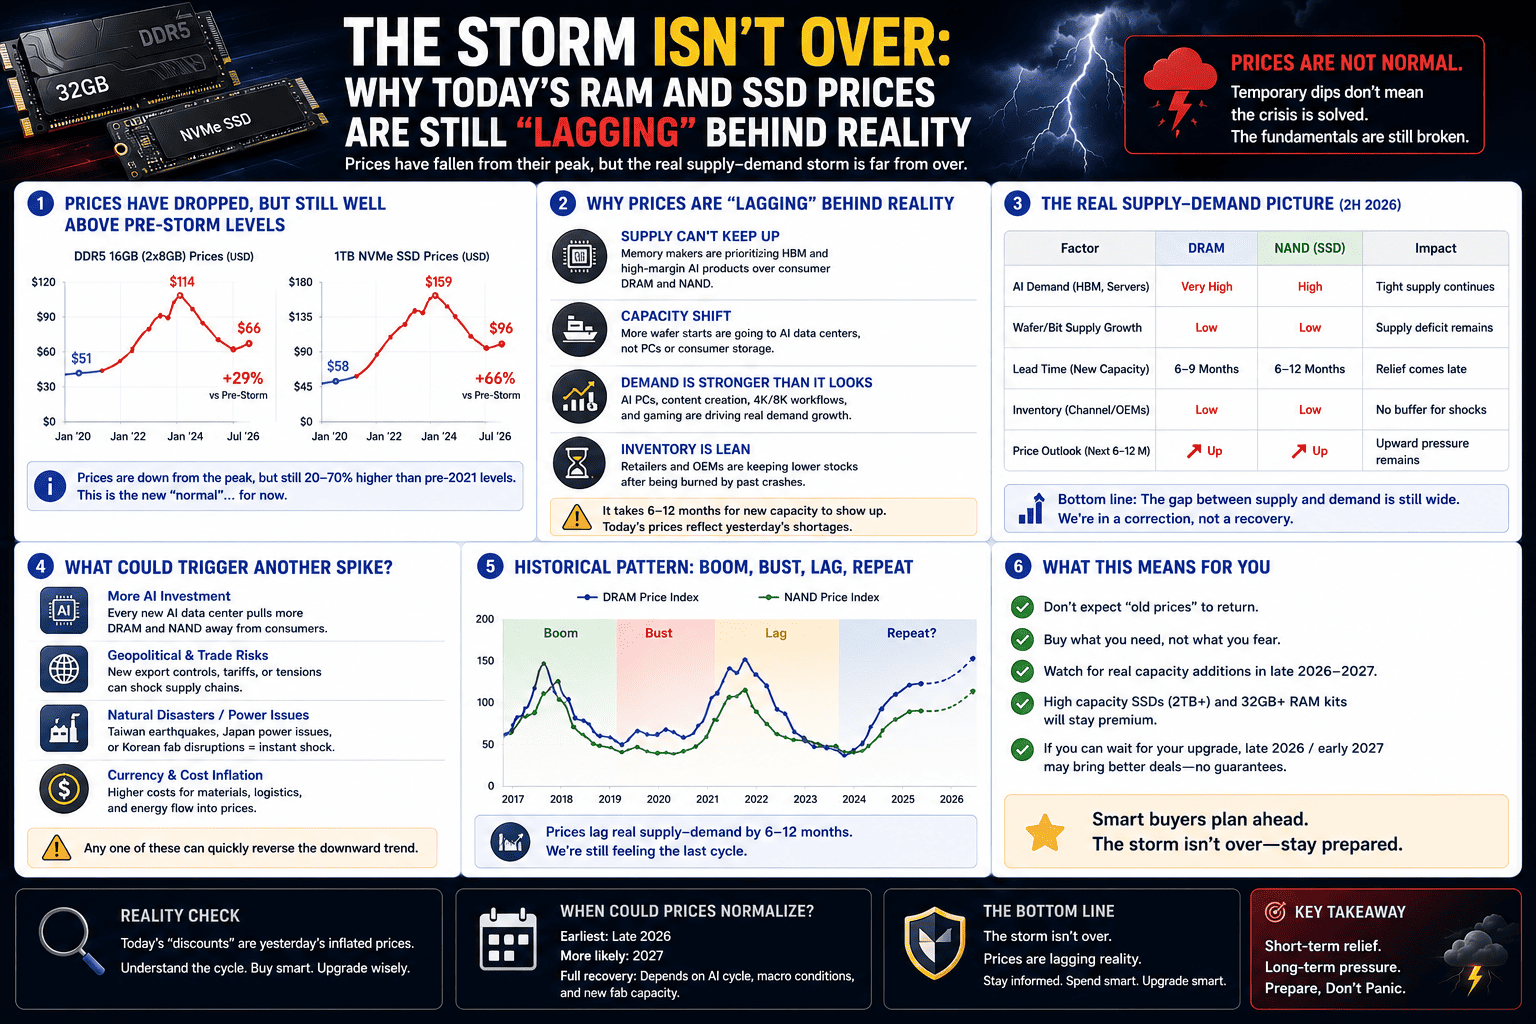
The Storm Isn’t Over: Why Today’s RAM and SSD Prices Are Still “Lagging” Behind Reality

The Storm Isn’t Over: Why Today’s RAM and SSD Prices Are Still “Lagging” Behind Reality

If you thought current RAM and SSD prices were already painful, Valve has a sobering message for the DIY PC community: the retail market hasn’t even felt the worst of it yet.

In a conversation with Bloomberg regarding the development and launch of the $1,049 Steam Machine, Valve hardware engineers Yazan Aldehayyat and Pierre-Loup Griffais dropped a stark warning about the state of component pricing. According to Valve’s internal tracking across global hardware supply chains, retail prices sitting on store shelves right now are lagging behind bulk wholesale costs by at least three to six months.

What you are paying at retail today isn’t reflecting current memory production costs—it reflects older inventory that vendors bought months ago. Once those older stocks dry up, the real price hikes will hit store shelves.

“Honestly, It’s Still Getting Worse”

When asked about the trajectory of component costs, Aldehayyat didn’t sugarcoat the situation:

“Honestly, it’s still getting worse. What people are seeing on retail shelves right now, from our observations, is lagging what we’re seeing from bulk supply by at least three to six months.”

This lag explains why pre-built machines and boutique consoles like the Steam Machine have seen elevated price tags. Valve engineer Pierre-Loup Griffais noted that memory capacity constraints are actively capping how many units the company can build: “We’re basically building everything we can get our hands on.”

[ Wholesale Supply Price Hike ] ──( 3 to 6 Month Delay )──> [ Retail Store Shelf Price Spike ]

When wholesale NAND flash and DRAM prices surge, retailers don’t immediately re-tag existing inventory. Instead, price increases filter down in waves as distributors exhaust older stock and reorder at higher contract rates.

Why Memory Costs Keep Escalating

Valve’s observations match broader industry forecasts from research firms like TrendForce and Gartner. The root cause remains an aggressive structural shift toward enterprise infrastructure:

  • The AI Memory Drain: Fabrication giants like Samsung, SK Hynix, and Micron continue reallocating silicon wafer capacity away from consumer DDR5 and client NVMe flash to produce high-margin HBM (High Bandwidth Memory) and high-density server V-NAND for AI data centers.

  • Depleted Buffer Inventories: PC manufacturers and component vendors built up inventory cushions in late 2025, but those buffers are now depleted.

  • No Quick Relief: Analysts predict DRAM and NAND contract prices will continue climbing through 2026 and well into 2027, with meaningful market relief not expected until 2028 at the earliest when new fabrication facilities (fabs) come online.

What This Means for PC Builders

If you are planning an upgrade or building a system, here is how to navigate the current market landscape:

Scenario Market Reality Recommended Action
Urgent Need (Broken Drive/RAM) Prices will likely be higher in 3–6 months than today. Buy now. Retail stock still reflects older, lower wholesale contract rates.
Optional Upgrade (More Storage) High-density 2TB/4TB NVMe drives are at multi-year price peaks. Wait it out. Maintain existing drives and offload non-essential files.
Handheld / SFF Upgrades Compact M.2 2230/2240 drives are seeing tight supply. Monitor drive wear and thermals to maximize current drive lifespan.

The Takeaway: Audit What You Already Own

Before spending inflated prices on replacement storage, audit your current drives using CrystalDiskInfo:

  1. Check Your Health Percentage: Review your primary NVMe drive’s Health Status. If it sits above 85–90%, you have plenty of operational life left.

  2. Monitor Total Host Writes: Compare your cumulative write volume against your drive’s rated TBW (Terabytes Written). Most users consume less than 10–15% of their drive’s physical cell endurance per year.

  3. Manage Heat: Ensure your active drive thermals stay under 60°C to prevent heat-induced wear on the memory controller.

The Lane-Sharing Nightmare: Why Adding a Second NVMe Drive Could Cut Your GPU Performance in Half

The Lane-Sharing Nightmare: Why Adding a Second NVMe Drive Could Cut Your GPU Performance in Half

You spent weeks picking out the perfect components for your PC. You scored a top-tier graphics card, paired it with a high-end processor, and installed a blistering-fast primary NVMe SSD. A year down the road, your storage fills up. You grab a second high-speed M.2 drive, click it into the open slot right below your graphics card, and boot up your PC.

Your storage space is doubled, but something feels off. Your frame rates in heavy games have taken a mysterious dip, and benchmarks show your GPU isn’t performing quite like it used to.

You didn’t break anything, and your graphics card isn’t dying. You have just run face-first into the single biggest hidden trap in modern motherboard design: PCIe Lane-Sharing.

Before you assume your hardware is defective, let’s look at how motherboards route data traffic, why your new storage drive might be starving your GPU of bandwidth, and how to spot the bottleneck using CrystalDiskInfo.

The Traffic Cop: Understanding PCIe Lanes

Think of your CPU as a massive city center and your components (the GPU and SSDs) as surrounding towns. PCIe lanes are the physical highways connecting them.

Modern consumer processors (like the latest AMD Ryzen or Intel Core platforms) have a strictly limited number of direct “CPU PCIe lanes”—usually only 20 to 24 lanes total.

In a standard, optimal setup, the lanes are perfectly divided:

  • x16 lanes go directly to the primary PCIe slot to give your graphics card maximum breathing room.

  • x4 lanes go directly to the primary M.2 slot for your blazing-fast operating system drive.

[ CPU: 20 Direct Lanes ]
  ├─── 16 Lanes ───> Primary PCIe Slot (GPU at Full x16 Speed)
  └───  4 Lanes ───> Primary M.2 Slot (OS SSD at Full x4 Speed)

This accounts for all 20 direct CPU lanes. But modern motherboards ship with three, four, or even five M.2 slots. Where do the lanes for those extra storage drives come from?

The Nightmare: The Bifurcation Split

To give you more M.2 slots, motherboard manufacturers use a method called bifurcation (lane-sharing). When you plug a second NVMe drive into specific secondary M.2 slots, the motherboard is forced to physically steal bandwidth away from the primary graphics card slot to feed the new drive.

Instead of running at its native x16 speed, the primary PCIe slot is instantly cut in half to x8 speed so the secondary M.2 slot can have its required x4 lanes.

[ Lane-Sharing Active ]
CPU Main Slot ───> Splits into: [ GPU at x8 Speed ] + [ Secondary NVMe at x4 Speed ]

While running a modern high-end graphics card at x8 bandwidth instead of x16 might only cause a minor frame rate drop on older Gen 4 setups, the bottleneck becomes massive if you are running heavy data-streaming pipelines, rendering complex 3D scenes, or utilizing DirectStorage in modern games. You paid for 100% of your GPU’s processing power, but a single layout choice slashed its pipeline in half.

How to Diagnose the Bottleneck via CrystalDiskInfo

You don’t need to open your PC case or guess if your hardware is sharing lanes. You can check the exact physical connection matrix using CrystalDiskInfo.

Open the app and select your secondary NVMe drive from the top selection bar. Look directly at the line labeled Transfer Mode.

http://googleusercontent.com/image_generation_content/7

Caption: Analyzing the Transfer Mode property in CrystalDiskInfo. The interface displays the current active operating speed on the left, separated by a vertical pipe from the drive’s maximum structural hardware specification on the right.

How to Read the Transfer Mode Line:

  • Optimal Status (PCIe 4.0 x4 | PCIe 4.0 x4): If both sides match perfectly, your drive is running at its maximum structural bandwidth. If this drive is routed through the motherboard’s chipset instead of sharing CPU lanes, your GPU remains completely unbottlenecked at x16.

  • The Bottleneck Status (PCIe 4.0 x2 | PCIe 4.0 x4): If the left side shows x2 while the right side shows x4, it means your drive has been down-mapped. The motherboard has choked the drive’s bandwidth to avoid splitting the GPU lanes, or it’s trapped in a low-priority slot.

  • The Hidden Trap (PCIe 5.0 x4 | PCIe 5.0 x4 on a Shared Slot): If you install a Gen 5 drive into a shared slot, the drive will look completely healthy at x4, but checking your GPU’s status in a tool like GPU-Z will reveal that the graphics card slot has dropped to x8.

How to Fix and Avoid Lane-Sharing Conflict

If your motherboard manual or diagnostic tools confirm that your storage expansion is starving your graphics card, follow these steps to restore your GPU’s performance:

1. Read the Motherboard Block Diagram

Before plugging in a drive, look at the manual’s “Storage Configuration” page. Avoid any M.2 slot labeled with warnings like “M2_2 shares bandwidth with PCIE_1.”

2. Move the Second Drive to Chipset-Routed Slots

Most mid-to-high-end motherboards route the bottom M.2 slots through the Motherboard Chipset rather than directly to the CPU. While passing through the chipset introduces a tiny bit of microsecond latency compared to a direct CPU link, it keeps your primary CPU lanes completely untouched. Your GPU stays at full x16 speed, and you still get full use of your expansion storage.

3. Consider a High-Capacity Single Drive Strategy

With retail inventory constraints making multiple small drives less cost-effective, the best way to avoid lane configurations entirely is to buy a single, high-capacity primary drive (like a 2TB or 4TB TLC NVMe). This keeps your secondary slots completely empty, ensuring your graphics card maintains an uninterrupted link directly to your processor.

The Bottom Line

A powerful PC is only as fast as its narrowest data lane. Don’t let a blind storage upgrade create an artificial bottleneck inside your system. Audit your hardware links with CrystalDiskInfo, route your secondary drives through the chipset slots, and ensure your graphics card has the wide-open highway it needs to deliver peak performance!

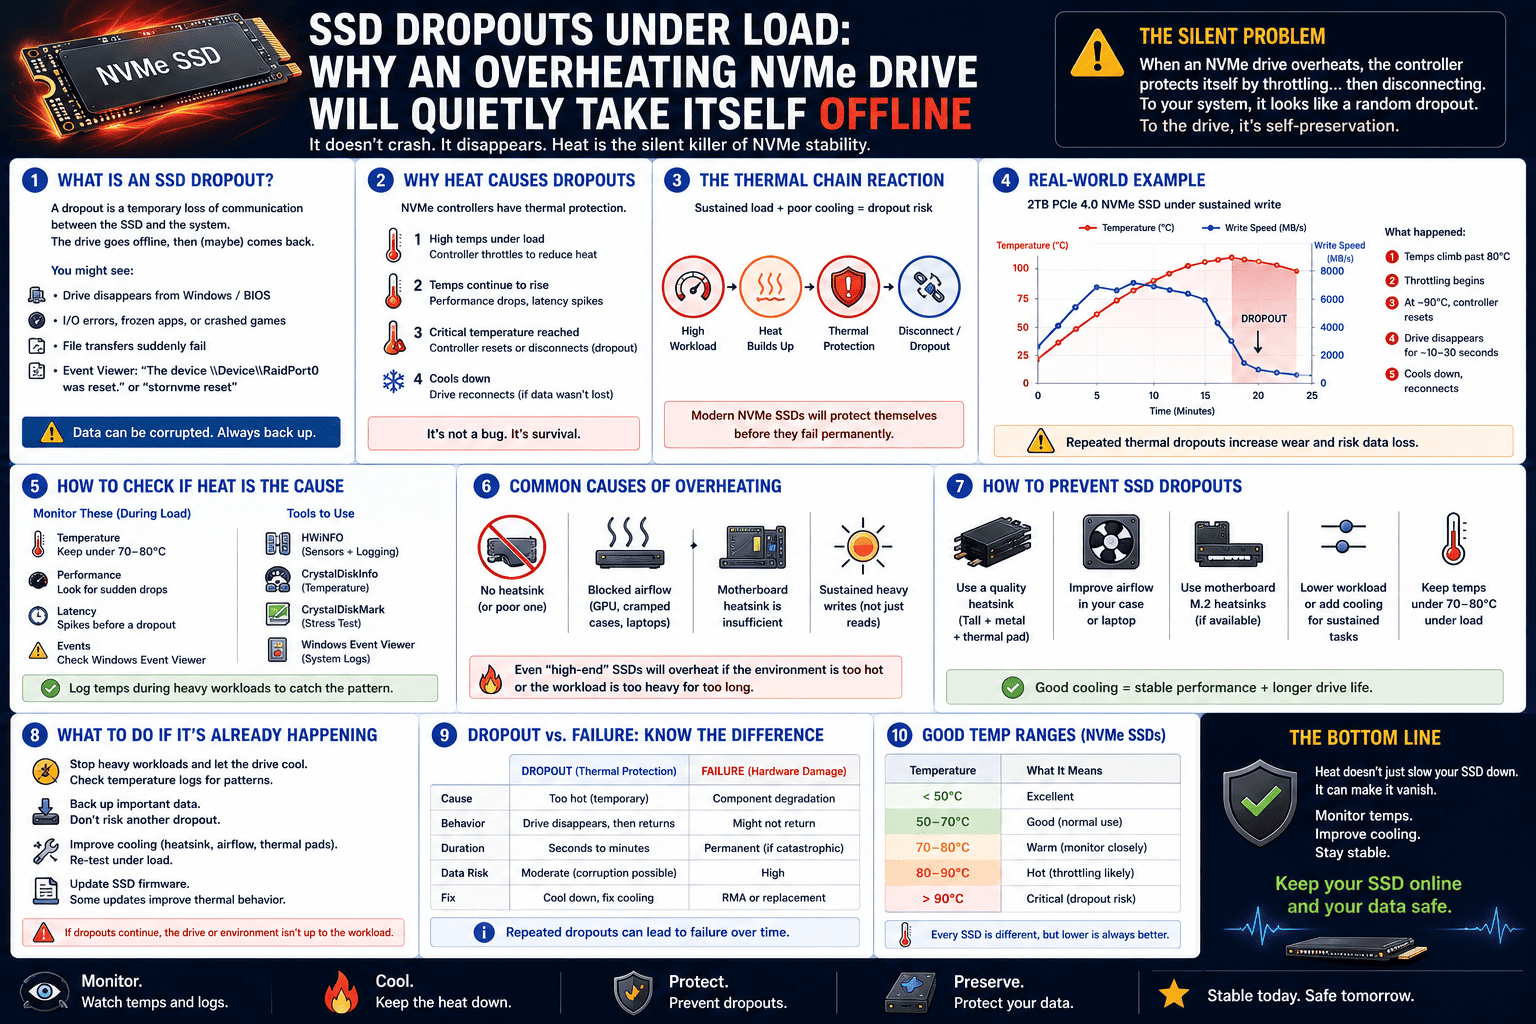
SSD Dropouts Under Load: Why an Overheating NVMe Drive Will Quietly Take Itself Offline

SSD Dropouts Under Load: Why an Overheating NVMe Drive Will Quietly Take Itself Offline

You are right in the middle of a heavy workflow—maybe you are rendering a massive multi-layered 4K video project, compiling a massive code repository, or running a local AI generation script. Suddenly, the application freezes. You open up Windows File Explorer, and your jaw drops: your secondary NVMe drive has completely vanished.

It isn’t just unreadable; it’s completely gone from your system as if you physically ripped it out of the motherboard. You restart your PC, and like magic, the drive is back as if nothing ever happened. Until the next time you put it under a heavy load.

When an SSD quietly takes itself offline like a ghost, most users immediately assume the drive is broken and file for a warranty replacement. But nine times out of ten, your SSD isn’t dead. It’s invoking a high-stakes emergency survival protocol: Thermal Emergency Shutdown.

Here is why your high-speed drive is vanishing mid-task and how to configure CrystalDiskInfo to prevent it from ever happening again.

The Panic Button: What is a Thermal Emergency Shutdown?

We all know about thermal throttling—when an NVMe drive gets too hot (usually around 70°C to 75°C), the internal controller intentionally slashes its operating speeds to cool down. It’s the equivalent of a runner slowing down to a walk because they are overheating.

But what happens when slowing down isn’t enough?

Modern Gen 4 and Gen 5 SSD controllers pull an immense amount of power under sustained workloads (up to 11.5 watts). If a drive is trapped in a case with stagnant airflow, or tucked directly beneath a giant graphics card radiating 300 watts of heat, the SSD controller will rapidly spiral out of control.

When the internal temperature sensor breaches a hard-coded critical threshold—typically 80°C to 85°C—the controller hits the panic button.

[ Normal Operation: Below 60°C ]  ──> Peak Speeds
[ Thermal Throttling: 70°C - 75°C ] ──> Speeds Slashed by 50%+
[ Emergency Shutdown: 80°C - 85°C ] ──> Controller cuts power entirely to save data!

To protect your data from permanent structural corruption caused by melting silicon, the controller instantly cuts all power and forces a hard reset. Because the link to the PCIe bus is severed instantly, Windows thinks the hardware was physically unplugged. The drive stays offline until you cycle the system’s power, cooling the controller down enough to allow it to boot safely again.

How to Set Up Real-Time Temperature Alerts in CrystalDiskInfo

You shouldn’t wait for your drive to drop offline to realize it’s cooking. You can use CrystalDiskInfo’s native background daemon to alert you the exact millisecond your NVMe drive crosses into the danger zone.

Here is how to configure an automated early warning system:

1.Enable Resident Mode:Step 1.

Open CrystalDiskInfo. Go to the top menu and click on Function. Check the box for Resident. This keeps the software running silently in your system tray even when you close the main window.

2.Enable Startup Launch:Step 2.

In the same Function menu, check the box for Startup. This ensures CrystalDiskInfo launches automatically every time you boot up Windows, protecting your drives from the moment you turn on your PC.

3.Configure the Alert Threshold:Step 3.

Go to Function > Alarm Setting > Temperature. Select your primary or secondary NVMe drive and set the threshold slider to 65°C. This gives you a 15-degree safety buffer before the drive hits its catastrophic shutdown point.

4.Select Your Notification Type:Step 4.

Under Function > Alert Features, you can choose how CrystalDiskInfo warns you. Check Show Popup Notice for a desktop notification, or check Sound Alert to have the system play a distinct audio chime if your drive hits the limit mid-game or mid-render.

The Fix: How to Stop the Dropouts

If your real-time alerts confirm that your drive is spiking into the high 70s under load, you need to intervene physically before the constant emergency shutdowns degrade the drive’s health status.

1. Fix the Radiant Heat Problem

Take a look inside your PC case. Is your secondary NVMe drive sitting directly underneath your graphics card’s exhaust fans? If so, the SSD is acting like a sponge for your GPU’s discarded heat. Move the drive to an alternate M.2 slot on your motherboard that is located above the graphics card or away from the direct exhaust zone.

2. Ditch the “Decorative” Heat Shields

Many motherboards come with sleek, thin metal covers meant to hide your SSDs for aesthetics. However, if these shields don’t have high-quality thermal pads, or if they trap heat without direct airflow passing over them, they act like tiny ovens. Upgrade to a dedicated, high-surface-area third-party passive heatsink with deep cooling fins, or look into a low-profile active fan block.

3. Change Your Windows Power Settings

If you are running sustained read/write tasks, navigate to your advanced Windows Power Plan settings. Ensure that Link State Power Management under the PCI Express tree is set to Moderate Power Savings or Off instead of Maximum Power Savings. Aggressive power cycling can confuse a hot controller, triggering accidental communication dropouts.

The Bottom Line

An SSD that vanishes under load is screaming for help, not necessarily dying. By leveraging CrystalDiskInfo’s background monitoring features, you can catch thermal spikes long before they trigger a hard hardware cutoff. Keep your airflow moving, treat your controller to a proper heatsink, and keep your next-gen storage out of the red zone!

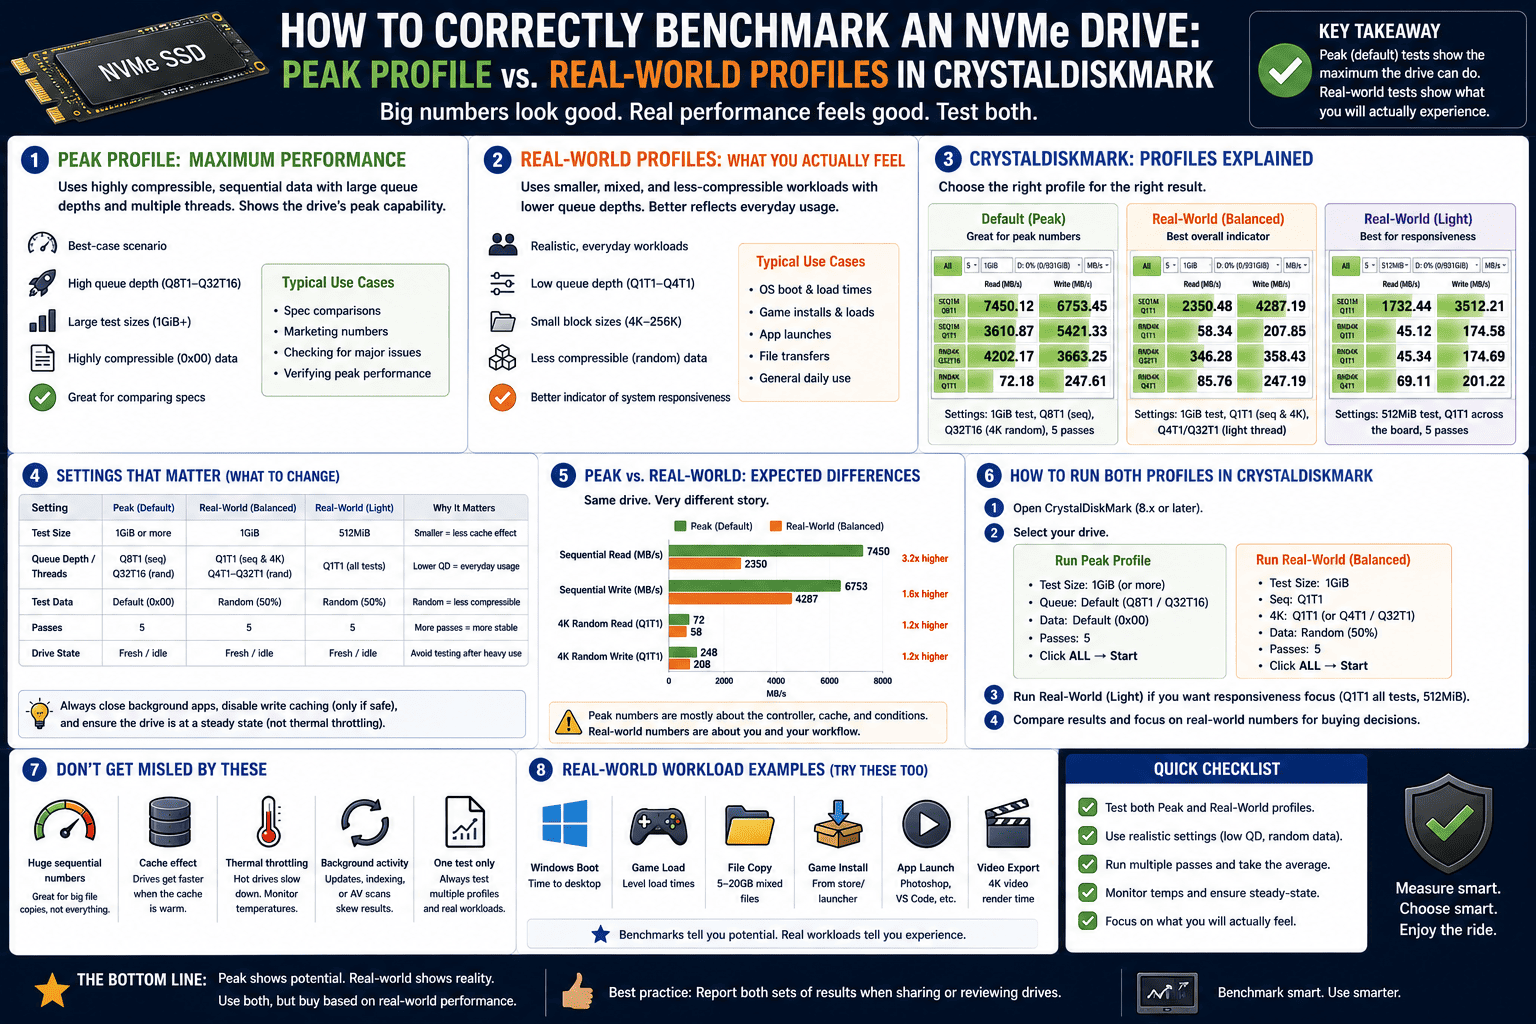
How to Correctly Benchmark an NVMe Drive: Peak Profile vs. Real-World Profiles in CrystalDiskMark

How to Correctly Benchmark an NVMe Drive: Peak Profile vs. Real-World Profiles in CrystalDiskMark

Go to any PC hardware forum, tech subreddit, or Discord server, and you will inevitably run into the exact same post. A user uploads a screenshot of their brand-new, premium NVMe drive, alongside a frustrated caption: “Why is my drive so slow? The box says 14,000 MB/s, but I’m only getting a fraction of that!”

Nine times out of ten, the drive isn’t defective, the motherboard isn’t broken, and the user hasn’t been scammed. The reality is simple: they ran the benchmark incorrectly.

CrystalDiskMark is the global standard for testing storage performance, but it is a precision instrument. If you just open the app and smash the “All” button without adjusting your configurations, you will likely get data that doesn’t match your drive’s advertised speeds.

To help you benchmark your SSD accurately, let’s break down the optimal CrystalDiskMark profile settings and explain why understanding sequential read vs. random read 4K tests is the secret to uncovering your drive’s true performance.

The Box Speed Illusion: Decoding Sequential 1MiB (Q8T1)

When a brand like Samsung or Corsair prints a massive speed rating on the front of the box (e.g., Up to 14,500 MB/s!), they are talking about Sequential Burst Speeds.

Sequential data refers to massive, unbroken blocks of files stored next to each other on the drive—think of it like copying a massive, single 100GB zip file or streaming a raw 8K video file.

To hit those maximum advertised limits in CrystalDiskMark, the software defaults to a specific testing profile: SEQ1M Q8T1.

  • SEQ1M: The test uses large 1 Mebibyte blocks of data.

  • Q8T1 (Queue 8, Thread 1): The software gives the drive’s controller a line of 8 tasks to complete sequentially, processing them on a single CPU thread.

Because the data blocks are massive and perfectly organized, the drive’s internal controller can operate at absolute peak efficiency. This is a “best-case scenario” test. If your goal is to verify that your new PCIe Gen 5 drive is properly configured in the BIOS and hitting its maximum theoretical limits, you must run this peak profile.

The Real-World Reality: Decoding Random 4KiB (Q1T1)

Here is the hard truth: outside of copying massive movie files, your operating system almost never handles sequential data.

Windows, web browsers, and video games operate by reading and writing thousands of tiny, completely scattered files all over the drive simultaneously. When you launch a game, load a webpage, or boot up your PC, your storage drive is fetching thousands of separate 4 Kilobyte (4KiB) files.

To see how your drive performs in daily use, look at the bottom row of your benchmark results: RND4K Q1T1.

  • RND4K: The test uses tiny 4 Kilobyte blocks of data scattered across the silicon chips.

  • Q1T1 (Queue 1, Thread 1): The software sends a single file request, waits for the drive to find it, fetches it, and only then sends the next request. There is no queue to help the drive plan ahead.

When you run a Random 4K test, that blazing-fast 14,000 MB/s Gen 5 drive will suddenly report speeds around 80 MB/s to 115 MB/s.

Don’t panic. This drop is completely normal. Because the controller has to constantly search the physical flash cells for scattered pieces of data without a queue backup, it encounters latency. The Random 4K Q1T1 metric is the single most accurate reflection of how “snappy” your PC will actually feel during daily multitasking.

Step-by-Step Guide: How to Configure CrystalDiskMark Correctly

To stop getting inaccurate readouts and properly evaluate your storage hardware, follow this configuration guide:

Profile 1: The “Verification” Test (To Hit Box Speeds)

Use this setup if you want to verify your drive isn’t defective and is successfully hitting its maximum advertised bandwidth.

  1. Open CrystalDiskMark.

  2. Navigate to the top menu bar and click on Settings > Profile.

  3. Select Default (or Peak Performance if your manufacturer explicitly lists high-queue benchmarks).

  4. Ensure your test size is set to 1 GiB and run the test. Your top row (SEQ1M) should closely match the speeds advertised on your SSD’s box.

Profile 2: The “Real-World” Test (To Measure Actual Daily Snappiness)

Use this configuration to benchmark how your drive will handle operating system tasks, loading screens, and professional applications.

  1. Go to Settings > Profile and select Real World Performance.

  2. Notice how the dashboard changes: the high-queue sequential tests disappear, replaced by low-queue tests like SEQ1M Q1T1 and RND4K Q1T1.

  3. Run the test. Do not look at the raw numbers expecting thousands of megabytes per second. Instead, compare your RND4K scores against other drives online. A drive scoring 100 MB/s here will feel significantly faster responsively than a budget drive scoring 50 MB/s, regardless of what the box speed says.

The Ultimate Benchmarking Checklist

Before you capture your next screenshot to share online, ensure your testing environment is optimized to avoid corrupted data variables:

  • Close Background Apps: Turn off Steam downloads, close web browsers, and pause cloud syncing tools. If another app writes data mid-test, your benchmark scores will instantly plunge.

  • Monitor Your Thermals: High-speed NVMe drives generate massive heat during sequential bursts. Keep CrystalDiskInfo open on a secondary monitor while running CrystalDiskMark. If your drive breaches 70°C, the controller will trigger thermal throttling, ruining your benchmark results.

  • Don’t Test a Full Drive: Solid-state memory slows down dramatically once it fills past 80% capacity because the controller struggles to find empty space to clear blocks. For accurate structural testing, benchmark your drive when it has plenty of breathing room.

The Bottom Line

The next time you see someone complaining that their premium NVMe drive is broken because it isn’t hitting 14,000 MB/s in everyday tasks, send them this guide. A fast drive is more than just a massive sequential burst number on a box; it’s a balance of architectural efficiency, low-latency random tracking, and smart configuration layout. Configure your profiles correctly, interpret the data accurately, and get the most out of your hardware!

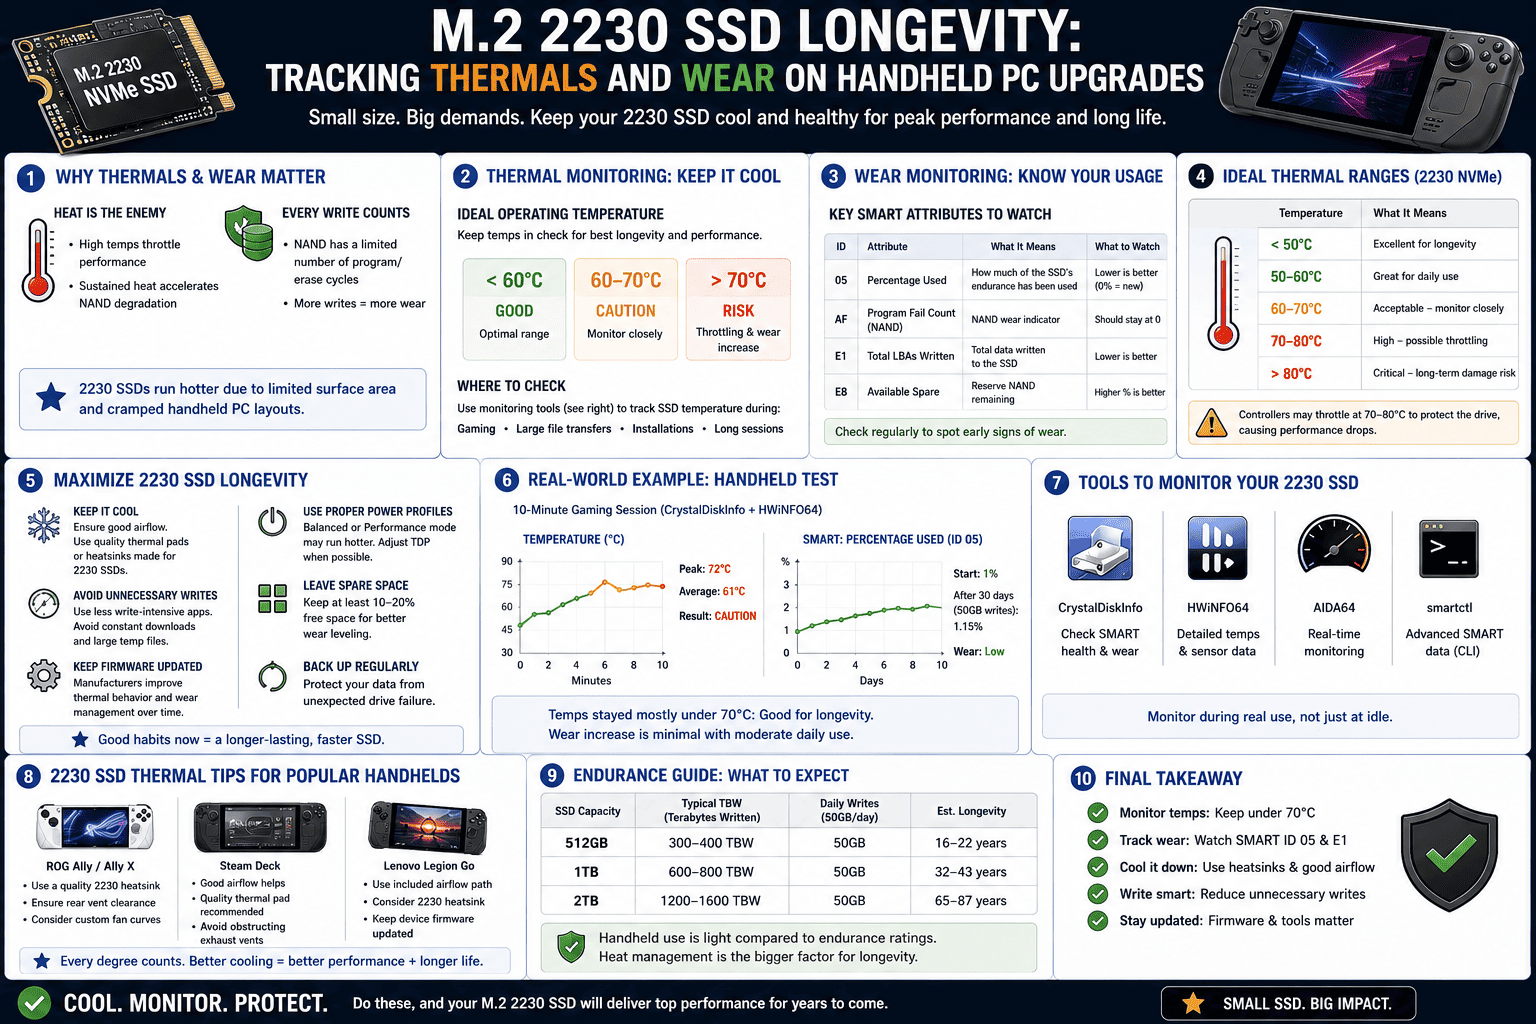
M.2 2230 SSD Longevity: Tracking Thermals and Wear on Handheld PC Upgrades

M.2 2230 SSD Longevity: Tracking Thermals and Wear on Handheld PC Upgrades

The handheld gaming revolution has completely rewritten the rules of portable PC gaming. Devices like the Steam Deck, ASUS ROG Ally, and Lenovo Legion Go have made it possible to play hardware-melting AAA titles right in the palm of your hand.

However, because these devices usually ship with restrictive internal storage capacities, the first thing most users do is open them up to install a high-capacity M.2 2230 expansion drive. The market is flooded with these ultra-compact drives, making a 1TB or 2TB upgrade incredibly affordable.

But there is a catch that most surface-level hardware reviews completely ignore: the unique, brutal thermal profile of the micro-form factor. Cramming desktop-class speeds into a drive the size of a postage stamp changes the physics of drive longevity. Here is how these tiny drives handle intense gaming workloads, why they are at high risk of early degradation, and how you can track their health percentage natively across both Windows and Linux interfaces.

The Tiny Furnace: Why M.2 2230 Drives Run So Hot

To understand why micro-form factor storage is vulnerable to premature wear, we have to look at its layout. A standard desktop NVMe SSD uses the longer M.2 2280 form factor (80mm long). This gives the drive plenty of physical surface area to separate the flash controller (the brain that manages the data) from the NAND flash cells (where the data lives).

An M.2 2230 drive is just 30mm long. Because space is at an absolute premium, these are single-sided chips where the controller and the NAND flash are crowded right next to each other, practically touching.

[ Standard 2280 SSD Layout - Spread Out ]
[ Controller ] ─── (Physical Space / Airflow) ───> [ NAND Flash Memory ]

[ Micro 2230 SSD Layout - Crowded ]
[ Controller ][ NAND ]  <─── Direct radiant heat transfer!

When you are playing a graphic-heavy game, the drive is constantly streaming massive high-resolution textures directly to your system RAM. This causes the controller to work at maximum capacity, generating immense radiant heat. On a microscopic 2230 drive, that intense thermal energy bleeds directly into the adjacent NAND cells.

Prolonged exposure to temperatures fluctuating between 65°C and 75°C inside a cramped handheld chassis drastically accelerates the electrical degradation of the flash memory. Over time, this extreme thermal stress leads to early read/write errors, dropping your drive straight toward a yellow “Caution” health alert.

How to Check Your Handheld’s SSD Health Percentage Natively

To avoid a sudden drive crash that wipes out all your game saves and configurations, you need to monitor your drive’s health status. Depending on the operating system your handheld runs, here is how to pull the native telemetry data:

1. For Windows Handhelds (ROG Ally, Legion Go, MSI Claw)

Because these devices run a standard version of Windows, checking your metrics is incredibly straightforward:

  • Download CrystalDiskInfo: Download the Standard Edition directly onto your handheld device.

  • Audit the Dashboard: Launch the app. Pay immediate attention to the Health Status Percentage and the Temperature badge.

  • The In-Game Test: Keep CrystalDiskInfo running in the background, launch a demanding game for 20 minutes, then quickly alt-tab back to the desktop. If your active temperature is flashing red (above 70°C), your drive is actively thermal throttling to protect itself, meaning your game load times are taking a severe performance hit.

2. For Linux Handhelds (Steam Deck / SteamOS)

The Steam Deck runs a customized, Linux-based operating system. While you can’t double-click a Windows .exe file natively, SteamOS has built-in diagnostic tools hidden inside its desktop interface:

  • Switch to Desktop Mode: Hold down the Power Button on your Steam Deck and select Switch to Desktop.

  • Open the System Menu: Click the application launcher icon in the bottom-left corner (similar to the Windows Start Menu).

  • Launch KDiskMark or KDE Partition Manager: Navigate to the System or Utilities folder and open KDE Partition Manager.

  • Read the S.M.A.R.T. Logs: Select your primary internal NVMe drive from the left panel, right-click it, and select Smart Status.

This interface pulls the exact same raw cryptographic firmware logs that CrystalDiskInfo reads on a desktop PC. Look closely at the raw hex values for Available Spare and Percentage Used to know exactly how much structural life your compact drive has left.

Step-by-Step Guide to Extend Your 2230 SSD’s Lifespan

If your diagnostic audit shows your handheld drive is running dangerously hot, follow these immediate preventative steps to keep it from dying prematurely:

  1. Never Use a Bare Drive: If your replacement 2230 drive didn’t come wrapped in a thin copper heat shield or a thermal foil pad, buy one immediately. A simple 0.5mm copper shim helps disperse radiant heat away from the controller, dropping peak temperatures by up to 8°C.

  2. Optimize the Handheld’s Fan Curve: Don’t rely purely on default “Silent” power profiles. Using a custom manual fan curve inside ASUS Armoury Crate or SteamOS settings to push slightly higher fan speeds during heavy gaming will cool down the entire internal chassis, saving your storage drive from baking in ambient heat.

  3. Offload Non-Essential Games to a High-Speed MicroSD: Do not use your primary NVMe drive for everything. Heavy AAA titles that rely on continuous asset streaming belong on the internal SSD, but older indie titles, emulators, and ROM archives run perfectly fine off a high-quality MicroSD card. This keeps your internal drive’s active write cycles low, preserving its precious TBW (Terabytes Written) threshold.

The Bottom Line

Upgrading your handheld PC’s storage is an incredible quality-of-life improvement, but micro-form factor components require strict oversight. Don’t let your microscopic drive cook itself to death behind a screen. Flip over to your desktop layer periodically, audit your diagnostic health tools, keep your thermals under control, and ensure your handheld setup stays running perfectly for years to come!

Why AI is Eating the World’s Storage: How Global NAND Shortages are Impacting Consumer SSD Prices

Why AI is Eating the World’s Storage: How Global NAND Shortages are Impacting Consumer SSD Prices

If you have tried to upgrade your PC’s storage or build a new gaming rig recently, you have likely experienced serious sticker shock. The golden era of incredibly cheap consumer storage has ground to a sudden halt.

We aren’t just experiencing a minor market fluctuation. Hyperscale cloud deployments and massive enterprise AI inference workloads have triggered severe global DRAM and NAND shortages, pushing consumer SSD contract prices up significantly.

The storage drive you bought a couple of years ago has dramatically outpaced normal inflation. How did the tech world’s sudden obsession with artificial intelligence filter down to the cost of an M.2 drive for your home PC? Let’s analyze the massive enterprise pivot that is reshaping the hardware landscape and look at how you can use CrystalDiskInfo to protect your wallet.

The Pivot: High-Density G9 Platforms and AI Server Storage Demands

To understand the global NAND flash shortage, you have to look at the architectural requirements of modern AI clusters. Training an AI model requires processing petabytes of data at lightning speed. Running that model in real-time (inference) requires massive, non-volatile storage frameworks that can stream data to clusters of power-hungry GPUs without introducing latency bottlenecks.

Because of these massive AI server storage demands, tech giants are building data centers at an unprecedented rate. To fit as much storage as possible into standard server racks, memory manufacturers have pivoted their production lines to high-density, enterprise-grade storage platforms.

  • Samsung’s 9th-Generation (G9) V-NAND: Samsung has shifted immense manufacturing capacity toward its ultra-dense 290-layer V-NAND stacks, heavily prioritizing high-margin enterprise SSDs meant for tech conglomerates.

  • Micron’s Enterprise G9 Technology: Similarly, Micron’s production is deeply focused on high-capacity, high-efficiency enterprise silicon designed specifically to mitigate the strict thermal and spatial limitations of AI server farms.

The Consumer Penalty

Silicon wafers are a finite resource. Every clean-room production line at a fabrication plant that is dedicated to building a premium, high-density enterprise chip is a line that isn’t building standard consumer TLC memory chips.

Because enterprise clients are signing multibillion-dollar supply contracts, memory manufacturers have naturally pushed consumer retail production to the back burner. Component brands like ADATA, Corsair, and TeamGroup are paying massively inflated premiums just to acquire the raw memory wafers needed to build consumer drives. The inevitable result? A staggering SSD price increase at retail stores.

How to Outride the Crisis: Monitoring Your Current Drive

With industry analysts predicting that the enterprise storage squeeze will likely persist, buying a replacement drive right now should be an absolute last resort. The smartest financial move you can make is to maximize the life of the hardware you already own.

To prevent a sudden storage failure from forcing you to buy an overpriced replacement drive, open up CrystalDiskInfo and look directly at the top-right corner of the dashboard. Your target metric is Total Host Writes (sometimes listed as Total Writes or Host Writes).

http://googleusercontent.com/image_generation_content/6

Caption: Locating the Total Host Writes metric in CrystalDiskInfo. The arrow points directly to the top-right corner of the software panel, highlighting the cumulative volume of data written to the drive since its factory initialization.

How to Calculate Your Drive’s Remaining Lifetime

Your SSD doesn’t wear out from reading data; it wears out from writing it. Manufacturers rate every solid-state drive with a specific metric called TBW (Terabytes Written). This number represents the total amount of data you can write to the drive before the internal flash memory cells begin to physically degrade.

Here is how you can use CrystalDiskInfo to audit your drive’s true remaining lifespan:

  1. Find Your Host Writes: Check the value displayed next to Total Host Writes in CrystalDiskInfo (e.g., 45,000 GB or roughly 45 TB).

  2. Look Up Your Factory TBW: Find your specific drive model’s official spec sheet online.

    • Standard 1TB TLC Drive: Usually rated for 600 TBW.

    • Premium 2TB TLC Drive (like the Samsung 990 PRO): Usually rated for 1,200 TBW.

    • Budget 1TB QLC Drive: Usually rated lower, around 200 TBW.

  3. Do the Math: Subtract your current Total Host Writes from the official TBW rating.

If you have a 600 TBW drive and CrystalDiskInfo shows you have written 60 TB over the last three years, you have only consumed 10% of the drive’s physical cell lifespan. You can comfortably ride out the current pricing crisis for several more years without any anxiety.

Pro-Tips to Reduce Active SSD Wear

If you check your metrics and realize your host writes are climbing dangerously fast, you can change your daily PC habits to dramatically slow down the wear level:

  • Stop Using Your SSD for Casual Downloads: If you frequently torrent files, download massive uncompressed video archives, or record hours of gameplay footage, change your download directory to a cheap, external mechanical hard drive. Mechanical platters don’t suffer from write degradation.

  • Audit Your Windows Pagefile: If your PC is low on physical RAM, Windows will use your fast NVMe drive as temporary memory (Virtual Memory / Pagefile). This causes thousands of micro-writes every hour. Upgrading your system’s RAM is a cheap way to drastically extend your primary drive’s lifespan.

  • Be Selective with Game Patches: Modern games push massive 50GB to 100GB update patches that completely rewrite game assets. If you aren’t actively playing a game, uninstall it or move it to a mechanical drive rather than letting it constantly shuffle data on your primary flash storage.

The Bottom Line

The AI revolution is changing the physical economics of computer hardware. As long as tech giants continue to buy up massive volumes of flash storage, consumer prices will remain under pressure. Take control of your setup, track host writes in CrystalDiskInfo, keep your drive cool, and let smart data management preserve your PC budget until the market stabilizes!

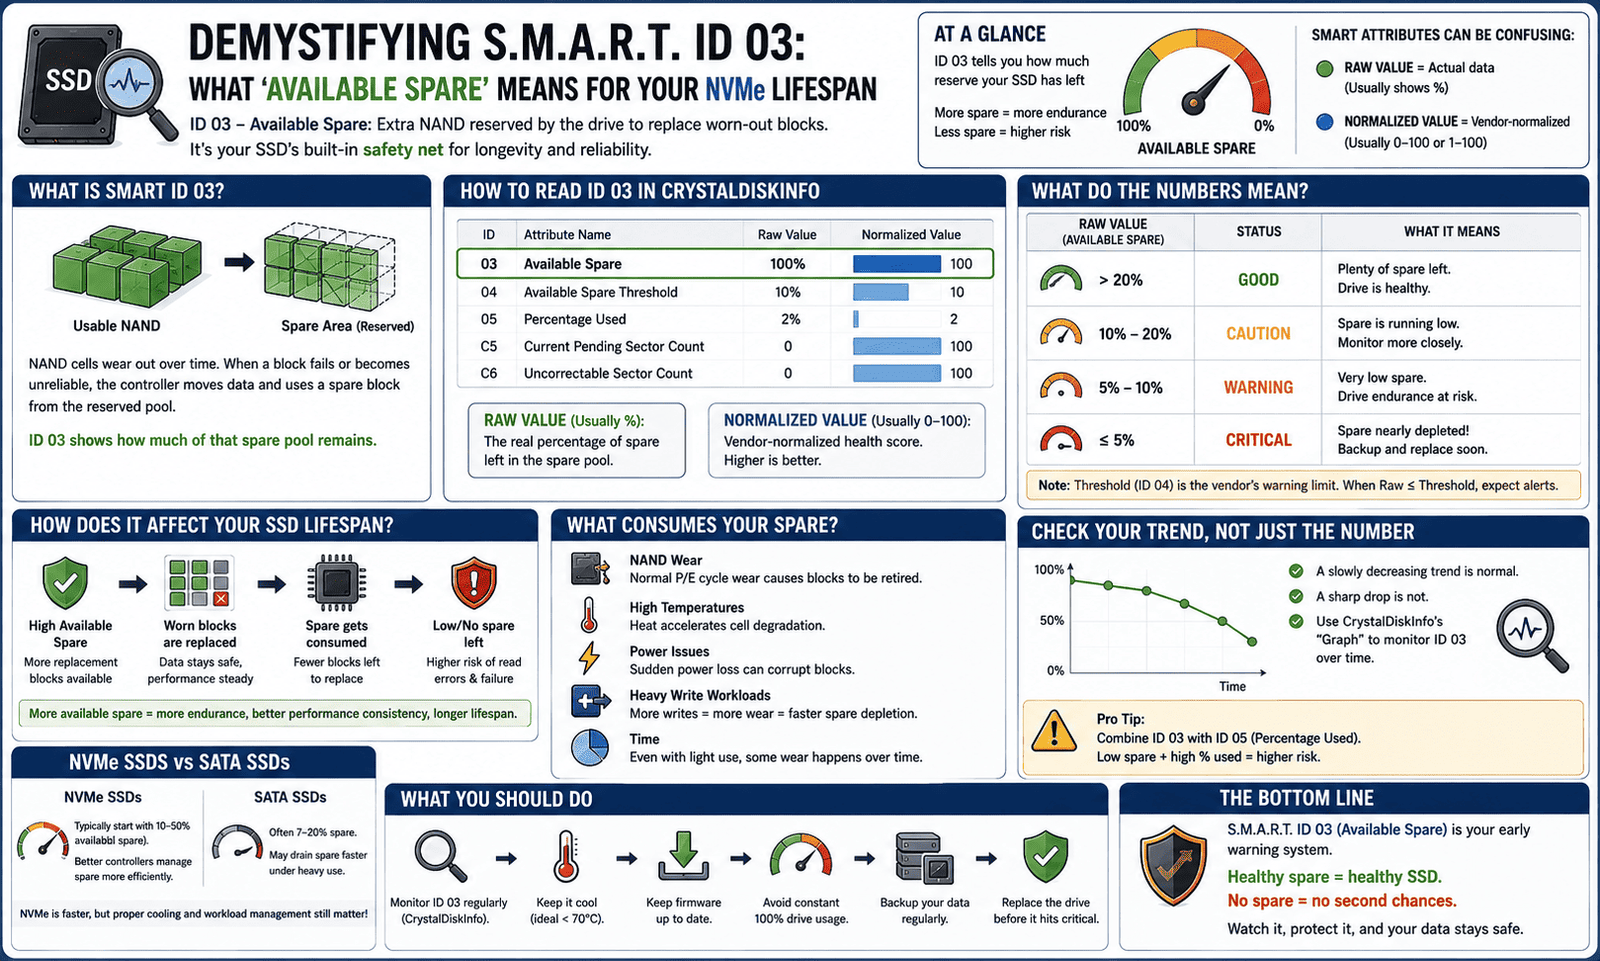
Demystifying S.M.A.R.T. ID 03: What ‘Available Spare’ Means for Your NVMe Lifespan

Demystifying S.M.A.R.T. ID 03: What ‘Available Spare’ Means for Your NVMe Lifespan

You launch CrystalDiskInfo just to check on your PC’s health, expecting the usual clean bill of health. Instead, you’re hit with a flashing yellow “Caution” box. You scroll down past the standard metrics, expecting to see broken sectors, but everything there looks perfectly clean. Instead, the warning dot is glowing right next to ID 03: Available Spare.

If you try to look up generic hard drive guides, they won’t help you. Most surface-level tech blogs talk endlessly about “Reallocated Sectors” on old mechanical drives, leaving a massive gap for modern solid-state storage users.

Seeing an available spare smart error in CrystalDiskInfo can cause immediate panic, especially when your total error counts look entirely normal. Here is a deep, technical, yet beginner-friendly guide explaining exactly what ID 03 means, how your NVMe drive manages its internal lifespan, and what you need to do next.

What Actually is “Available Spare” (ID 03)?

To understand this metric, we have to look at how an SSD is physically built. Unlike mechanical hard drives that use magnetic platters, an NVMe drive stores data on silicon chips inside microscopic rooms called flash cells.

Every time you write data to a cell, you have to blast it with electricity to shift its state. Over months and years of heavy use, this constant electrical wear physically degrades the cell until it can no longer reliably maintain a charge.

The engineers who design modern SSDs knew this would happen. To prevent your drive from losing storage capacity the moment a cell breaks, they build every drive with a hidden, factory-reserved pool of extra flash cells that are completely invisible to Windows. This is your Available Spare.

  • When the drive is brand new: Your Available Spare (ID 03) will sit firmly at 100%.

  • As the drive ages: When the primary NVMe flash degradation tracker flags a cluster of cells as worn out, the controller seamlessly retires them and maps a fresh cluster from the hidden reserve pool.

As the drive dips into this emergency backup pool, that 100% value begins to slowly tick down.

The Silent Caution: Why CrystalDiskInfo Flags ID 03

Here is the part that throws most users into a loop: Your drive can trigger a yellow Caution status even if you have zero active read/write errors.

Manufacturers hardcode a critical threshold level directly into the SSD’s internal firmware (usually set around 10%). If your remaining backup cell pool drops below that factory threshold limit, the drive controller panics and flags a health alert.

CrystalDiskInfo intercepts this S.M.A.R.T. telemetry and immediately updates your health box to “Caution.”

Think of it like the oil life monitor on your car’s dashboard. Your engine hasn’t broken down, and it isn’t actively smoking, but the vehicle is warning you that your vital reserves are dangerously low, and an outright failure is right around the corner. If your available spare pool hits 0%, the drive has completely run out of safety nets. The next cell that degrades will result in permanent, unrecoverable data corruption.

Can You Fix an ID 03 Warning?

If you are looking for a magical software patch to fix an ID 03 warning on your SSD, we have to give you a harsh reality check: You cannot physically regenerate worn-out silicon flash memory.

Unlike a temporary software glitch or unstable “Pending Sectors” (ID C5) that can sometimes be cleared out by running a full disk overwrite or an advanced Windows chkdsk scan, a drop in Available Spare is a reflection of permanent, physical wear and tear.

However, you should handle the warning based on how fast that number dropped:

Scenario A: The Gradual Decline (Normal Wear)

If you have owned your primary NVMe drive for four or five years, use it daily for heavy workflows like 4K video editing, rendering large datasets, or managing massive local AI databases, a slow decline down to the threshold is completely normal.

  • The Verdict: Your drive has served you well, but its physical lifespan is simply coming to an end. It is time to back up your system and order a modern replacement drive.

Scenario B: The Sudden Plunge (Potential Firmware Bug or Faulty Drive)

If you bought your drive less than a year ago, or if you check your drive metrics and notice the value dropped from 100% down to 10% in a matter of weeks, you are dealing with a severe hardware anomaly. Either a massive chunk of flash cells failed simultaneously due to a manufacturing defect, or your drive is suffering from a known firmware bug that miscalculates S.M.A.R.T. health states.

  • The Verdict: Check your drive manufacturer’s utility software (like Samsung Magician or Western Digital Dashboard) to see if a vital firmware update is available to fix the readout tracking. If the firmware is up to date and the pool is genuinely depleted, open an RMA request immediately—your drive is fully covered under its factory endurance warranty.

Summary Health Checklist

Metric State (ID 03) Risk Assessment System Stability Required Action
100% to 50% Safe / Healthy Optimal Performance Normal use. No intervention required.
49% to 11% Moderate Wear Stable Good time to double-check that your automated cloud backups are active.
10% to 1% CRITICAL (Caution) At Risk Drive reserves are depleted. Backup your data immediately and plan a replacement.
0% Extreme Danger (Bad) High Risk of Data Loss Stop writing new data to the disk. Replace the hardware immediately.

The Bottom Line

Don’t ignore a S.M.A.R.T. ID 03 alert just because your PC still feels fast and responsive. The “Available Spare” parameter is your drive’s ultimate early warning system. It gives you an advance window to safeguard your irreplaceable personal photos, work documents, and system profiles long before the drive suffers a total, catastrophic hardware collapse.

Keep an eye on your percentages, manage your write cycles responsibly, and trust your diagnostic tools when they tell you it’s time for an upgrade!