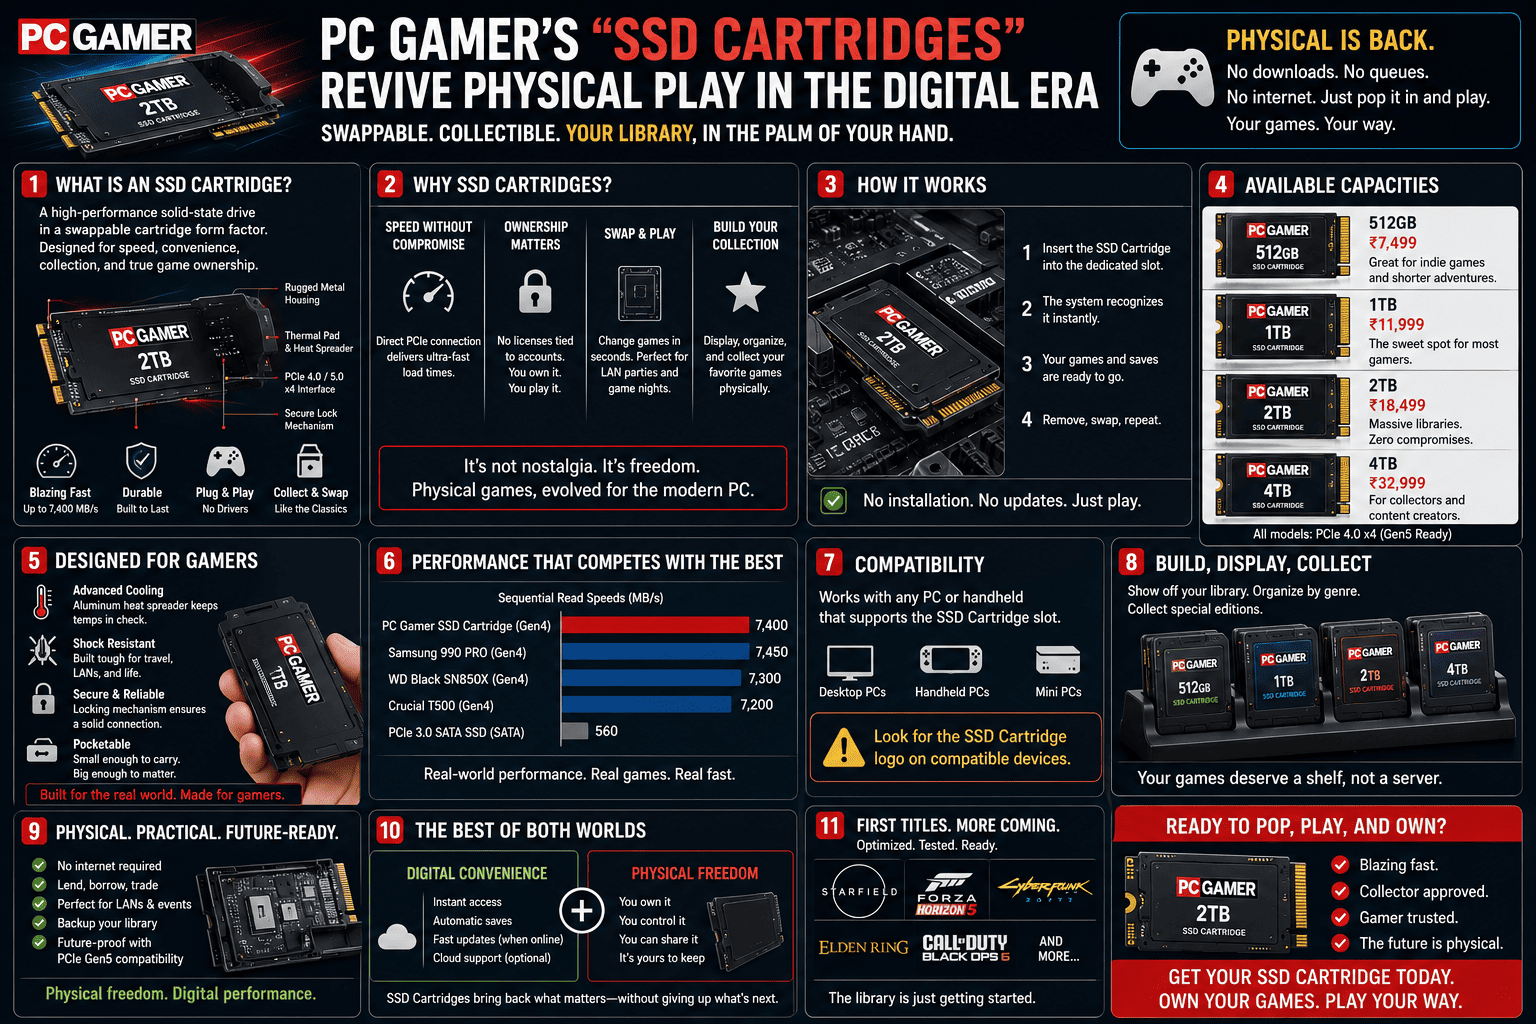
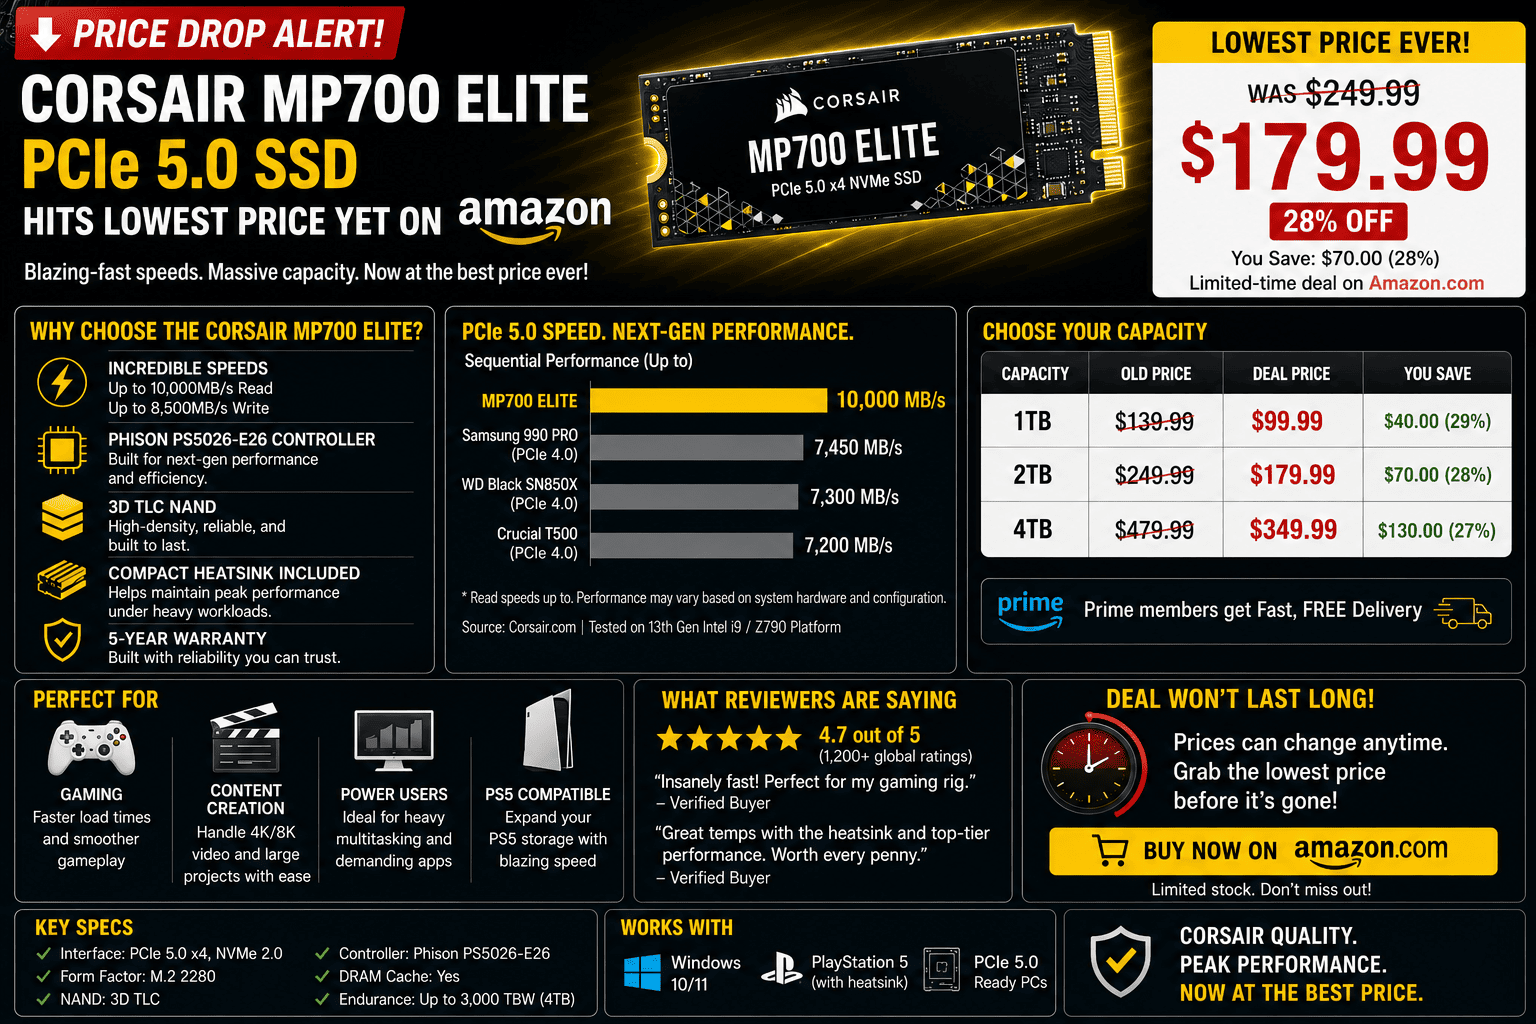
How to Fix the “Axc/Unknown” NVMe Detection Bug in CrystalDiskInfo

How to Fix the “Axc/Unknown” NVMe Detection Bug in CrystalDiskInfo

You plug in a brand-new, blistering-fast M.2 NVMe drive, boot up your PC, and immediately fire up CrystalDiskInfo to check your new toy’s temperatures and health stats.

But instead of seeing your exact drive model, you are greeted by a frustrating sight: the drive model is labeled as “Axc” or simply listed as an “Unknown NVMe Device.” Even worse, your S.M.A.R.T. attributes might be completely greyed out, or the health percentage box displays nothing but a blank dash.

Don’t worry—your new SSD isn’t broken, and it isn’t a fake. This is a common communication breakdown between the Windows storage drivers, your motherboard’s controller, and CrystalDiskInfo itself.

Here is exactly why this detection bug happens and how to fix it in under five minutes.

Why Is CrystalDiskInfo Showing “Axc” or “Unknown”?

CrystalDiskInfo is an incredible tool, but it doesn’t talk to your SSD directly. It sends a command through Windows to your motherboard’s storage controller, asking for the drive’s firmware signature.

When you get an “Axc” or “Unknown” error, it means the data stream got scrambled or blocked along the way. This almost always boils down to three main culprits:

  1. The Intel RST / RAID Driver Trap: If your motherboard’s BIOS is configured to use Intel Rapid Storage Technology (RST) or RAID mode instead of AHCI/NVMe passthrough, Windows hides the raw S.M.A.R.T. data behind a software wall.

  2. Third-Party USB Enclosures: If you are using an external M.2 to USB enclosure (like an Orico or Asus ROG Strix Arion), the bridge chip inside the enclosure might not be passing the NVMe telemetry data correctly.

  3. Outdated Controller Maps: Your version of CrystalDiskInfo might simply be too old to recognize the firmware string of a newly released flash controller.

Step-by-Step Fixes to Restore Your NVMe Detection

Work your way down this checklist to force CrystalDiskInfo to properly communicate with your drive.

Fix 1: Change the Advanced Disk Search Settings

Before tweaking your system drivers, try changing how CrystalDiskInfo scans your hardware. The software has built-in safe modes that can sometimes bypass stubborn system controllers.

  1. Open CrystalDiskInfo.

  2. Click on the Function tab in the top menu bar.

  3. Hover over Advanced Feature and look for Disk Search.

  4. If your drive is an external USB enclosure, make sure [USB] is checked. If it’s an internal drive giving you errors, toggle the advanced detection settings or click Rescan to force a fresh hardware query.

Fix 2: The Motherboard BIOS Fix (Switch RAID to AHCI/NVMe)

This is the single most common reason internal NVMe drives show up as “Unknown.” Many pre-built PCs (especially from Dell, HP, or Lenovo) ship with the storage controller set to RAID/Intel RST mode in the BIOS by default, which blocks standard telemetry.

  • The Fix: You need to enter your motherboard’s BIOS/UEFI screen during startup (usually by tapping F2 or Delete as the PC turns on). Locate your storage configuration settings and change the SATA/Storage mode from RAID or Intel RST to AHCI or NVMe Passthrough.

⚠️ CRITICAL NOTE: Changing this setting blindly can cause Windows to give you an “Inaccessible Boot Device” blue screen on startup. To prevent this, boot Windows into Safe Mode first, change the setting in your BIOS, and then boot back into normal Windows so the operating system can automatically swap to the correct standard NVMe driver.

Fix 3: Update to Standard Windows NVMe Drivers

Sometimes proprietary storage drivers from your motherboard manufacturer conflict with standard tracking software. Swapping back to the native Microsoft driver often instantly fixes the bug.

  1. Right-click the Windows Start Button and select Device Manager.

  2. Expand the Storage controllers section.

  3. Look for anything labeled “Intel Rapid Storage” or a proprietary controller. Right-click it and choose Update driver.

  4. Select Browse my computer for drivers > Let me pick from a list of available drivers on my computer.

  5. Choose the Standard NVM Express Controller provided by Microsoft, install it, and restart your PC.

Fix 4: Update CrystalDiskInfo (Version 9.9.0+)

If you are running an older edition of the software, it literally might not have the definition file required to read your drive’s hardware ID.

Ensure you have downloaded the latest Standard Edition (Version 9.9.0 or newer). The developer frequently pushes updates specifically to expand the database for newly released controllers and external USB bridge chips.

The Verdict

Seeing an “Axc” or “Unknown” status can be jarring, but it is purely a software translation issue. If Windows Disk Management lets you format the drive and you can transfer files at normal speeds, your hardware is perfectly healthy. Following the steps above to switch your controller mode or update your storage drivers will get your CrystalDiskInfo dashboard back to displaying beautiful, blue “Good” metrics in no time!

Anticipating PCIe Gen 6 NVMe SSDs: Do You Need a Massive Heatsink to Avoid Thermal Crashing?

Anticipating PCIe Gen 6 NVMe SSDs: Do You Need a Massive Heatsink to Avoid Thermal Crashing?

Just when you thought your system couldn’t possibly get any faster, the tech world is already gearing up for the next massive leap in storage technology: PCIe Gen 6 NVMe SSDs.

If you remember the jump from Gen 4 to Gen 6 platforms, you know that doubling bandwidth always brings an unexpected guest to the party: heat. Current high-end Gen 5 drives already push speeds up to 14,500 MB/s, but they require heavy motherboard armor or active mini-fans just to stay operational.

With Gen 6 drives threatening to smash through the 28,000 MB/s barrier, the hardware community is asking a critical question: Are our M.2 slots about to turn into literal miniature furnaces? Do we need massive, tower-style heatsinks just to keep our systems from crashing?

Let’s look at the engineering reality behind Gen 6 storage and what it means for your PC’s thermals.

The Gen 6 Speed Beast: Why It Runs Hot

To understand the thermal challenges, we have to look at the math. PCIe Gen 6 doubles the bandwidth of Gen 5 by moving from NRZ (Non-Return-to-Zero) signaling to PAM4 (Pulse Amplitude Modulation 4-level) signaling. This allows the drive to pack twice as much data into the exact same physical space over the lanes.

Processing that much data requires a massive upgrade to the SSD controller (the “brain” of the drive).

  • The Controller Problem: Next-gen controllers fabricated on ultra-dense nodes (like TSMC’s 5nm or 6nm processes) draw significantly more power under heavy mixed workloads.

  • The Wattage Spike: While older Gen 4 drives capped out around 6 to 9 watts of power consumption, elite Gen 6 enterprise and enthusiast consumer drives are projected to push 11 to 14 watts under sustained read/write cycles.

When you push 14 watts of electrical power through a chip the size of a postage stamp, it generates heat incredibly fast. Without a massive cooling solution, a bare Gen 6 drive will hit its thermal ceiling in less than 5 seconds of sustained load.

What Happens When an NVMe Drive Crosses the Red Line?

If you run a high-speed drive without adequate cooling, you won’t just see a high temperature readout in CrystalDiskInfo. You will experience severe performance stability issues:

  1. The Thermal Throttling Cliff: Modern SSD controllers are programmed with aggressive thermal guardrails. When the temperature sensor hits 70°C to 75°C, the controller artificially slashes its clock speeds to protect the NAND flash cells from permanent physical degradation. Your 28,000 MB/s dream drive will instantly plunge down to less than 2,000 MB/s.

  2. Thermal Crashing (BSOD): If the controller fails to shed heat quickly enough and breaches 80°C to 85°C, it triggers an emergency shutdown. To Windows, it looks like the boot drive completely vanished from the system, resulting in a sudden freeze or a Blue Screen of Death (BSOD).

Tracking the Danger Zone in CrystalDiskInfo

When Gen 6 drives hit the market, monitoring your health metrics will be more vital than ever. Here is how to interpret your drive’s internal temperature sensors:

  • Blue/Green (Under 55°C): The gold standard. Your drive is completely safe, and you are getting 100% of the advertised bandwidth.

  • Yellow (56°C to 68°C): Heavy Load. This is perfectly normal during intensive tasks like transferring 100GB game files via DirectStorage, rendering 8K video, or compiling large code repositories.

  • Red (69°C and Above): Critical Risk. Your drive is actively thermal throttling or dangerously close to an abrupt thermal crash.

The Verdict: Do You Need a Massive Heatsink?

The short answer is yes, but it might not have to look like a giant block of metal sticking out of your motherboard. While the earliest engineering samples of Gen 6 controllers run incredibly hot, major chip manufacturers are fighting back using two primary design choices:

1. Active Airflow is King

You don’t necessarily need a tower-style heatsink that blocks your graphics card, but you will need active airflow. Small, silent 20mm or 30mm fans built directly into low-profile M.2 heatsinks are becoming the industry standard. A tiny fan pushing direct air across a copper fin array is significantly more effective than a giant passive block of aluminum sitting in stagnant air.

2. Monolithic Liquid Cooling Integration

For high-end enthusiast PC builders utilizing upcoming premium processors, motherboard manufacturers are already designing built-in M.2 waterblocks that route directly into custom liquid cooling loops.

The Takeaway for crystalmarkinfo.com Readers

If you plan on upgrading to a PCIe Gen 6 drive down the road, never buy a bare drive. Ensure your upcoming motherboard choice features heavy, high-surface-area integrated M.2 cooling armor, or budget an extra $30 to $40 for an active, fan-assisted third-party heatsink. Keep your hardware cool, keep your data safe, and let CrystalDiskInfo handle the monitoring!

TLC vs. QLC SSDs: Why Your Cheap Storage Choice Might Trigger an Early ‘Caution’ Status

TLC vs. QLC SSDs: Why Your Cheap Storage Choice Might Trigger an Early ‘Caution’ Status

If you’ve been shopping for a new NVMe drive lately, you’ve probably noticed a massive price gap between drives that look almost identical on paper.

Take a budget-friendly 2TB drive from an entry-level brand. It’s cheap, it boasts decent speeds, and it fits perfectly into your PC or Steam Deck. But right next to it is a premium 2TB drive (like the new Samsung 9100 PRO) that costs nearly double.

Why the massive premium? It usually comes down to three letters hidden deep in the spec sheet: TLC vs. QLC.

While buying a cheap QLC drive feels great for your wallet today, that budget-friendly choice might explain why your CrystalDiskInfo health status starts dropping down to a yellow “Caution” warning much sooner than you ever expected. Here is the plain-English breakdown of why cheap storage burns out faster.

The Core Difference: How Many Guests in One Room?

To understand why these drives wear out at different speeds, we have to look at how they physically hold your data using NAND flash cells.

Imagine an SSD as a massive apartment building filled with tiny rooms (cells), and bits of data as the guests staying inside them.

  • TLC (Triple-Level Cell): Stacks 3 bits of data per cell. To read the data, the drive’s controller has to manage 8 different voltage states. It’s the current “sweet spot” for performance and longevity.

  • QLC (Quad-Level Cell): Crams 4 bits of data into that exact same microscopic cell. To handle that extra bit, the controller has to manage 16 different voltage states.

Cramming a fourth bit into a cell sounds like an absolute win for storage capacity, but it forces the drive to operate with razor-thin margins of error.

Every time you write data to a cell, you physically degrade it by pushing electrons through a microscopic insulating wall. Because QLC cells have 16 ultra-precise voltage levels, even a tiny amount of cell wear makes it incredibly difficult for the controller to accurately read the data.

Why QLC Drives Trigger the ‘Caution’ Status Early

When you open CrystalDiskInfo, the software reads your drive’s internal S.M.A.R.T. health data. QLC drives hit the dangerous thresholds much quicker because of two major factors:

1. The Shocking Drop in TBW (Total Bytes Written)

An SSD’s lifespan is officially measured in TBW—the total amount of data you can write to the drive before the manufacturer can no longer guarantee the cells will hold a charge. The disparity between technologies is immense:

  • A standard 1TB TLC drive usually offers an endurance rating of 600 TBW.

  • A budget 1TB QLC drive typically plummets down to just 150 to 200 TBW.

If you are a content creator rendering 4K video, a gamer constantly installing 150GB patches, or someone running local AI models, you will exhaust that 150 TBW allowance rapidly. Once you pass that threshold, CrystalDiskInfo’s Percentage Used value will climb aggressively, pushing your drive straight into the yellow “Caution” zone.

2. High Write Amplification (The “Shuffling” Penalty)

Because QLC cells are so tightly packed, the drive cannot simply write a tiny 4KB file onto an empty spot. It often has to read an entire massive block of data, clear it, shuffle everything around, and rewrite it.

This behavior is called Write Amplification. You might think you only wrote 10GB of files to your drive today, but behind the scenes, your cheap QLC controller physically wore down the cells by writing 30GB worth of data shuffling. This massive internal stress causes Current Pending Sectors [C5] and Reallocated Sectors [05] to show up far earlier in your drive’s lifecycle.

TLC vs. QLC: Real-World Comparison

Feature TLC SSDs (The Premium Choice) QLC SSDs (The Budget Choice)
Bits Per Cell 3 Bits (8 voltage states) 4 Bits (16 voltage states)
Typical Lifespan (1TB) 600+ TBW 150 – 200 TBW
Sustained Write Speed Fast and consistent Plunges significantly during massive transfers
CrystalDiskInfo Risk Low (Stays “Good” for years) High (Rapidly drops if used heavily)
Best Used For OS Boot Drives, Gaming, Heavy Creation Mass game libraries, Media archives, Cold storage

Which One Should You Buy?

Don’t mistake this for a total takedown of QLC technology. QLC drives have taken massive leaps forward recently (such as high-capacity 4TB expansion drives), and they are absolutely brilliant for secondary storage. If you just need a cheap drive to hold a massive library of single-player Steam games or archive your family movies, QLC is an excellent, cost-effective option because you are mostly reading data, not constantly writing it.

However, never use a cheap QLC drive as your main Windows boot drive (C: Drive). Your operating system is constantly writing temporary files, background logs, and cache data to the drive 24/7. Putting a low-TBW QLC drive under that kind of constant pressure is a surefire way to see a yellow “Caution” warning flashing on your screen within a couple of years.

Spend a little extra cash on a high-quality TLC drive for your main system. Your peace of mind—and your CrystalDiskInfo dashboard—will thank you down the road.

Why Are SSD Prices Skyrocketing? (And How to Protect Your Current Drive)

Why Are SSD Prices Skyrocketing? (And How to Protect Your Current Drive)

If you’ve looked at the price of a solid-state drive lately, you probably had to double-check your screen.

Just a year or two ago, you could casually hop onto Amazon or Newegg and grab a blazing-fast 2TB NVMe SSD for a modest $120 to $150. It felt like the golden age of cheap storage. Fast forward to today, and that exact same 2TB drive is sitting closer to $300. Even budget-tier 1TB drives have completely doubled in price, while premium next-gen storage like the Samsung 9100 PRO will easily set you back nearly $480.

What on earth happened? Did the factories burn down? Is it just corporate greed?

The short answer is a perfect storm of economic shifts, manufacturing cuts, and one massive, data-hungry tech boom. Let’s break down exactly why SSD prices are exploding and, more importantly, what you can do to save your wallet.

1. The Real Culprit: AI is Devouring the World’s Storage

We hear about Artificial Intelligence everywhere, but it isn’t just taking over software—it’s physically eating up the hardware supply chain.

Every modern SSD relies on NAND Flash memory (the microscopic chips that actually hold your data). The massive tech giants building AI data centers need an astronomical amount of high-speed storage to train and run their large language models.

Because enterprise data centers are willing to pay top dollar and sign massive contracts, chip manufacturers like Samsung, SK Hynix, and Micron have shifted their factories away from consumer storage. When a factory can make a massive profit selling premium enterprise chips to tech billionaires, making budget 1TB drives for gaming PCs falls to the bottom of the priority list.

In fact, the global NAND shortage is so intense that major component brands like ADATA and TeamGroup are collectively borrowing nearly $880 million just to afford buying raw memory chips to build their consumer drives.

2. NAND Wafer Prices Have Gone Vertical

Because the global demand for AI infrastructure is completely outstripping what factories can produce, the cost of raw materials has gone completely haywire.

Industry reports show that NAND flash contract prices have surged quarter-after-quarter. With raw material and clean-room fabrication plant costs jumping up sharply, manufacturers have no choice but to pass those expenses directly down to us—the consumers.

What Can You Realistically Do About It?

Since market experts warn that this storage squeeze will likely drag out through the rest of the year, waiting for a massive price drop isn’t a viable strategy right now. Instead, the smartest move you can make is to take care of the storage you already own. Here is your proactive checklist to keep your current drive alive and avoid paying the “2026 tax” on a replacement:

Step 1: Keep a Hawk-Eye on CrystalDiskInfo

Don’t wait for your PC to hit you with a Blue Screen of Death. Fire up CrystalDiskInfo regularly and monitor your health metrics. Look closely at your Percentage Used and Media and Data Integrity Errors. If your drive status is a steady blue “Good,” you’re in the clear. If it drops to a yellow “Caution,” you know it’s time to start organizing your files before a sudden failure forces your hand.

Step 2: Manage Your Drive’s Thermals

Heat is the absolute silent killer of modern M.2 NVMe drives. High-speed drives run incredibly hot under load. If your SSD is constantly idling above 60°C, its lifespan is actively degrading. Make sure your drive has a proper motherboard heatsink attached, replace any dried-out factory thermal pads, and ensure your PC case has solid intake airflow.

Step 3: Stop Treating Your SSD Like a Trash Can

SSDs degrade based on how much data is written to them (measured as Terabytes Written, or TBW). If you are constantly downloading, deleting, and re-downloading massive 150GB modern games just to clear space, you are actively burning through your drive’s lifespan. Be selective about what you install, and utilize older, cheaper external mechanical hard drives for basic file archiving.

The Final Verdict

We are officially living through a “RAMpocalypse” and storage crunch. The days of treating high-speed NVMe storage like a cheap commodity are temporarily on pause.

If you absolutely need an upgrade right now for a new build or a critical work machine, bite the bullet and buy it—waiting a few months likely won’t save you much money. But if your current storage is holding up fine, look after it, keep it cool, monitor it with CrystalDiskInfo, and let your current hardware ride out the storm.

How to Fix S.M.A.R.T. Error [C5] Current Pending Sector Count (Without Panicking)

How to Fix S.M.A.R.T. Error [C5] Current Pending Sector Count (Without Panicking)

You open up CrystalDiskInfo just to check on your PC, and instead of that reassuring blue “Good” box, you are greeted by a bright yellow “Caution” status. You look down the list of technical attributes, and your eyes lock onto a yellow or red dot next to ID C5: Current Pending Sector Count.

Your first thought is probably: Is my hard drive about to explode? Is all my data gone?

Take a deep breath. While a [C5] error means your drive is experiencing a hiccup, it is the one S.M.A.R.T. error that you might actually be able to fix and return your drive’s status back to a healthy blue.

Here is a plain-English, step-by-step guide on what this error actually means, how to secure your files, and how to fix it.

What Actually is a “Current Pending Sector”?

Think of your hard drive or SSD like a massive grid of tiny storage blocks called sectors.

A Current Pending Sector is essentially an unstable sector that the drive’s internal controller has flagged as “suspicious”. The drive tried to read or write data to that specific spot and failed. However, the drive isn’t ready to give up on it just yet. It places that sector in “purgatory” (pending status) until it can test it again.

  • The Good News: The drive hasn’t declared the sector permanently dead yet.

  • The Bad News: If your system tries to read data sitting on that pending sector right now, your PC might freeze, stutter, or hit you with a Blue Screen of Death (BSOD).

The image below shows exactly how this software warning connects directly to physical instability on your hardware components

Caption: Linking software alerts to physical reality. This technical overlay maps the digital [C5] Current Pending Sector Count error warning directly onto the physical, unstable data pathways of the drive storage hardware.

Step 1: The Golden Rule (Backup First!)

Before you attempt any fixes, back up your critical data immediately.

The process of fixing a [C5] error requires forcing your drive to deeply read and write data to test those unstable sectors. If your drive is genuinely on its deathbed, this intense testing can push it over the edge.

Grab an external drive, a thumb drive, or use cloud storage and save your irreplaceable photos, documents, and game saves. Do not worry about backing up easily downloadable games or your operating system files—just save the essentials.

Step 2: How to “Fix” the [C5] Error

To get rid of the pending count, we have to force the drive to make a final decision on those unstable sectors. When forced to rewrite data to a pending sector, one of two things will happen:

  1. The sector passes the test: The drive successfully writes data to it, realizes it was just a temporary glitch, and clears it. Your [C5] count drops back to 0. (Best case scenario)

  2. The sector fails the test: The drive confirms the sector is physically broken. It permanently retires it and moves the data to a healthy “spare” sector (this will cause your ID 05: Reallocated Sectors Count to go up).

In both cases, the [C5] Pending count drops to zero, and your imminent warning is resolved. Here are the two best ways to force this test:

Method A: Use Windows Chkdsk (The Easiest Way)

Windows has a built-in tool designed to scan and repair drive sectors.

  1. Type cmd into your Windows search bar.

  2. Right-click Command Prompt and select Run as Administrator.

  3. Type the following command and hit Enter (replace C: with the letter of the drive you want to fix):

    Plaintext

    chkdsk /f /r C:
    
  4. If it’s your main system drive, Windows will ask if you want to schedule the scan for the next restart. Type Y and hit Enter, then reboot your PC.

Windows will scan the entire drive. This can take anywhere from 30 minutes to several hours depending on your drive’s size. It will force the drive firmware to evaluate the pending sectors.

Method B: Perform a Full “Zero-Fill” Erase (The Most Effective Way)

If chkdsk doesn’t clear the error, you need a more aggressive approach. A Zero-Fill or Secure Erase completely wipes the drive, writing a binary 0 to every single microscopic block of storage. This forces the drive controller to test absolutely everything.

  • Note: This will completely delete everything on the drive.

  • How to do it: Use the official software provided by your drive’s manufacturer (such as Samsung Magician, Western Digital Dashboard, or Crucial Storage Executive) and look for the Secure Erase or Write Zeros feature.

The Verdict: Check CrystalDiskInfo Again

Once your Chkdsk scan or Zero-Fill erase is complete, open CrystalDiskInfo up again and look at the numbers:

  • If [C5] dropped to 0 and your health turned Blue: Congratulations! It was a soft/temporary error. Your drive is stable and completely fine to keep using as normal.

  • If [C5] dropped to 0 but [05] (Reallocated Sectors) went up: The drive successfully sequestered the broken sectors. If the reallocated number is low (under 10–20) and stops increasing, the drive is stable enough to use for casual gaming or secondary data storage, but keep an eye on it.

  • If the numbers keep going up every day: If you run the fixes and the counts continue to climb, your drive is actively degrading. No software wizardry can fix physical wear. Save your data and buy a replacement drive.

Reallocated Sectors Count: Is Your SSD Dying? (The Truth)

Reallocated Sectors Count: Is Your SSD Dying? (The Truth)

If you’ve opened CrystalDiskInfo and noticed a non-zero value for ID 05: Reallocated Sectors Count, you’re likely seeing a yellow “Caution” sign.

The short answer? Yes, your drive is beginning to fail physically, but it might not “die” today. Here is exactly what is happening inside your drive and what you need to do next.

What is a Reallocated Sector?

Every modern SSD and HDD is manufactured with a small “spare” area of storage that isn’t visible to Windows.

  • When the drive’s controller encounters a bad sector (a physical part of the disk that can no longer hold data), it permanently retires that sector.

  • It then “remaps” or reallocates the data to one of those spare sectors.

  • The Reallocated Sectors Count is simply a tally of how many times this has happened.

Is the Drive Dying? The “Rate of Change” Rule

A single reallocated sector isn’t an immediate death sentence. However, it is a sign of permanent physical degradation. To determine if your SSD is dying, you must monitor the Raw Value in CrystalDiskInfo over 24–48 hours.

Trend Risk Level Meaning
Stable (Value stays the same) Low/Medium The drive found a flaw, fixed it using spares, and the damage isn’t spreading.
Increasing (Value goes up) CRITICAL The drive is actively “rotting.” Each new reallocated sector means the physical hardware is crumbling.

Why SSDs are Different from HDDs

On an old-school Hard Drive (HDD), a reallocated sector often meant a physical scratch on the platter. On an SSD, it usually means the NAND flash cells are wearing out and can no longer maintain an electrical charge. Once an SSD starts reallocating sectors, it often snowballs quickly because the surrounding cells are under similar stress.

What Should You Do?

1. The “Zero-Increase” Test

If you see a count of, say, 10, write it down. Use your computer normally for a day. Re-check CrystalDiskInfo. If that 10 becomes 11 or 12, Shut down the PC immediately. Your drive is in an active failure state.

2. Check the “Health Percentage.”

In CrystalDiskInfo, look at the Percentage icon (e.g., 90% Good). If your Reallocated Sectors Count is high but the percentage is still high, the drive still has plenty of “spare” sectors left. If the percentage is dropping fast, the “spare pool” is empty.

3. Evacuate Critical Data

Don’t wait for the drive to hit 0%. SSDs, unlike HDDs, often fail “silently”—they don’t make noise; they just stop being recognized by the BIOS one morning.

  • Move: High-value photos, work documents, and crypto keys.

  • Leave: Games, OS files, and applications that can be re-downloaded.

Verdict: Replace or Keep?

  • If it’s your Boot Drive (C: Drive): Replace it. A failing OS drive causes blue screens (BSOD), file corruption, and “stuttering” in Windows.

  • If it’s a secondary Game Drive: You can keep using it until it dies, provided you don’t mind reinstalling your games later.

Pro Tip for crystalmarkinfo.com users: If your count is high, check your warranty. Many manufacturers like Samsung, Western Digital, and Crucial will honor an RMA (Replacement) if the S.M.A.R.T. data shows the drive is failing before the warranty period ends!

CrystalDiskMark vs AS SSD Benchmark: Which Speed Test is Better? (2026 Guide)

CrystalDiskMark vs AS SSD Benchmark: Which Speed Test is Better? (2026 Guide)

CrystalDiskMark vs AS SSD Benchmark: Which Speed Test is Better? (2026 Guide)

CrystalDiskMark vs AS SSD Benchmark: We compare the two most popular free SSD testing tools. Learn the difference between compressible data, copy tests, and which benchmark you should trust.

Introduction

If you want to know exactly how fast your new Solid State Drive (SSD) is, you will inevitably run into two legendary pieces of freeware: CrystalDiskMark and AS SSD Benchmark.

On the surface, they look incredibly similar. They both feature a simple grid interface, they both test Sequential and Random read/write speeds, and they both output results in Megabytes per second (MB/s).

However, beneath the surface, these two programs test your hardware in entirely different ways. Depending on the type of SSD controller you have, one program might show a blazing-fast score of 7,000 MB/s, while the other shows a much slower 5,000 MB/s on the exact same drive!

In this comprehensive guide, we will break down the exact differences in the CrystalDiskMark vs AS SSD Benchmark showdown, explain why their scores differ, and help you decide which tool to trust.

CrystalDiskMark: The Industry Standard

Developed in Japan by Crystal Dew World, CrystalDiskMark (CDM) is the most widely recognized storage benchmark on the internet. Whenever a manufacturer like Samsung or Western Digital advertises the “up to” speeds on their SSD boxes, they are almost always quoting a CrystalDiskMark result.

How it Works: CrystalDiskMark tests your drive’s peak, absolute maximum performance capabilities. It highly stresses the drive by simulating different “Queue Depths” (how many data requests are waiting in line) and “Threads” (how many software processes are asking for data at once).

The Pros:

  • Highly Customizable: You can adjust the test file size (from 16MB to 64GB), the queue depth, and the thread count to perfectly simulate your specific workload.

  • Peak Performance: It shows you the absolute maximum speed your drive is capable of achieving under ideal conditions.

  • Modern NVMe Profile: The newest versions include a specific “NVMe SSD” profile designed to push PCIe Gen 4 and Gen 5 drives to their absolute limits.

The Cons:

  • Unrealistic Expectations: Because it tests for absolute peak performance, the speeds you see in CrystalDiskMark are rarely the speeds you will experience in normal, daily Windows usage.

AS SSD Benchmark: The Worst-Case Scenario Tester

Developed in Germany, AS SSD Benchmark was created specifically to expose the weaknesses in early SSD controllers (specifically SandForce controllers, which used data compression to cheat speed tests).

How it Works:

Unlike other testers, AS SSD uses 100% incompressible data (completely randomized zeros and ones). It forces the SSD controller to work as hard as physically possible without using any software shortcuts or caching tricks.

The Pros:

  • The “Copy Benchmark”: This is AS SSD’s secret weapon. Instead of just showing raw MB/s, it includes a real-world copy test. It simulates exactly how long it will take (in seconds) to copy an ISO file, load a heavy software Program, or launch a Game.

  • The Overall Score: At the end of the test, AS SSD gives you a single, unified “Score” (e.g., 5,200). This makes it incredibly easy to compare two completely different drives without having to analyze eight different data points.

  • Shows True Minimum Speeds: Because it uses incompressible data, AS SSD shows you the “worst-case scenario” for your drive.

The Cons:

  • Lower Scores: Your speeds will almost always look slower in AS SSD compared to CrystalDiskMark. This can confuse users into thinking their drive is broken.

  • Outdated UI: The software has not been updated as frequently as CrystalDiskMark, and the interface feels quite old.

The Core Difference: Compressible vs Incompressible Data

If you run both tests back-to-back, you will notice something strange: CrystalDiskMark will usually give you a higher score. Why?

It comes down to how the data is generated.

  • Some SSD controllers use a trick where they instantly compress data on the fly to write it faster.

  • By default, CrystalDiskMark generates data that is fairly easy for the SSD to compress, allowing the drive to hit its absolute maximum advertised speeds.

  • AS SSD Benchmark intentionally generates data that is mathematically impossible to compress. This forces the SSD to write the full weight of the file, completely bypassing the controller’s speed tricks.

Think of CrystalDiskMark as testing a car’s top speed on a perfectly smooth racetrack, while AS SSD Benchmark tests that same car’s speed while driving up a steep, muddy hill.

Feature Comparison Table

Feature CrystalDiskMark AS SSD Benchmark
Data Type Used Default (Customizable) 100% Incompressible
Real-World “Copy” Test No Yes (ISO, Program, Game)
Overall Final Score No Yes
Customizable Queue Depths Yes (Highly advanced) Limited
Best For Finding absolute peak speeds Finding worst-case scenario speeds

Conclusion: Which One Should You Use? 

At the end of the day, both tools are completely free, lightweight, and safe to use. You do not have to pick just one!

  • Use CrystalDiskMark when you install a brand-new drive and want to verify that it hits the speeds printed on the manufacturer’s box. It is the gold standard for verifying that your hardware is working correctly.

  • Use AS SSD Benchmark when you want to know exactly how your drive will perform under the heaviest, most unoptimized workloads, or if you want a simple “Overall Score” to compare against your friend’s PC.

CrystalDiskInfo Not Detecting Your Drive? (5 Easy Fixes)

crystaldiskinfo-fix-1-enable-advanced-usb-search-external-drive-missing

CrystalDiskInfo Not Detecting Your Drive? (5 Easy Fixes)

Is CrystalDiskInfo not showing your external hard drive, USB, or internal SSD? Try these 5 simple fixes to resolve the “Disk Not Found” error and read your S.M.A.R.T. data.

Introduction

You suspect your hard drive might be failing, so you download CrystalDiskInfo to check its health. But when you open the software, your drive is completely missing from the top menu bar.

Seeing a blank screen or a “Disk Not Found” error in CrystalDiskInfo is incredibly frustrating. However, before you panic and assume your drive is completely dead, you should know that this is a very common software issue.

CrystalDiskInfo requires low-level hardware access to read S.M.A.R.T. data. Sometimes, Windows permissions, cheap USB enclosures, or outdated software can block this connection. Here are 5 easy ways to fix CrystalDiskInfo not detecting your drive.

Fix 1: Enable Advanced USB Search (For External Drives)

By far, the most common reason CrystalDiskInfo cannot see a drive is because it is plugged in externally via USB. Many external hard drive enclosures use cheap “bridge chips” that block S.M.A.R.T. data from reaching the computer.

Furthermore, CrystalDiskInfo occasionally ignores USB drives by default to speed up its loading time. You need to force the software to look for them.

How to fix it:

  1. Open CrystalDiskInfo.

  2. Click on Function in the top menu bar.

  3. Hover over Advanced Feature.

  4. Click on Advanced Disk Search.

  5. (Optional) If it still doesn’t appear, go back to Advanced Feature and click on [DEBUG] USB/IEEE 1394.

Note: CrystalDiskInfo is designed for HDDs and SSDs. It generally cannot read standard USB Flash Drives (thumb drives) or SD cards, as those devices do not have S.M.A.R.T. monitoring chips built into them.

Fix 2: Run as Administrator

To talk directly to your motherboard and storage controllers, CrystalDiskInfo needs elevated Windows permissions. If you are running the program on a standard Windows user account without Admin rights, the software will be blocked from seeing your drives.

How to fix it:

  1. Close CrystalDiskInfo completely.

  2. Right-click on the CrystalDiskInfo shortcut (or the .exe file).

  3. Select “Run as Administrator.”

  4. Click “Yes” on the Windows User Account Control prompt.

Fix 3: Update to the Latest Version

Storage technology changes rapidly. If you are using a brand-new PCIe Gen 5 NVMe SSD, or a newly released external NVMe-to-USB enclosure, an older version of CrystalDiskInfo simply might not have the code required to recognize the new controller.

How to fix it: If you are running version 8.0 or older, it is time to upgrade. Head back to the CrystalMarkInfo homepage and download the latest version (v9.0+). Installing the newest version directly over your old one often fixes missing NVMe and external drive bugs instantly.

Fix 4: The RAID Array Limitation

Are you running two or more drives tied together in a RAID array (like RAID 0 for speed or RAID 1 for redundancy)?

The Hard Truth: CrystalDiskInfo does not support most hardware RAID controllers. When drives are put into a hardware RAID, the controller chip acts as a middleman and hides the individual S.M.A.R.T. data of the drives from Windows.

How to fix it: If you need to check the health of a drive inside a hardware RAID, you will either need to use the proprietary software provided by your RAID controller manufacturer (like Intel Rapid Storage Technology or AMD RAIDXpert), or you must temporarily remove the drive and plug it directly into a standard SATA port on your motherboard.

Fix 5: Check Windows Disk Management

If you have tried all the steps above and CrystalDiskInfo still cannot see your drive, we need to find out if Windows can even see it.

How to fix it:

  1. Right-click on the Windows Start Button.

  2. Select Disk Management from the menu.

  3. Look through the list of drives at the bottom of the window.

  • If you see the drive here (even if it says “Unallocated” or “RAW”): Your drive is physically alive, but the partition is corrupted. You can try recovering data with software like DMDE or Recuva.

  • If the drive is completely missing from Disk Management: The drive is physically disconnected or dead. Check your SATA cables, try a different M.2 slot, or try a different USB cable. If it still doesn’t show up in Disk Management, the drive has suffered a fatal hardware failure and needs to be replaced.

Summary

CrystalDiskInfo is a powerful tool, but it relies on clear communication pathways to your hardware. By running the software as an Administrator,

What is a Good CrystalDiskMark Score for Your SSD? (2026 Guide)

What is a Good CrystalDiskMark Score for Your SSD? (2026 Guide)

Wondering what a good CrystalDiskMark score is? We break down SEQ1M vs RND4K speeds and provide average benchmark ranges for HDDs, SATA SSDs, and NVMe drives.

Introduction

You just built a new PC or bought a high-end SSD, installed it, and immediately downloaded CrystalDiskMark to test its speed. You click “All” to run the benchmark, and a few minutes later, you are staring at a grid of massive numbers.

While seeing a score of 7,000 MB/s looks incredibly impressive, most users have no idea what these numbers actually mean or if their drive is performing the way it should. What exactly is a good CrystalDiskMark score?

In this comprehensive guide, we will break down exactly how to read your benchmark results, explain the critical difference between Sequential and Random speeds, and give you the average score ranges for every type of drive on the market today.

Understanding the Tests: Sequential vs. Random

CrystalDiskMark doesn’t just run one test; it simulates different ways your computer actually uses data. To understand your score, you must understand the two main rows on the results screen: SEQ1M and RND4K.

SEQ1M Q8T1 (Sequential Large File Transfers)

The top rows of your benchmark represent Sequential read and write speeds. This tests how fast your drive can move a single, massive file in one continuous block.

  • Real-World Example: Copying a massive 50GB 4K movie file from one folder to another, or downloading a massive zipped game file.

  • The Marketing Metric: When you look at an SSD box and it proudly claims “Speeds up to 7,400 MB/s,” they are advertising the Sequential speed. It looks great on paper, but it is not how your computer operates most of the time.

RND4K Q32T1 (Random Tiny Files)

The bottom rows represent Random 4K read and write speeds. This tests how fast your drive can find and move thousands of tiny, scattered files located all over the storage chips.

  • Real-World Example: Booting up Windows, launching your web browser, or loading a game with thousands of small texture files.

  • The “Feel” Metric: This is the most important score for a snappy, responsive PC. Even the fastest Gen 5 NVMe drives will score dramatically lower here (often under 100 MB/s), but this is the number that dictates how fast your computer actually feels during everyday tasks.

What is a Good CrystalDiskMark Score?

A “good” score depends entirely on the physical hardware you have installed. You cannot compare an old mechanical hard drive to a modern M.2 stick.

Here are the target Sequential (SEQ1M) speed ranges you should expect depending on your storage type:

Drive Type Expected Read Speed (MB/s) Expected Write Speed (MB/s) Best Used For
Traditional SATA HDD 100 to 250 100 to 200 Mass storage, backups, archives
SATA 2.5″ SSD 500 to 550 450 to 530 Older laptops, budget game drives
Gen 3 NVMe M.2 SSD 3,000 to 3,500 2,500 to 3,300 Excellent everyday performance
Gen 4 NVMe M.2 SSD 5,000 to 7,500 4,000 to 6,800 High-end gaming, video editing
Gen 5 NVMe M.2 SSD 10,000 to 14,000+ 9,000 to 12,000+ Extreme enthusiast workloads

Why is My Score Lower Than the Box Says?

If you bought a Gen 4 NVMe SSD advertised at 7,000 MB/s, but CrystalDiskMark is only showing a score of 3,500 MB/s or less, do not panic. Your drive is likely fine, but it is being limited by one of these common bottlenecks:

  • Motherboard Bottlenecks (PCIe Generations): This is the most common issue. If you plug an ultra-fast Gen 4 SSD into an older motherboard that only supports PCIe Gen 3, the motherboard will limit the drive to Gen 3 speeds (capping it around 3,500 MB/s).

  • Testing Your Boot Drive: If you are benchmarking the exact same drive that Windows is currently running on, your scores will be lower. Windows is constantly reading and writing background files, which interrupts the CrystalDiskMark test.

  • Thermal Throttling: NVMe SSDs get incredibly hot. If your drive does not have a heatsink, it might hit 70°C+ during the benchmark and intentionally slow itself down to prevent melting.

  • “Up To” Marketing Speeds: Manufacturers test their drives in absolutely perfect, laboratory conditions on completely empty drives. A drive that is 80% full will naturally benchmark slightly slower than an empty one.

The Bottom Line

When trying to determine what a good CrystalDiskMark score is, always manage your expectations based on your hardware. If your Sequential speeds are near the advertised limits of your drive’s generation, your hardware is perfectly healthy.

However, remember not to obsess over the massive 7,000+ MB/s sequential numbers. If your computer boots up instantly and applications open without delay, your Random 4K speeds are doing exactly what they need to do.

CrystalDiskInfo vs Hard Disk Sentinel: Which Drive Monitor is Better?

CrystalDiskInfo vs Hard Disk Sentinel: Which Drive Monitor is Better?

Deciding between CrystalDiskInfo and Hard Disk Sentinel? We compare the free, easy-to-use S.M.A.R.T. reader against the paid, deep-diagnostic tool to help you choose.

Introduction

When it comes to monitoring the health of your Hard Disk Drives (HDDs) and Solid State Drives (SSDs), two names dominate the conversation: CrystalDiskInfo and Hard Disk Sentinel (HDSentinel).

If you are trying to figure out which one to download, you aren’t alone. Both tools are highly respected in the PC building and data recovery communities. However, they are built for entirely different types of users. One is a lightweight, free snapshot of your drive’s health, while the other is a premium, deep-diagnostic suite designed to predict failures before they happen.

In this guide, we will compare CrystalDiskInfo vs. Hard Disk Sentinel to help you decide which storage monitor is the right fit for your computer.

CrystalDiskInfo: The Casual Health Checker 

CrystalDiskInfo is the undisputed king of freeware drive monitoring. It is a lightweight, open-source tool designed to do one thing very well: read your drive’s internal S.M.A.R.T. (Self-Monitoring, Analysis, and Reporting Technology) data and translate it into a simple, color-coded health grade.

The Pros:

  • 100% Free: There are no premium tiers or locked features.

  • Incredibly Simple: You launch it, and instantly see a “Good,” “Caution,” or “Bad” status.

  • Lightweight: It uses practically zero system resources, meaning you can leave it running in the background while gaming or working.

  • Temperature Monitoring: Displays real-time temperatures on your Windows taskbar.

The Cons:

  • Passive Monitoring Only: It only reads what the drive tells it. It cannot actively scan the physical surface of the drive for hidden errors.

  • Limited Hardware Support: It struggles to read drives configured in complex RAID arrays or NAS (Network Attached Storage) setups.

Who is it for? CrystalDiskInfo is perfect for 90% of casual PC users and gamers. If you just want a quick, free way to make sure your brand-new SSD is healthy or to check why your old laptop is running slow, this is the only tool you need.

Hard Disk Sentinel: The Deep-Dive Doctor

Hard Disk Sentinel (often abbreviated as HDS) is a premium, professional-grade diagnostic tool. While CrystalDiskInfo simply reads the drive’s self-reported log, Hard Disk Sentinel actively interrogates the hardware.

The Pros:

  • Active Surface Testing: HDSentinel can run intense read/write hardware tests to physically verify every single sector on the drive. It can sometimes even force a dying drive to reallocate bad sectors, stabilizing it temporarily.

  • Failure Prediction: It doesn’t just tell you if a drive is bad; it calculates an estimated “Days Remaining” before the drive completely dies.

  • Advanced Alerts: It can be configured to automatically send you an email or shut down your PC entirely if a drive crosses a dangerous temperature threshold.

  • Broad Support: It flawlessly reads drives in RAID arrays, external USB enclosures, and complex server setups.

The Cons:

  • It Costs Money: While there is a limited free trial, the Pro version requires a paid license (typically around $30-$50).

  • Overwhelming Interface: The sheer amount of data, graphs, and textual descriptions can be intimidating for beginners.

Who is it for?

Hard Disk Sentinel is built for IT professionals, server admins, and data hoarders. If you have a NAS filled with 80TB of irreplaceable family videos, or if you run a small business server, the investment in Hard Disk Sentinel is absolutely worth the peace of mind.

Side-by-Side Feature Comparison

Feature CrystalDiskInfo Hard Disk Sentinel (Pro)
Price Free Paid (Lifetime License)
S.M.A.R.T. Reading Yes Yes
Temperature Monitoring Yes Yes
Hardware Surface Tests No Yes
Predicts Lifespan (Days) No Yes
RAID / NAS Support Limited Comprehensive
Automated Backups on Alert No Yes


Conclusion: Which One Should You Download?

Choosing between CrystalDiskInfo and Hard Disk Sentinel comes down to what you are trying to protect and your budget.

If you are a standard home user, gamer, or student with a single PC, CrystalDiskInfo is the clear winner. It gives you all the essential warnings you need for exactly zero dollars.

However, if you are managing a server, working with multi-drive RAID setups, or trying to diagnose a highly corrupted hard drive that Windows refuses to read, you need the heavy-duty active testing that Hard Disk Sentinel provides.

Pro Tip: You don’t have to choose permanently! Many PC builders keep CrystalDiskInfo installed for daily background monitoring, and only download the Hard Disk Sentinel trial when they suspect a severe hardware issue.