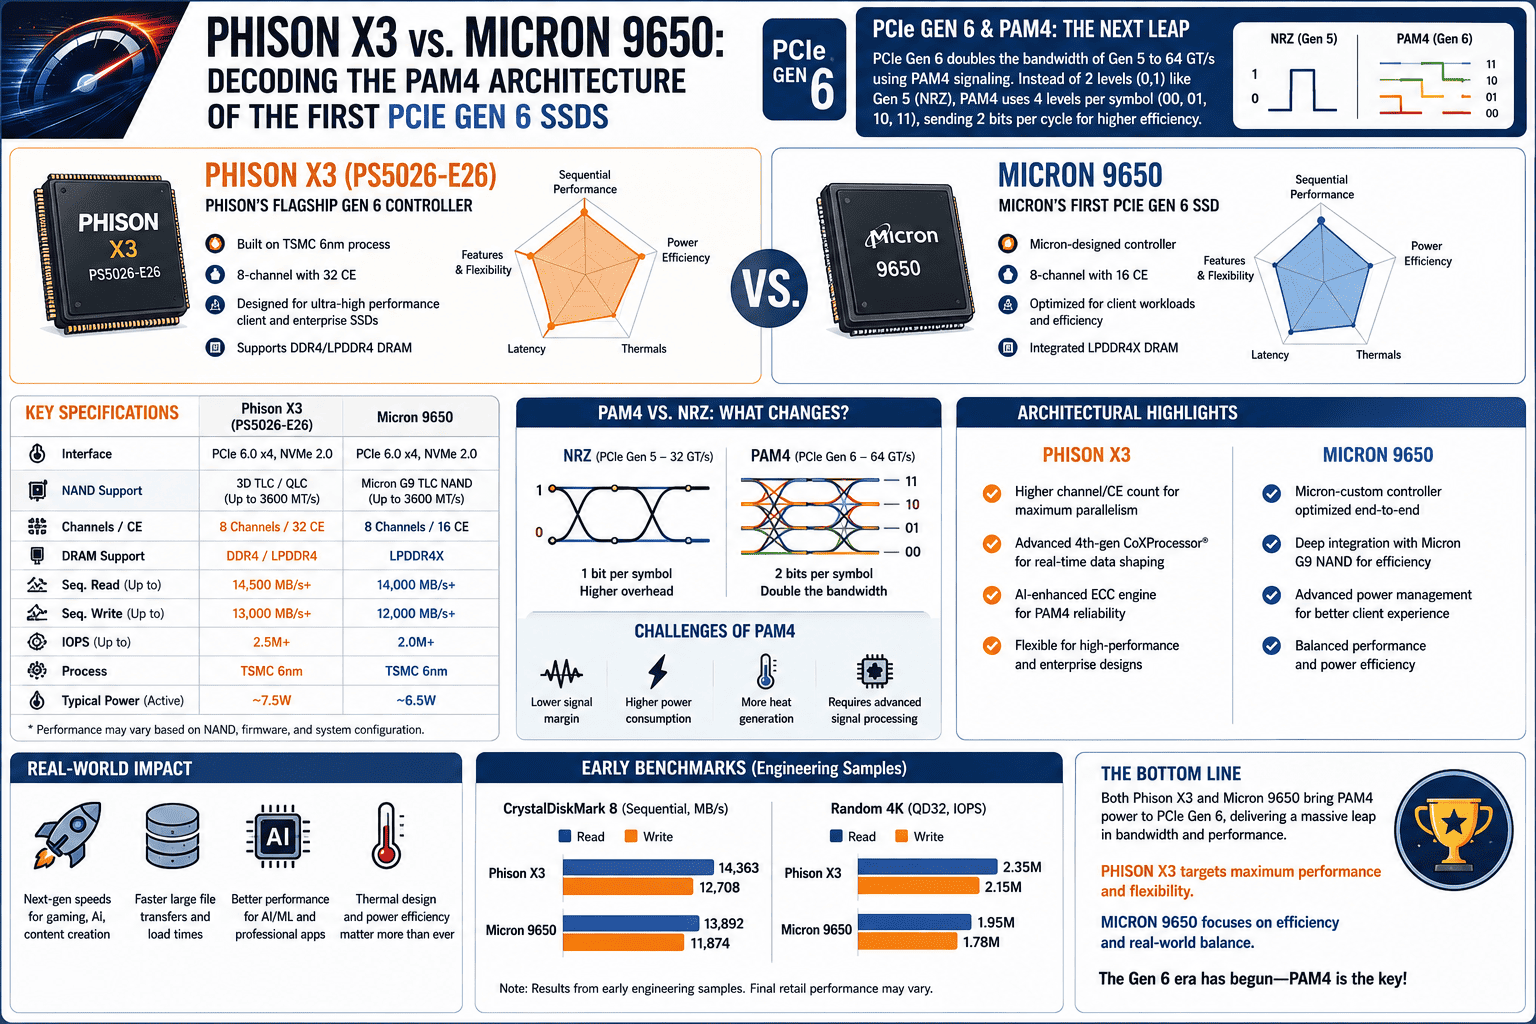
Phison X3 vs. Micron 9650: Decoding the PAM4 Architecture of the First PCIe Gen 6 SSDs

Phison X3 vs. Micron 9650: Decoding the PAM4 Architecture of the First PCIe Gen 6 SSDs

Just when you thought your system’s storage couldn’t possibly get any faster, the tech industry has officially kicked down the door to the next generation. PCIe Gen 5 SSDs already push a blistering 14,500 MB/s, but they are about to look like turtle-paced legacy hardware.

With the recent finalization of Phison’s X3 controller and Micron launching the ground-breaking 9650 drive, tech enthusiasts are intensely searching for how the first wave of PCIe Gen 6 SSDs plans to achieve an earth-shattering 28,000 MB/s (28 GB/s) of sequential throughput.

Doubling the speeds of Gen 5 isn’t just a matter of overclocking a silicon chip. It required a complete overhaul of how data physically travels across your motherboard. Let’s decode the secret weapon behind Gen 6 storage—PAM4 signaling—and pit the two early titans against each other to see how they handle the brutal reality of next-gen engineering.

The Secret Weapon: What is PAM4 Data Encoding Storage?

To understand how the Micron 9650 sequential speed limits manage to hit 28 GB/s, we have to look at the highway your data drives on.

Every generation of consumer PCIe storage before this used a signaling method called NRZ (Non-Return-to-Zero). Think of NRZ like a simple light switch that transmits data using binary: the light is either On (1) or Off (0). Each clock cycle can only send a single bit of data. To make it faster, you had to physically increase the frequency, which created massive electrical noise and stability issues.

PCIe Gen 6 completely ditches this model for PAM4 (Pulse Amplitude Modulation 4-Level) encoding.

Instead of a basic light switch, PAM4 works like a dimmer switch with four distinct brightness levels (voltages). By having four levels instead of two, a single electrical pulse can carry two bits of data at the exact same time (00, 01, 10, or 11).

[ NRZ Signaling ] --->  Level 0 (Bit 0)  or  Level 1 (Bit 1)
[ PAM4 Encoding ] --->  Level 0 (00) | Level 1 (01) | Level 2 (10) | Level 3 (11)

By packing double the data into the same time slice, Gen 6 instantly doubles the bandwidth of the bus without needing to push frequencies to unstable, heat-generating extremes.

Phison X3 vs. Micron 9650: The Architecture Clash

While both drives leverage PAM4 architecture to rewrite the rules of a PCIe Gen 6 SSD benchmark, the internal Phison X3 controller specs show a completely different engineering philosophy compared to Micron’s in-house silicon.

1. The Phison X3 Controller

Phison is the undisputed king of off-the-shelf consumer NVMe controllers. The X3 is their crown jewel. Fabricated on TSMC’s ultra-efficient 4nm process, the X3 is designed to pair perfectly with the latest 2yy-layer TLC and QLC NAND blocks.

  • The Key Stat: Phison’s primary objective with the X3 isn’t just raw speed; it’s thermal survival. The controller features an advanced hardware-level Forward Error Correction (FEC) mechanism explicitly tuned to handle the tight voltage tolerances of PAM4 signals without causing processing delays.

2. The Micron 9650 SSD

Micron has taken a monolithic approach by designing both the controller architecture and the raw V-NAND layers completely under one roof. The Micron 9650 is built as a heavy-duty flagship drive meant to handle demanding next-gen computing workloads.

  • The Key Stat: By building a tightly vertical hardware stack, Micron optimizes the link between the PAM4 data lanes and their custom 232-layer TLC flash memory, aiming for sustained, brutal read and write consistency that doesn’t falter even during long data-dump sequences.

The Ultimate Engineering Hurdle: The 7-Watt Thermal Target

If you’ve owned a Gen 5 SSD, you know they run incredibly hot, often requiring massive heatsinks or loud, whiny mini-fans to avoid thermal throttling. Because PAM4 signaling relies on analyzing four distinct voltage steps, the controllers have to work twice as hard to parse the data stream, which naturally generates massive amounts of radiant heat.

Early engineering prototypes of Gen 6 controllers were absolute furnaces, pulling up to 14 watts of power and instantly thermal-crashing into a Blue Screen of Death (BSOD) within seconds if left bare.

This is where the true battle lies. The victor of the Gen 6 era won’t be the drive that hits 28 GB/s first—it will be the drive that can maintain it without melting.

Phison has taken a massive stand here, publicly targeting a 7W active power draw threshold for the X3 controller under heavy load. By dropping the power draw down to 7 watts through architecture shrinks, Phison is trying to ensure that Gen 6 drives can still be cooled by standard motherboard heat shields rather than requiring tower-coolers that block your graphics card slot. Micron is countering this with advanced, dynamic low-power sleep states built directly into the firmware of the 9650 to shed thermal energy during micro-seconds of processing downtime.

Head-to-Head Technical Spec Speculation

Metric Phison X3 Platform Micron 9650 Platform
Data Signaling PAM4 Encoding PAM4 Encoding
Max Target Sequential Read Up to 28,000 MB/s Up to 28,000 MB/s
Fabrication Node TSMC 4nm Custom Enterprise-Grade Node
Core Power Target ~7 Watts (High Efficiency) ~9 Watts (High Sustained Load)
Error Correction Specialized PAM4 FEC Proprietary Matrix ECC

The Verdict for Benchmarkers

When these drives hit consumer shelves and users start dropping them into CrystalDiskMark to post screenshots online, the numbers are going to look surreal. We are talking about filling a 1TB drive from completely empty to completely full in under 40 seconds.

However, when you are auditing these drives natively in CrystalDiskInfo, thermal monitoring is going to be your absolute highest priority. Because PAM4 encoding leaves very little room for electrical instability, running these drives close to their 70°C thermal redline will degrade your health status and trigger aggressive performance drops much faster than older tech.

The Phison X3 looks like the champion for clean, daily desktop use due to its strict 7W cooling target, while the Micron 9650 is shaping up to be a relentless production workhorse. Whichever way you lean, start saving up for a high-airflow PC case—the Gen 6 era is fast, furious, and undeniably hot.
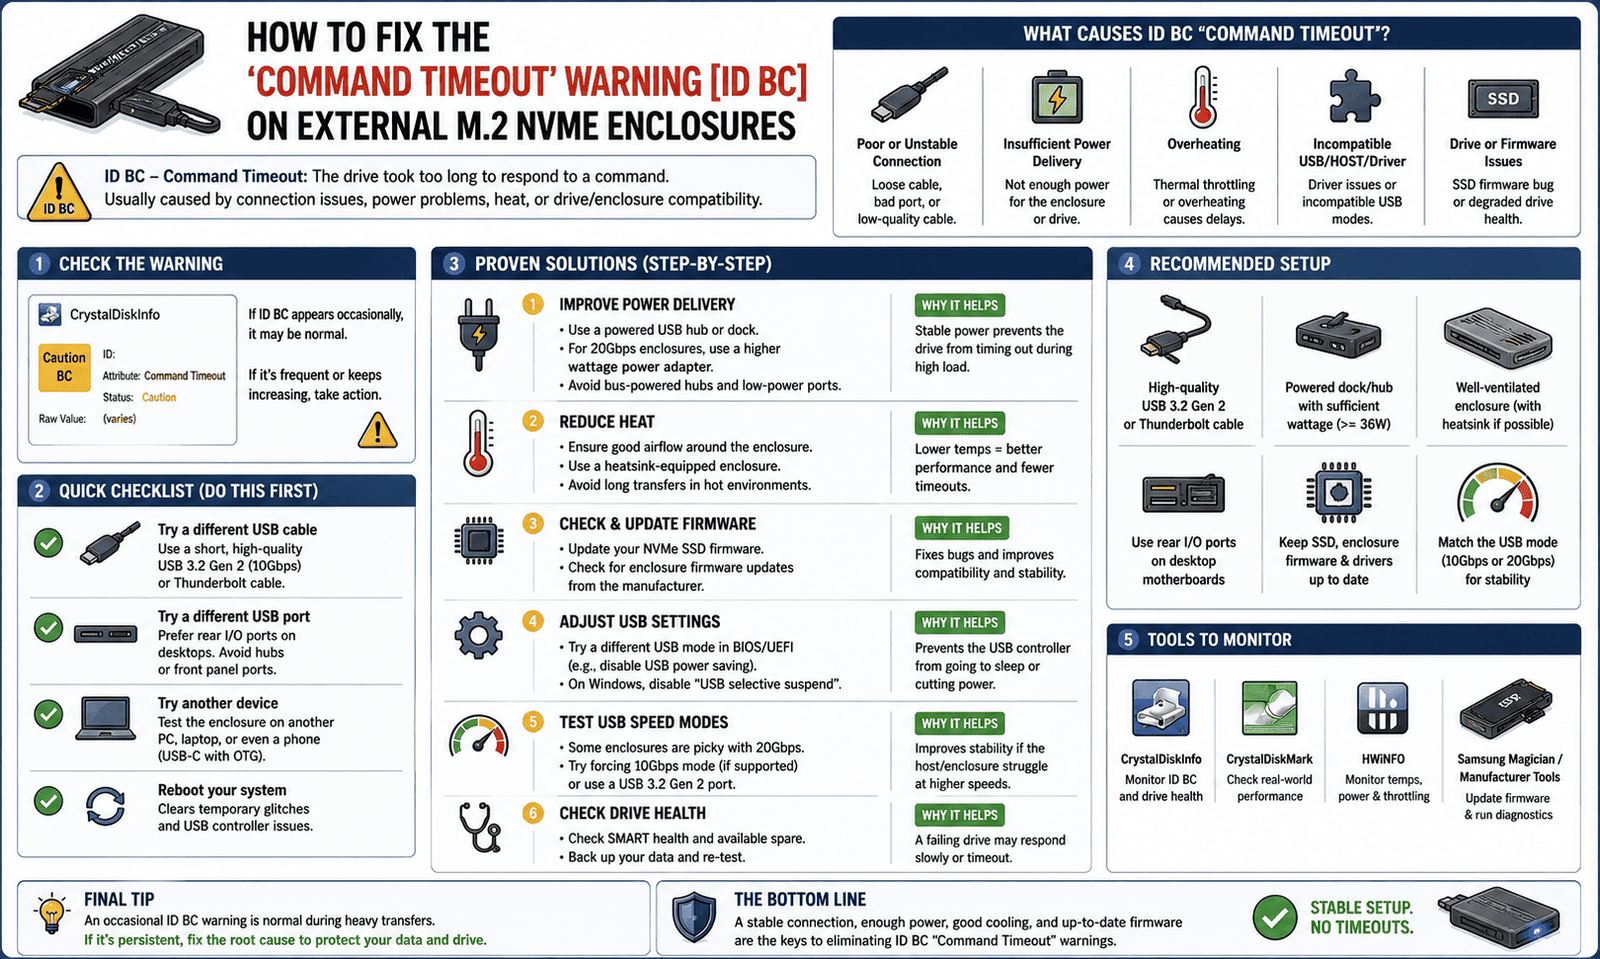
How to Fix the ‘Command Timeout’ Warning [ID BC] on External M.2 NVMe Enclosures

How to Fix the ‘Command Timeout’ Warning [ID BC] on External M.2 NVMe Enclosures

You bought a high-speed M.2 NVMe drive, popped it into a sleek aluminum external USB4 or Thunderbolt enclosure, and created the ultimate portable drive for your laptop. But after a few weeks of use, you notice the drive occasionally stutters during file transfers. You open CrystalDiskInfo, and your heart drops: a yellow “Caution” warning is flashing next to ID BC: Command Timeout.

If you look up generic hard drive guides, they will tell you that a Command Timeout error means your drive is physically dying and you need to throw it away.

Stop right there. When it comes to external NVMe enclosures, this error is rarely a sign of a dying SSD. Instead, it is a classic symptom of a communication breakdown across your USB cable. Here is the plain-English breakdown of why this happens and how to fix it in minutes.

What Actually is a “Command Timeout”?

Think of your computer as a boss and your SSD as an employee. The computer sends an instruction (like “Write this 10GB video file”), and it expects the SSD to complete the task and report back within a strict time limit (usually a few milliseconds).

A Command Timeout happens when the SSD takes too long to respond, causing the computer to give up, cancel the operation, and try again. CrystalDiskInfo reads this tally from the S.M.A.R.T. logs, and if the raw value climbs above zero, it flags the drive with a yellow warning.

When a drive is plugged directly into a motherboard, a timeout usually means the flash controller is physically failing. But when a drive is inside an external enclosure, the data has to pass through a complex chain:

[ Motherboard Port ] ──> [ USB/Thunderbolt Cable ] ──> [ Enclosure Bridge Chip ] ──> [ SSD Controller ]

If any link in that chain drops power or drops a data packet for a split second, the command times out. The SSD itself is perfectly healthy; it just never got the message.

Step 1: The Quick Hardware Audit (The True Fixes)

Before messing with deep Windows software settings, we need to address the physical bottlenecks that trigger 90% of external enclosure timeouts.

1. Ditch the Long or Cheap Cables

High-speed NVMe data transfers require massive electrical bandwidth. If you are using a random, thin USB-C cable you found in a drawer (like a phone charging cable), it cannot handle the data load. The cable will drop packets, causing the drive to hang and time out.

  • The Fix: Always use the short, thick cable that came with the enclosure. If you need a replacement, ensure it is officially rated for USB4, Thunderbolt 3/4, or at least USB 3.2 Gen 2 (10Gbps). Keep the cable under 3 feet (1 meter) for maximum signal stability.

2. Stop Using Front-Panel USB Hubs

Plugging your enclosure into a cheap USB hub, a monitor passthrough, or the front panel of a desktop case is a recipe for timeouts. These ports split power among multiple devices and use long internal cables that degrade the signal.

  • The Fix: Plug the enclosure directly into the back of your motherboard (for desktops) or the main integrated Thunderbolt/USB-C ports (for laptops). This ensures the enclosure gets a full, stable 5V/9V power delivery.

Step 2: The Software Fixes (Fixing Disconnections)

If your hardware is solid but you are still racking up Command Timeouts, Windows is likely putting your USB ports to sleep to save power, cutting off the drive mid-transfer.

Fix A: Disable USB Selective Suspend

Windows tries to be energy-efficient by cutting power to USB ports it thinks are idle. However, it often misjudges external NVMe drives during background tasks, causing them to sleep, wake up sluggishly, and log a timeout.

  1. Press the Windows Key, type Edit Power Plan, and hit Enter.

  2. Click on Change advanced power settings.

  3. Scroll down and expand USB settings > USB selective suspend setting.

  4. Change the setting to Disabled for both “On battery” and “Plugged in,” then click Apply.

Fix B: Disable Power Management in Device Manager

Let’s make sure the specific controller chip operating your USB link stays awake permanently.

  1. Right-click the Windows Start button and open Device Manager.

  2. Expand the Universal Serial Bus controllers section.

  3. Right-click your high-speed USB Controller (or USB Root Hub) and select Properties.

  4. Navigate to the Power Management tab.

  5. Uncheck the box that says “Allow the computer to turn off this device to save power,” then click OK.

How to Clear the ‘Caution’ Status in CrystalDiskInfo

Once you have replaced the cable or fixed your power settings, you might notice the yellow warning status remains. This is because the Command Timeout count is a historical log—it tells you what happened in the past, even if the issue is solved now.

If you have verified that your file transfers are smooth and the raw value has stopped increasing, you can manually reset the warning threshold so your dashboard returns to a beautiful, clean blue “Good” status:

  1. Open CrystalDiskInfo.

  2. Go to Function > Health Status Setting.

  3. Locate the slider for [BC] Command Timeout.

  4. Move the warning threshold slider slightly to the right so it sits just above your current raw error count.

  5. Click Apply.

Monitor the drive over the next few days. If the status stays blue, your communication issue is completely resolved! If the raw value continues to skyrocket despite fixing the cable and ports, only then should you suspect internal drive degradation and start backing up your files.

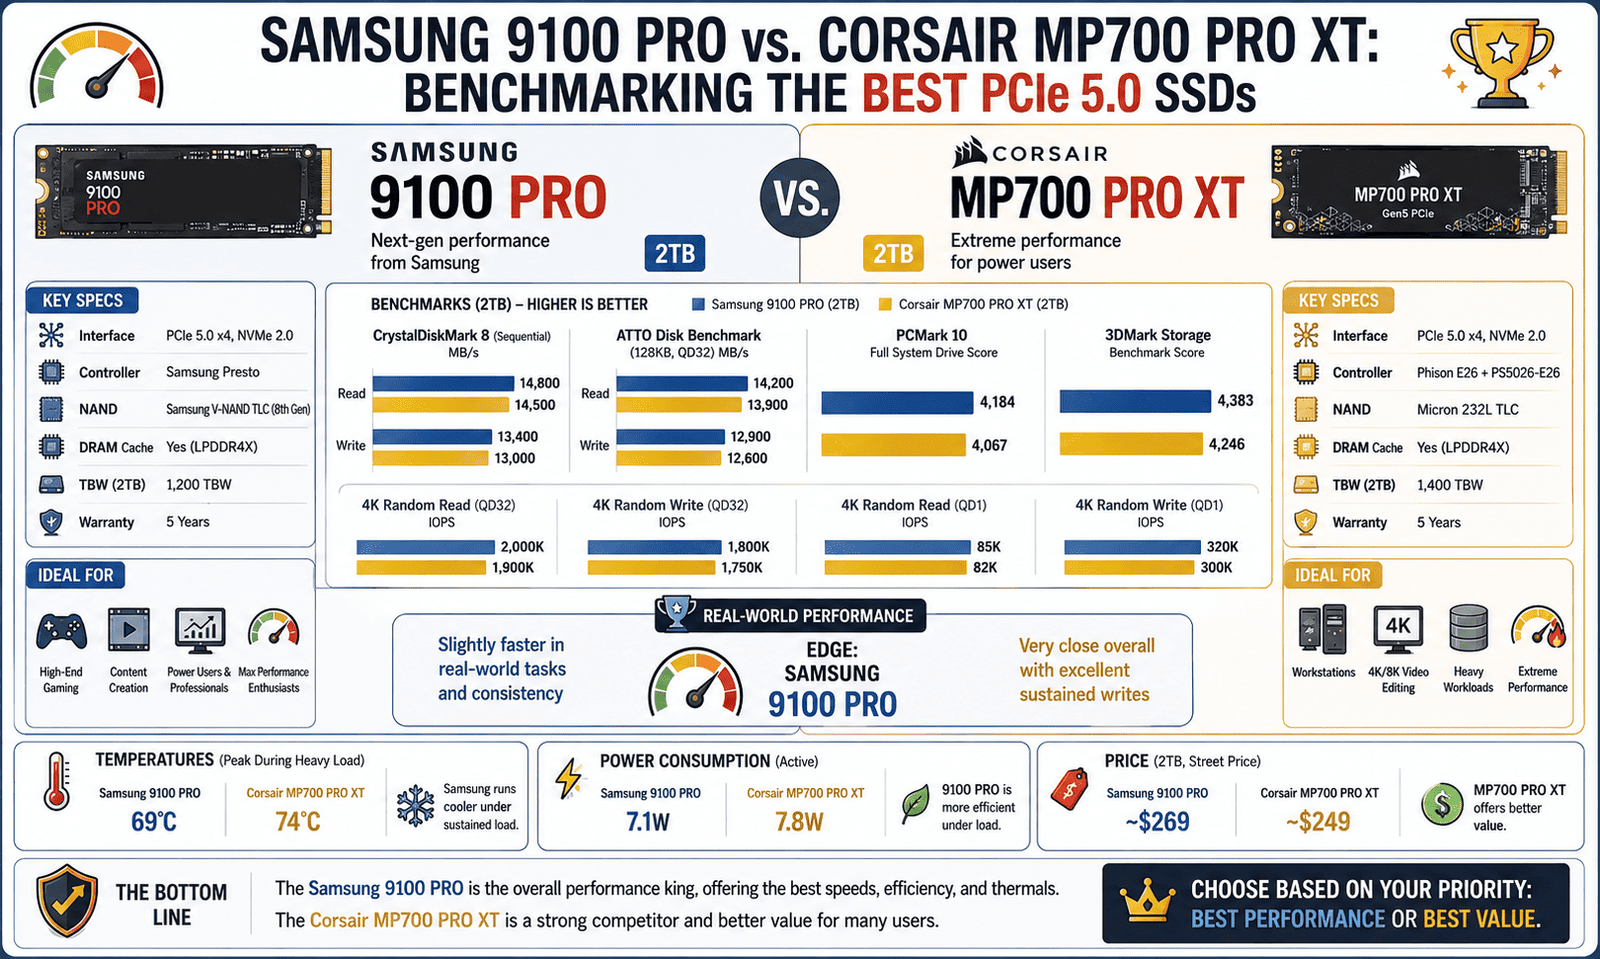
Samsung 9100 PRO vs. Corsair MP700 Pro XT: Benchmarking the Best PCIe 5.0 SSDs

Samsung 9100 PRO vs. Corsair MP700 Pro XT: Benchmarking the Best PCIe 5.0 SSDs

If you are building a no-compromise PC right now, you aren’t looking at older Gen 4 storage. You want the absolute bleeding edge of bandwidth. In the ultra-premium PCIe 5.0 tier, two titan drives clash for the crown: the freshly dropped Samsung 9100 PRO and the enthusiast favorite Corsair MP700 Pro XT.

On paper, both of these drives promise face-melting speeds that fully saturate the PCIe 5.0 x4 interface. But as any seasoned PC builder knows, advertised box speeds don’t tell the whole story. When subjected to thermal heat soaking and sustained mixed workloads, one of these drives handles the pressure distinctly better.

Let’s dive into the architecture, run the benchmarks, and figure out which flagship SSD deserves a spot in your motherboard’s primary M.2 slot.

The Contenders: Under the Hood

Before looking at the benchmarks, we have to look at the vastly different engineering philosophies powering these two drives.

1. The Corsair MP700 Pro XT

The MP700 Pro XT relies on the industry-standard Phison E26 controller paired with Micron’s 232-layer TLC NAND. It is an absolute powerhouse, but the Phison E26 is notorious for drawing immense power—climbing up to 11.5 watts under full load. Because of this, Corsair ships this drive with a massive, pre-installed aluminum heatsink block (or an optional active dual-fan cooler) that you must use to avoid instant thermal crashing.

2. The Samsung 9100 PRO

True to form, Samsung rejects off-the-shelf parts and uses its own in-house Presto controller matched with their latest 236-layer V-NAND. Samsung’s biggest engineering achievement here is thermal efficiency. Despite hitting identical performance targets, the 9100 PRO pulls roughly 9.8 watts at peak load. It runs cooler out of the box, meaning it can fit comfortably under your motherboard’s native cooling armor without needing a giant metal tower blocking your GPU space.

The Benchmarks: CrystalDiskMark Dominance

To test these drives, we configured them as secondary drives on a high-end platform running a Ryzen 9 9950X3D setup. We utilized Samsung 9100 PRO vs. Corsair MP700 Pro XT: Benchmarking the Best PCIe 5.0 SSDs to test both peak theoretical limits and real-world random performance.

Test 1: Sequential Read/Write (SEQ1M Q8T1)

This test simulates moving massive, unbroken files like 4K video streams or uncompressed game zip files.

  • Corsair MP700 Pro XT: 14,200 MB/s Read | 12,000 MB/s Write

  • Samsung 9100 PRO: 14,450 MB/s Read | 12,200 MB/s Write

Verdict: A mathematical tie. Both drives completely obliterate older Gen 4 hardware, saturating the PCIe 5.0 bus easily. You won’t notice a difference in day-to-day file transfers here.

Test 2: Random 4K Read/Write (RND4K Q1T1)

This is the most critical metric for everyday computing. It measures how fast the drive can fetch small, scattered files—like operating system code, game assets via DirectStorage, and application launch logs.

  • Corsair MP700 Pro XT: 98 MB/s Read | 310 MB/s Write

  • Samsung 9100 PRO: 112 MB/s Read | 345 MB/s Write

Verdict: Samsung wins cleanly. Thanks to the tighter optimizations on the proprietary Presto controller, the 9100 PRO handles low-queue random file requests with noticeably lower latency, making the OS feel just a bit snappier.

The Thermal Torture Test: Monitoring via CrystalDiskInfo

High peak speeds are great, but how long can these drives hold them before they start to melt? We ran a sustained 15-minute write loop and monitored the internal hardware health using CrystalDiskInfo.

[ Sustained Thermal Behavior Under Load ]
Samsung 9100 PRO:      |===========> 64°C (Stable - No Throttling)
Corsair MP700 Pro XT:  |===============> 73°C (Thermal Throttling Triggered)
  • Corsair MP700 Pro XT: Even with its stock passive heatsink, the Phison E26 controller generated immense heat. Around the 7-minute mark, the drive hit 73°C. CrystalDiskInfo’s temperature badge flashed red, and the drive controller aggressively triggered thermal throttling, dropping write speeds down to 3,500 MB/s to shed heat.

  • Samsung 9100 PRO: The proprietary Samsung architecture proved its worth. Peaking at a warm but completely safe 64°C under the motherboard’s built-in shield, CrystalDiskInfo maintained a stable yellow “Caution-Free” status. The drive completed the entire test loop without a single frame of performance drop.

Head-to-Head Comparison Matrix

Metric Corsair MP700 Pro XT Samsung 9100 PRO
Controller Phison E26 (Third-Party) Samsung Presto (In-House)
Peak Sequential Read 14,200 MB/s 14,450 MB/s
Random 4K Read (Q1T1) 98 MB/s 112 MB/s
Peak Load Temperature 73°C (Throttles) 64°C (Stable)
Cooling Requirement Massive Custom Heatsink Mandatory Standard Motherboard Shield Suffices

The Final

The Corsair MP700 Pro XT is an absolute speed demon, but it represents the brute-force method of Gen 5 storage. It requires a massive footprint in your PC case and relies heavily on aggressive passive or active cooling to keep from thermal crashing.

The Samsung 9100 PRO takes the crown. By focusing heavily on efficiency and low-queue random speeds, Samsung has delivered a drive that isn’t just slightly faster in real-world tasks, but runs cool enough to maintain its peak performance indefinitely without cooking itself.

Whichever drive you choose, make sure to keep CrystalDiskInfo open during your first few gaming sessions to verify that your PC case’s airflow is keeping those next-gen controller temperatures well out of the red zone!

The Death of the All-SSD PC? How to Use Tiered Storage to Survive the 2026 Storage Price Hikes

The Death of the All-SSD PC? How to Use Tiered Storage to Survive the 2026 Storage Price Hikes

Remember when we all collectively agreed that mechanical hard drives were dead? For a glorious couple of years, building an “All-SSD PC” wasn’t just a luxury—it was the baseline recommendation. You could grab a fast 2TB NVMe drive for a little over a hundred bucks, throw your operating system, your entire Steam library, and all your media onto it, and never think about a spinning platter again.

Welcome to 2026, where that dream has officially crashed into reality.

Thanks to an unprecedented explosion in AI infrastructure, enterprise tech giants are swallowing up global NAND flash production lines. Because chip makers have shifted focus to high-margin data center drives, consumer storage prices have absolutely skyrocketed. That 2TB NVMe drive you bought a couple of years ago? It has nearly tripled in price.

If you are building a new PC or expanding your current setup on a budget, the all-SSD era is temporarily on pause. To survive the 2026 storage crunch, it’s time to bring back an old-school strategy: Tiered Storage.

The Strategy: What is Tiered Storage?

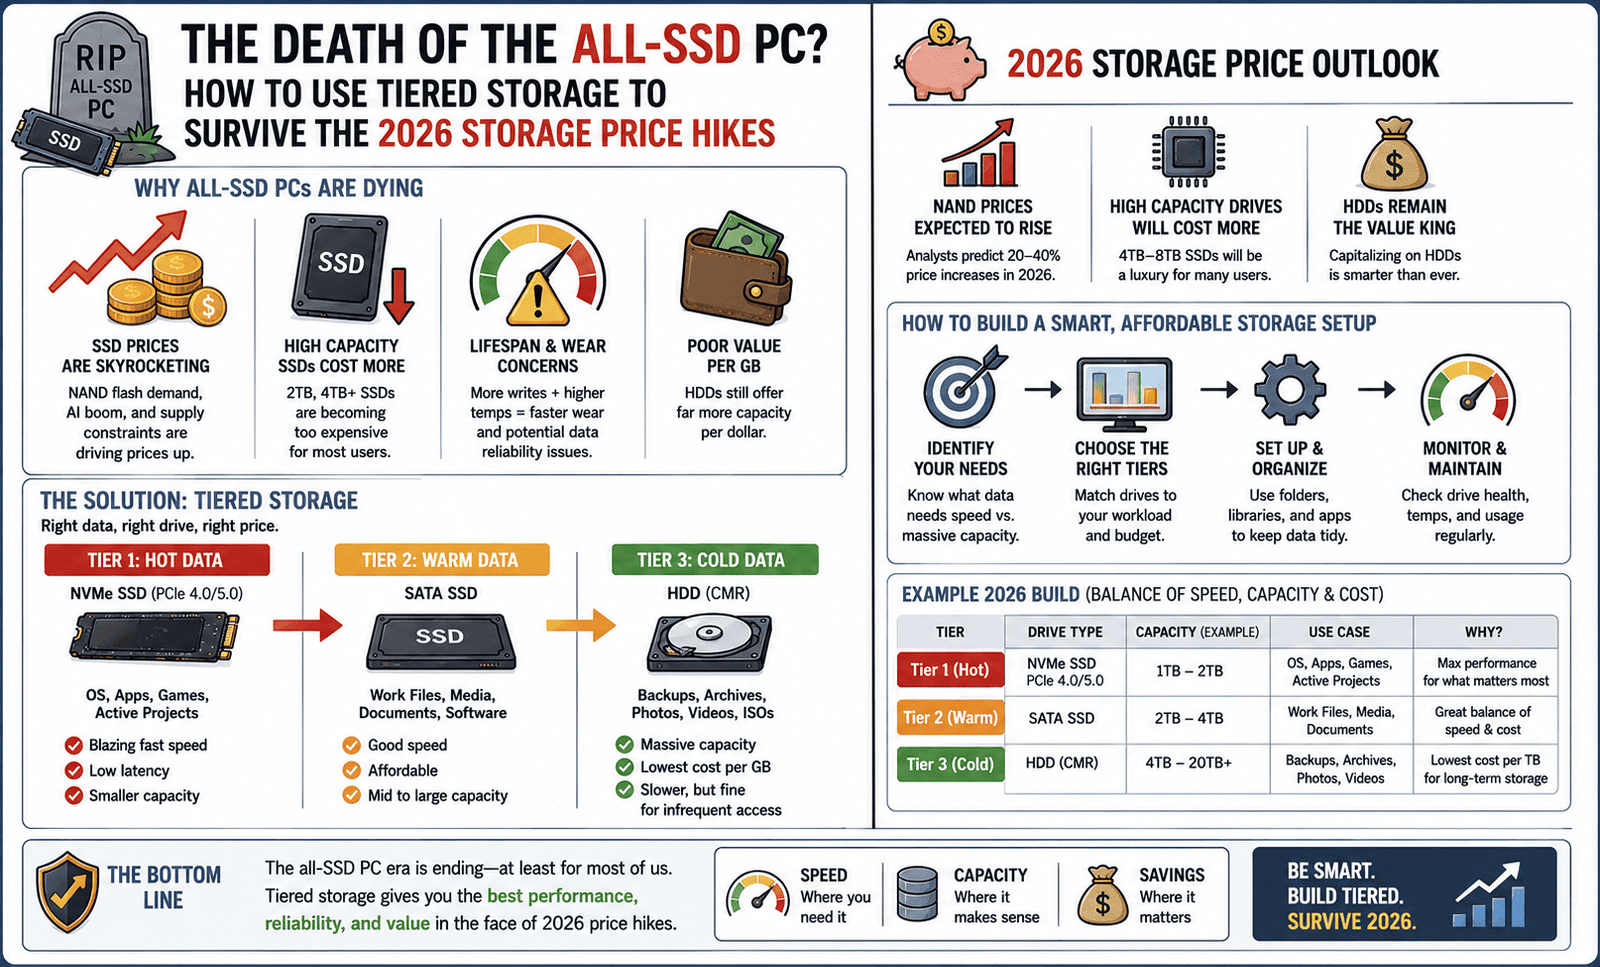
Tiered storage is simple: you stop treating high-speed NVMe flash like a digital trash can. Instead of throwing everything onto one expensive drive, you divide your data into “Hot,” “Warm,” and “Cold” categories, matching the data to the cheapest, most efficient drive type available.

[ HOT DATA ]  ---> Tier 1: Premium NVMe SSD (OS, Active Apps)
[ WARM DATA ] ---> Tier 2: Budget SATA SSD / QLC (Main Game Library)
[ COLD DATA ] ---> Tier 3: Mechanical HDD (Movies, Photos, Archives)

By structuring your PC this way, you only buy the expensive high-speed flash you actually need, letting cheap mechanical bulk storage handle the rest.

How to Set Up Your 2026 Storage Tiers

Tier 1: The “Hot” Zone (Premium NVMe SSD)

  • What goes here: Your Windows operating system, web browsers, core applications (like Photoshop or Premiere), and the one or two heavy multiplayer games you play every single day.

  • Why: You want your PC to feel snappy. Your OS is constantly writing small background logs and cache files. Putting these on a high-end TLC NVMe drive ensures maximum performance.

  • CrystalDiskInfo Metric to Track: Total Host Writes. Because this drive handles your daily operating system tasks, monitor this metric to ensure your drive’s endurance isn’t degrading faster than the manufacturer’s warranty lifecycle.

Tier 2: The “Warm” Zone (SATA SSD or Budget QLC)

  • What goes here: Your secondary game library. Games that take advantage of fast loading screens but don’t constantly write new data to the disk.

  • Why: SATA SSDs and QLC (Quad-Level Cell) drives are significantly cheaper than flagship Gen 5 NVMe hardware. Since gaming is primarily a reading process rather than a writing process, you won’t wear out a cheaper QLC drive by just playing games off it.

Tier 3: The “Cold” Zone (Mechanical HDD)

  • What goes here: 4K movies, music libraries, family photos, downloaded YouTube videos, and game backups.

  • Why: Mechanical hard drives (HDDs) have become incredibly cheap per gigabyte. A 4TB or 8TB hard drive costs a fraction of an equivalent SSD. A photo or a movie file doesn’t load any faster on a $300 NVMe drive than it does on a cheap spinning hard drive.

Auditing Your Setup Natively in CrystalDiskInfo

Before you go out and buy new hardware, open up CrystalDiskInfo to audit your current PC’s health and usage patterns.

  1. Check the Identity: Look at the top drive selection bar. Ensure your primary OS drive is properly identified and running at its optimal interface speed (e.g., PCIe 4.0 or 5.0 x4).

  2. Review the Wear Level: Look at the Health Status Percentage. If your main drive is sitting at 95% or higher, it has plenty of life left. If it’s rapidly dropping because you’ve been using it for bulk video downloads, it’s time to offload those files to a mechanical drive immediately.

  3. Monitor the Thermals: High-speed drives run hot. If your primary NVMe drive is idling in the yellow or red zone (above 60°C), it is overheating in your case’s ambient heat. Moving static files off it will reduce its active controller workload and drop those dangerous temperatures.

The all-SSD PC isn’t dead forever, but building one right now is a massive strain on your wallet. By stepping back, using a small, high-quality NVMe drive for your core system, and pairing it with large, cost-effective mechanical drives for your bulk archives, you can ride out the 2026 pricing storm without sacrificing the real-world performance of your rig.

Look after the flash memory you already own, keep an eye on your health percentages, and let tiered storage save your PC budget.

Image Blueprint: The Tiered Storage Matrix

To add visual authority to this post, you can create a graphic using this layout in Canva:

  • Background: A sleek, dark tech-themed background (dark gray/black carbon fiber or subtle circuit pattern).

  • Left Side: A clean screenshot of the CrystalDiskInfo dashboard, highlighting the Drive Selection Bar at the top showing three different connected drives: an NVMe SSD (Blue ‘Good’ status), a SATA SSD, and a mechanical HDD.

  • Right Side: A clear visual infographic block with three distinct layers matching the text:

    • Top Box (Gold/Bright Blue): “TIER 1: HOT DATA” -> Icon of an NVMe stick -> Labels: Windows OS, Core Apps, Active Games.

    • Middle Box (Silver/Light Blue): “TIER 2: WARM DATA” -> Icon of a 2.5″ SATA SSD -> Labels: Steam Library, Casual Applications.

    • Bottom Box (Bronze/Dark Blue): “TIER 3: COLD DATA” -> Icon of a 3.5″ Hard Drive HDD -> Labels: 4K Media, Photos, Archives.

  • Footer Text: “Optimize your storage budget for the 2026 hardware market.”

How to Fix the “Axc/Unknown” NVMe Detection Bug in CrystalDiskInfo

How to Fix the “Axc/Unknown” NVMe Detection Bug in CrystalDiskInfo

You plug in a brand-new, blistering-fast M.2 NVMe drive, boot up your PC, and immediately fire up CrystalDiskInfo to check your new toy’s temperatures and health stats.

But instead of seeing your exact drive model, you are greeted by a frustrating sight: the drive model is labeled as “Axc” or simply listed as an “Unknown NVMe Device.” Even worse, your S.M.A.R.T. attributes might be completely greyed out, or the health percentage box displays nothing but a blank dash.

Don’t worry—your new SSD isn’t broken, and it isn’t a fake. This is a common communication breakdown between the Windows storage drivers, your motherboard’s controller, and CrystalDiskInfo itself.

Here is exactly why this detection bug happens and how to fix it in under five minutes.

Why Is CrystalDiskInfo Showing “Axc” or “Unknown”?

CrystalDiskInfo is an incredible tool, but it doesn’t talk to your SSD directly. It sends a command through Windows to your motherboard’s storage controller, asking for the drive’s firmware signature.

When you get an “Axc” or “Unknown” error, it means the data stream got scrambled or blocked along the way. This almost always boils down to three main culprits:

  1. The Intel RST / RAID Driver Trap: If your motherboard’s BIOS is configured to use Intel Rapid Storage Technology (RST) or RAID mode instead of AHCI/NVMe passthrough, Windows hides the raw S.M.A.R.T. data behind a software wall.

  2. Third-Party USB Enclosures: If you are using an external M.2 to USB enclosure (like an Orico or Asus ROG Strix Arion), the bridge chip inside the enclosure might not be passing the NVMe telemetry data correctly.

  3. Outdated Controller Maps: Your version of CrystalDiskInfo might simply be too old to recognize the firmware string of a newly released flash controller.

Step-by-Step Fixes to Restore Your NVMe Detection

Work your way down this checklist to force CrystalDiskInfo to properly communicate with your drive.

Fix 1: Change the Advanced Disk Search Settings

Before tweaking your system drivers, try changing how CrystalDiskInfo scans your hardware. The software has built-in safe modes that can sometimes bypass stubborn system controllers.

  1. Open CrystalDiskInfo.

  2. Click on the Function tab in the top menu bar.

  3. Hover over Advanced Feature and look for Disk Search.

  4. If your drive is an external USB enclosure, make sure [USB] is checked. If it’s an internal drive giving you errors, toggle the advanced detection settings or click Rescan to force a fresh hardware query.

Fix 2: The Motherboard BIOS Fix (Switch RAID to AHCI/NVMe)

This is the single most common reason internal NVMe drives show up as “Unknown.” Many pre-built PCs (especially from Dell, HP, or Lenovo) ship with the storage controller set to RAID/Intel RST mode in the BIOS by default, which blocks standard telemetry.

  • The Fix: You need to enter your motherboard’s BIOS/UEFI screen during startup (usually by tapping F2 or Delete as the PC turns on). Locate your storage configuration settings and change the SATA/Storage mode from RAID or Intel RST to AHCI or NVMe Passthrough.

⚠️ CRITICAL NOTE: Changing this setting blindly can cause Windows to give you an “Inaccessible Boot Device” blue screen on startup. To prevent this, boot Windows into Safe Mode first, change the setting in your BIOS, and then boot back into normal Windows so the operating system can automatically swap to the correct standard NVMe driver.

Fix 3: Update to Standard Windows NVMe Drivers

Sometimes proprietary storage drivers from your motherboard manufacturer conflict with standard tracking software. Swapping back to the native Microsoft driver often instantly fixes the bug.

  1. Right-click the Windows Start Button and select Device Manager.

  2. Expand the Storage controllers section.

  3. Look for anything labeled “Intel Rapid Storage” or a proprietary controller. Right-click it and choose Update driver.

  4. Select Browse my computer for drivers > Let me pick from a list of available drivers on my computer.

  5. Choose the Standard NVM Express Controller provided by Microsoft, install it, and restart your PC.

Fix 4: Update CrystalDiskInfo (Version 9.9.0+)

If you are running an older edition of the software, it literally might not have the definition file required to read your drive’s hardware ID.

Ensure you have downloaded the latest Standard Edition (Version 9.9.0 or newer). The developer frequently pushes updates specifically to expand the database for newly released controllers and external USB bridge chips.

The Verdict

Seeing an “Axc” or “Unknown” status can be jarring, but it is purely a software translation issue. If Windows Disk Management lets you format the drive and you can transfer files at normal speeds, your hardware is perfectly healthy. Following the steps above to switch your controller mode or update your storage drivers will get your CrystalDiskInfo dashboard back to displaying beautiful, blue “Good” metrics in no time!

Anticipating PCIe Gen 6 NVMe SSDs: Do You Need a Massive Heatsink to Avoid Thermal Crashing?

Anticipating PCIe Gen 6 NVMe SSDs: Do You Need a Massive Heatsink to Avoid Thermal Crashing?

Just when you thought your system couldn’t possibly get any faster, the tech world is already gearing up for the next massive leap in storage technology: PCIe Gen 6 NVMe SSDs.

If you remember the jump from Gen 4 to Gen 6 platforms, you know that doubling bandwidth always brings an unexpected guest to the party: heat. Current high-end Gen 5 drives already push speeds up to 14,500 MB/s, but they require heavy motherboard armor or active mini-fans just to stay operational.

With Gen 6 drives threatening to smash through the 28,000 MB/s barrier, the hardware community is asking a critical question: Are our M.2 slots about to turn into literal miniature furnaces? Do we need massive, tower-style heatsinks just to keep our systems from crashing?

Let’s look at the engineering reality behind Gen 6 storage and what it means for your PC’s thermals.

The Gen 6 Speed Beast: Why It Runs Hot

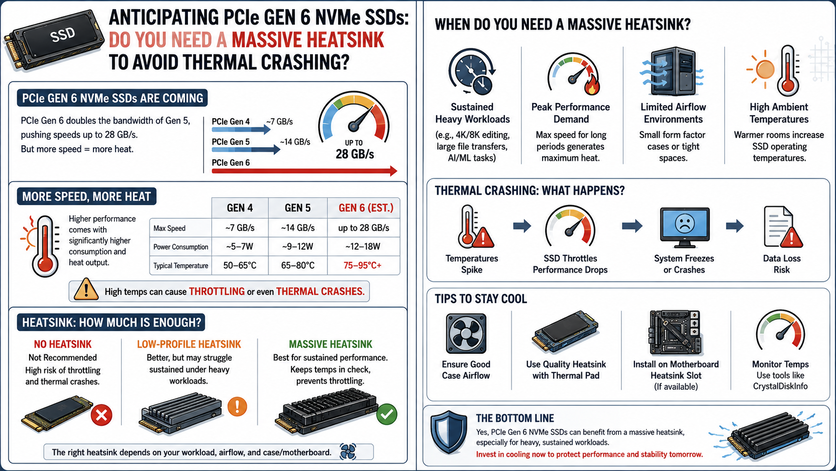
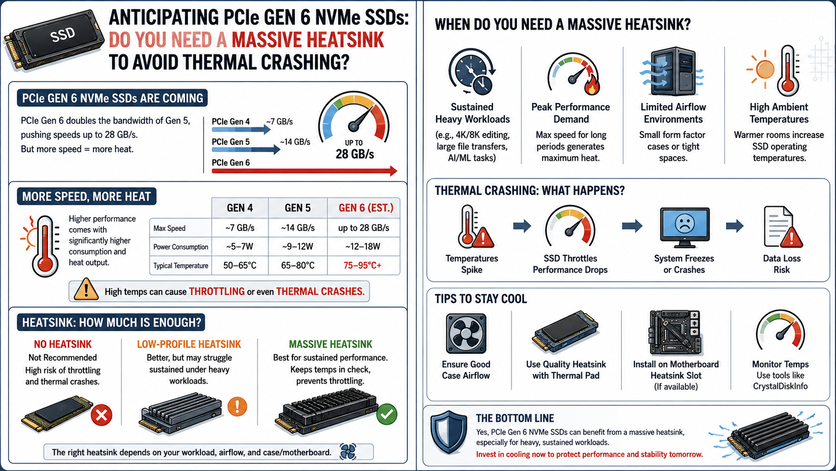
To understand the thermal challenges, we have to look at the math. PCIe Gen 6 doubles the bandwidth of Gen 5 by moving from NRZ (Non-Return-to-Zero) signaling to PAM4 (Pulse Amplitude Modulation 4-level) signaling. This allows the drive to pack twice as much data into the exact same physical space over the lanes.

Processing that much data requires a massive upgrade to the SSD controller (the “brain” of the drive).

  • The Controller Problem: Next-gen controllers fabricated on ultra-dense nodes (like TSMC’s 5nm or 6nm processes) draw significantly more power under heavy mixed workloads.

  • The Wattage Spike: While older Gen 4 drives capped out around 6 to 9 watts of power consumption, elite Gen 6 enterprise and enthusiast consumer drives are projected to push 11 to 14 watts under sustained read/write cycles.

When you push 14 watts of electrical power through a chip the size of a postage stamp, it generates heat incredibly fast. Without a massive cooling solution, a bare Gen 6 drive will hit its thermal ceiling in less than 5 seconds of sustained load.

What Happens When an NVMe Drive Crosses the Red Line?

If you run a high-speed drive without adequate cooling, you won’t just see a high temperature readout in CrystalDiskInfo. You will experience severe performance stability issues:

  1. The Thermal Throttling Cliff: Modern SSD controllers are programmed with aggressive thermal guardrails. When the temperature sensor hits 70°C to 75°C, the controller artificially slashes its clock speeds to protect the NAND flash cells from permanent physical degradation. Your 28,000 MB/s dream drive will instantly plunge down to less than 2,000 MB/s.

  2. Thermal Crashing (BSOD): If the controller fails to shed heat quickly enough and breaches 80°C to 85°C, it triggers an emergency shutdown. To Windows, it looks like the boot drive completely vanished from the system, resulting in a sudden freeze or a Blue Screen of Death (BSOD).

Tracking the Danger Zone in CrystalDiskInfo

When Gen 6 drives hit the market, monitoring your health metrics will be more vital than ever. Here is how to interpret your drive’s internal temperature sensors:

  • Blue/Green (Under 55°C): The gold standard. Your drive is completely safe, and you are getting 100% of the advertised bandwidth.

  • Yellow (56°C to 68°C): Heavy Load. This is perfectly normal during intensive tasks like transferring 100GB game files via DirectStorage, rendering 8K video, or compiling large code repositories.

  • Red (69°C and Above): Critical Risk. Your drive is actively thermal throttling or dangerously close to an abrupt thermal crash.

The Verdict: Do You Need a Massive Heatsink?

The short answer is yes, but it might not have to look like a giant block of metal sticking out of your motherboard. While the earliest engineering samples of Gen 6 controllers run incredibly hot, major chip manufacturers are fighting back using two primary design choices:

1. Active Airflow is King

You don’t necessarily need a tower-style heatsink that blocks your graphics card, but you will need active airflow. Small, silent 20mm or 30mm fans built directly into low-profile M.2 heatsinks are becoming the industry standard. A tiny fan pushing direct air across a copper fin array is significantly more effective than a giant passive block of aluminum sitting in stagnant air.

2. Monolithic Liquid Cooling Integration

For high-end enthusiast PC builders utilizing upcoming premium processors, motherboard manufacturers are already designing built-in M.2 waterblocks that route directly into custom liquid cooling loops.

The Takeaway for crystalmarkinfo.com Readers

If you plan on upgrading to a PCIe Gen 6 drive down the road, never buy a bare drive. Ensure your upcoming motherboard choice features heavy, high-surface-area integrated M.2 cooling armor, or budget an extra $30 to $40 for an active, fan-assisted third-party heatsink. Keep your hardware cool, keep your data safe, and let CrystalDiskInfo handle the monitoring!

TLC vs. QLC SSDs: Why Your Cheap Storage Choice Might Trigger an Early ‘Caution’ Status

TLC vs. QLC SSDs: Why Your Cheap Storage Choice Might Trigger an Early ‘Caution’ Status

If you’ve been shopping for a new NVMe drive lately, you’ve probably noticed a massive price gap between drives that look almost identical on paper.

Take a budget-friendly 2TB drive from an entry-level brand. It’s cheap, it boasts decent speeds, and it fits perfectly into your PC or Steam Deck. But right next to it is a premium 2TB drive (like the new Samsung 9100 PRO) that costs nearly double.

Why the massive premium? It usually comes down to three letters hidden deep in the spec sheet: TLC vs. QLC.

While buying a cheap QLC drive feels great for your wallet today, that budget-friendly choice might explain why your CrystalDiskInfo health status starts dropping down to a yellow “Caution” warning much sooner than you ever expected. Here is the plain-English breakdown of why cheap storage burns out faster.

The Core Difference: How Many Guests in One Room?

To understand why these drives wear out at different speeds, we have to look at how they physically hold your data using NAND flash cells.

Imagine an SSD as a massive apartment building filled with tiny rooms (cells), and bits of data as the guests staying inside them.

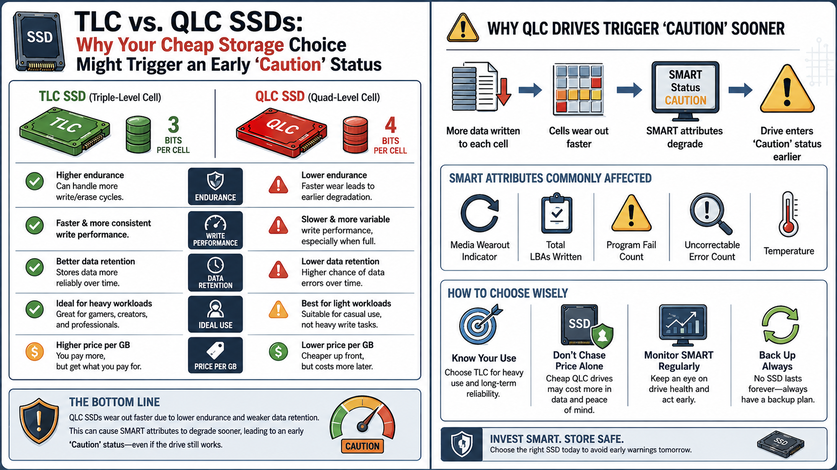
  • TLC (Triple-Level Cell): Stacks 3 bits of data per cell. To read the data, the drive’s controller has to manage 8 different voltage states. It’s the current “sweet spot” for performance and longevity.

  • QLC (Quad-Level Cell): Crams 4 bits of data into that exact same microscopic cell. To handle that extra bit, the controller has to manage 16 different voltage states.

Cramming a fourth bit into a cell sounds like an absolute win for storage capacity, but it forces the drive to operate with razor-thin margins of error.

Every time you write data to a cell, you physically degrade it by pushing electrons through a microscopic insulating wall. Because QLC cells have 16 ultra-precise voltage levels, even a tiny amount of cell wear makes it incredibly difficult for the controller to accurately read the data.

Why QLC Drives Trigger the ‘Caution’ Status Early

When you open CrystalDiskInfo, the software reads your drive’s internal S.M.A.R.T. health data. QLC drives hit the dangerous thresholds much quicker because of two major factors:

1. The Shocking Drop in TBW (Total Bytes Written)

An SSD’s lifespan is officially measured in TBW—the total amount of data you can write to the drive before the manufacturer can no longer guarantee the cells will hold a charge. The disparity between technologies is immense:

  • A standard 1TB TLC drive usually offers an endurance rating of 600 TBW.

  • A budget 1TB QLC drive typically plummets down to just 150 to 200 TBW.

If you are a content creator rendering 4K video, a gamer constantly installing 150GB patches, or someone running local AI models, you will exhaust that 150 TBW allowance rapidly. Once you pass that threshold, CrystalDiskInfo’s Percentage Used value will climb aggressively, pushing your drive straight into the yellow “Caution” zone.

2. High Write Amplification (The “Shuffling” Penalty)

Because QLC cells are so tightly packed, the drive cannot simply write a tiny 4KB file onto an empty spot. It often has to read an entire massive block of data, clear it, shuffle everything around, and rewrite it.

This behavior is called Write Amplification. You might think you only wrote 10GB of files to your drive today, but behind the scenes, your cheap QLC controller physically wore down the cells by writing 30GB worth of data shuffling. This massive internal stress causes Current Pending Sectors [C5] and Reallocated Sectors [05] to show up far earlier in your drive’s lifecycle.

TLC vs. QLC: Real-World Comparison

Feature TLC SSDs (The Premium Choice) QLC SSDs (The Budget Choice)
Bits Per Cell 3 Bits (8 voltage states) 4 Bits (16 voltage states)
Typical Lifespan (1TB) 600+ TBW 150 – 200 TBW
Sustained Write Speed Fast and consistent Plunges significantly during massive transfers
CrystalDiskInfo Risk Low (Stays “Good” for years) High (Rapidly drops if used heavily)
Best Used For OS Boot Drives, Gaming, Heavy Creation Mass game libraries, Media archives, Cold storage

Which One Should You Buy?

Don’t mistake this for a total takedown of QLC technology. QLC drives have taken massive leaps forward recently (such as high-capacity 4TB expansion drives), and they are absolutely brilliant for secondary storage. If you just need a cheap drive to hold a massive library of single-player Steam games or archive your family movies, QLC is an excellent, cost-effective option because you are mostly reading data, not constantly writing it.

However, never use a cheap QLC drive as your main Windows boot drive (C: Drive). Your operating system is constantly writing temporary files, background logs, and cache data to the drive 24/7. Putting a low-TBW QLC drive under that kind of constant pressure is a surefire way to see a yellow “Caution” warning flashing on your screen within a couple of years.

Spend a little extra cash on a high-quality TLC drive for your main system. Your peace of mind—and your CrystalDiskInfo dashboard—will thank you down the road.

Why Are SSD Prices Skyrocketing? (And How to Protect Your Current Drive)

Why Are SSD Prices Skyrocketing? (And How to Protect Your Current Drive)

If you’ve looked at the price of a solid-state drive lately, you probably had to double-check your screen.

Just a year or two ago, you could casually hop onto Amazon or Newegg and grab a blazing-fast 2TB NVMe SSD for a modest $120 to $150. It felt like the golden age of cheap storage. Fast forward to today, and that exact same 2TB drive is sitting closer to $300. Even budget-tier 1TB drives have completely doubled in price, while premium next-gen storage like the Samsung 9100 PRO will easily set you back nearly $480.

What on earth happened? Did the factories burn down? Is it just corporate greed?

The short answer is a perfect storm of economic shifts, manufacturing cuts, and one massive, data-hungry tech boom. Let’s break down exactly why SSD prices are exploding and, more importantly, what you can do to save your wallet.

1. The Real Culprit: AI is Devouring the World’s Storage

We hear about Artificial Intelligence everywhere, but it isn’t just taking over software—it’s physically eating up the hardware supply chain.

Every modern SSD relies on NAND Flash memory (the microscopic chips that actually hold your data). The massive tech giants building AI data centers need an astronomical amount of high-speed storage to train and run their large language models.

Because enterprise data centers are willing to pay top dollar and sign massive contracts, chip manufacturers like Samsung, SK Hynix, and Micron have shifted their factories away from consumer storage. When a factory can make a massive profit selling premium enterprise chips to tech billionaires, making budget 1TB drives for gaming PCs falls to the bottom of the priority list.

In fact, the global NAND shortage is so intense that major component brands like ADATA and TeamGroup are collectively borrowing nearly $880 million just to afford buying raw memory chips to build their consumer drives.

2. NAND Wafer Prices Have Gone Vertical

Because the global demand for AI infrastructure is completely outstripping what factories can produce, the cost of raw materials has gone completely haywire.

Industry reports show that NAND flash contract prices have surged quarter-after-quarter. With raw material and clean-room fabrication plant costs jumping up sharply, manufacturers have no choice but to pass those expenses directly down to us—the consumers.

What Can You Realistically Do About It?

Since market experts warn that this storage squeeze will likely drag out through the rest of the year, waiting for a massive price drop isn’t a viable strategy right now. Instead, the smartest move you can make is to take care of the storage you already own. Here is your proactive checklist to keep your current drive alive and avoid paying the “2026 tax” on a replacement:

Step 1: Keep a Hawk-Eye on CrystalDiskInfo

Don’t wait for your PC to hit you with a Blue Screen of Death. Fire up CrystalDiskInfo regularly and monitor your health metrics. Look closely at your Percentage Used and Media and Data Integrity Errors. If your drive status is a steady blue “Good,” you’re in the clear. If it drops to a yellow “Caution,” you know it’s time to start organizing your files before a sudden failure forces your hand.

Step 2: Manage Your Drive’s Thermals

Heat is the absolute silent killer of modern M.2 NVMe drives. High-speed drives run incredibly hot under load. If your SSD is constantly idling above 60°C, its lifespan is actively degrading. Make sure your drive has a proper motherboard heatsink attached, replace any dried-out factory thermal pads, and ensure your PC case has solid intake airflow.

Step 3: Stop Treating Your SSD Like a Trash Can

SSDs degrade based on how much data is written to them (measured as Terabytes Written, or TBW). If you are constantly downloading, deleting, and re-downloading massive 150GB modern games just to clear space, you are actively burning through your drive’s lifespan. Be selective about what you install, and utilize older, cheaper external mechanical hard drives for basic file archiving.

The Final Verdict

We are officially living through a “RAMpocalypse” and storage crunch. The days of treating high-speed NVMe storage like a cheap commodity are temporarily on pause.

If you absolutely need an upgrade right now for a new build or a critical work machine, bite the bullet and buy it—waiting a few months likely won’t save you much money. But if your current storage is holding up fine, look after it, keep it cool, monitor it with CrystalDiskInfo, and let your current hardware ride out the storm.

How to Fix S.M.A.R.T. Error [C5] Current Pending Sector Count (Without Panicking)

How to Fix S.M.A.R.T. Error [C5] Current Pending Sector Count (Without Panicking)

You open up CrystalDiskInfo just to check on your PC, and instead of that reassuring blue “Good” box, you are greeted by a bright yellow “Caution” status. You look down the list of technical attributes, and your eyes lock onto a yellow or red dot next to ID C5: Current Pending Sector Count.

Your first thought is probably: Is my hard drive about to explode? Is all my data gone?

Take a deep breath. While a [C5] error means your drive is experiencing a hiccup, it is the one S.M.A.R.T. error that you might actually be able to fix and return your drive’s status back to a healthy blue.

Here is a plain-English, step-by-step guide on what this error actually means, how to secure your files, and how to fix it.

What Actually is a “Current Pending Sector”?

Think of your hard drive or SSD like a massive grid of tiny storage blocks called sectors.

A Current Pending Sector is essentially an unstable sector that the drive’s internal controller has flagged as “suspicious”. The drive tried to read or write data to that specific spot and failed. However, the drive isn’t ready to give up on it just yet. It places that sector in “purgatory” (pending status) until it can test it again.

  • The Good News: The drive hasn’t declared the sector permanently dead yet.

  • The Bad News: If your system tries to read data sitting on that pending sector right now, your PC might freeze, stutter, or hit you with a Blue Screen of Death (BSOD).

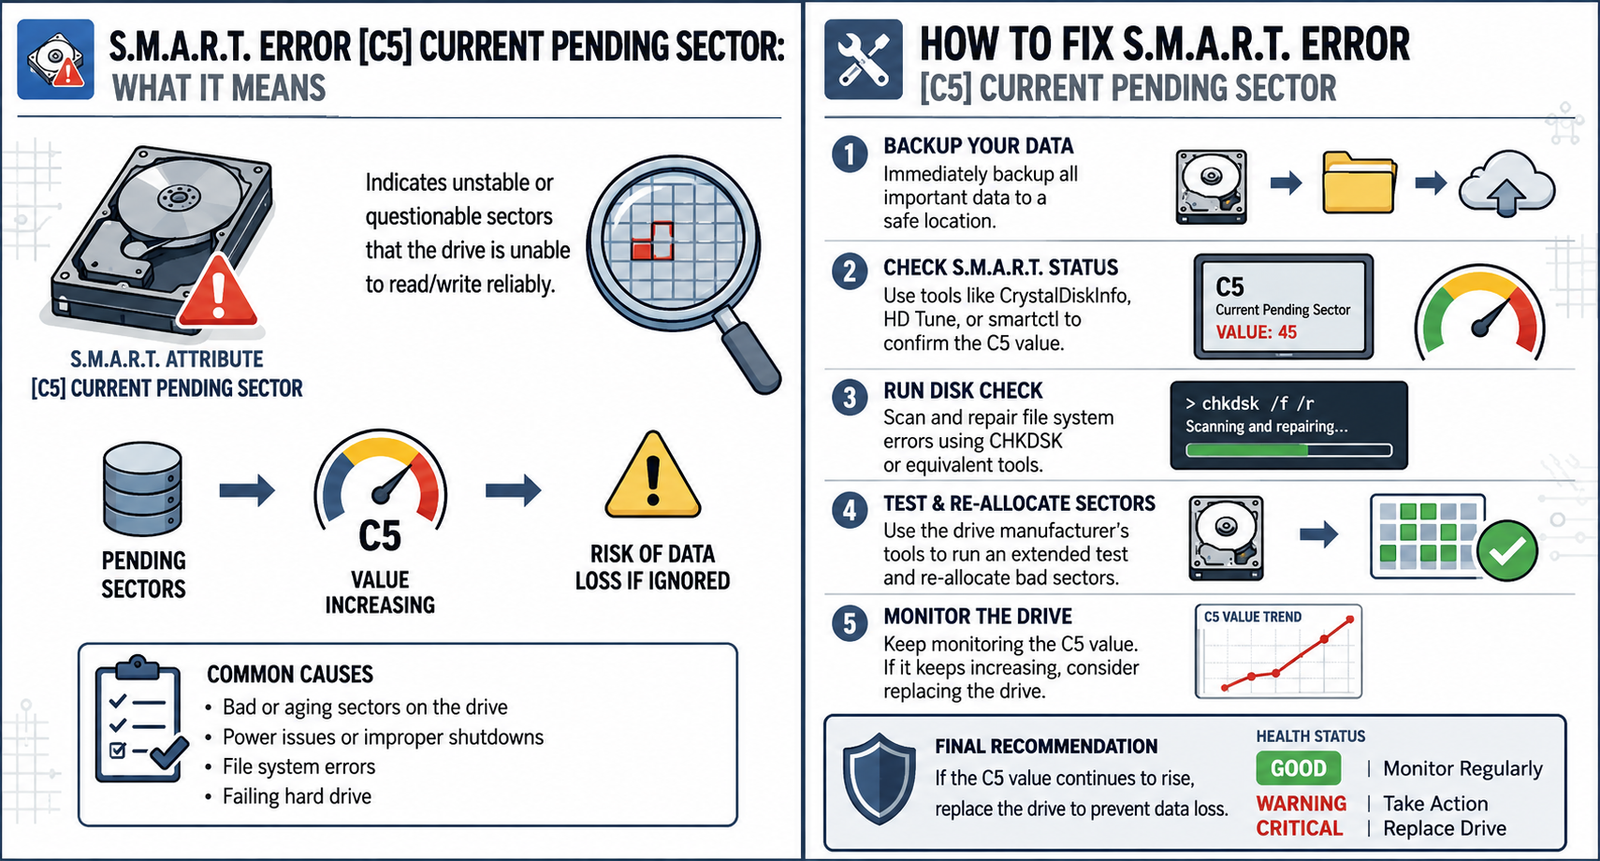
The image below shows exactly how this software warning connects directly to physical instability on your hardware components

Caption: Linking software alerts to physical reality. This technical overlay maps the digital [C5] Current Pending Sector Count error warning directly onto the physical, unstable data pathways of the drive storage hardware.

Step 1: The Golden Rule (Backup First!)

Before you attempt any fixes, back up your critical data immediately.

The process of fixing a [C5] error requires forcing your drive to deeply read and write data to test those unstable sectors. If your drive is genuinely on its deathbed, this intense testing can push it over the edge.

Grab an external drive, a thumb drive, or use cloud storage and save your irreplaceable photos, documents, and game saves. Do not worry about backing up easily downloadable games or your operating system files—just save the essentials.

Step 2: How to “Fix” the [C5] Error

To get rid of the pending count, we have to force the drive to make a final decision on those unstable sectors. When forced to rewrite data to a pending sector, one of two things will happen:

  1. The sector passes the test: The drive successfully writes data to it, realizes it was just a temporary glitch, and clears it. Your [C5] count drops back to 0. (Best case scenario)

  2. The sector fails the test: The drive confirms the sector is physically broken. It permanently retires it and moves the data to a healthy “spare” sector (this will cause your ID 05: Reallocated Sectors Count to go up).

In both cases, the [C5] Pending count drops to zero, and your imminent warning is resolved. Here are the two best ways to force this test:

Method A: Use Windows Chkdsk (The Easiest Way)

Windows has a built-in tool designed to scan and repair drive sectors.

  1. Type cmd into your Windows search bar.

  2. Right-click Command Prompt and select Run as Administrator.

  3. Type the following command and hit Enter (replace C: with the letter of the drive you want to fix):

    Plaintext

    chkdsk /f /r C:
    
  4. If it’s your main system drive, Windows will ask if you want to schedule the scan for the next restart. Type Y and hit Enter, then reboot your PC.

Windows will scan the entire drive. This can take anywhere from 30 minutes to several hours depending on your drive’s size. It will force the drive firmware to evaluate the pending sectors.

Method B: Perform a Full “Zero-Fill” Erase (The Most Effective Way)

If chkdsk doesn’t clear the error, you need a more aggressive approach. A Zero-Fill or Secure Erase completely wipes the drive, writing a binary 0 to every single microscopic block of storage. This forces the drive controller to test absolutely everything.

  • Note: This will completely delete everything on the drive.

  • How to do it: Use the official software provided by your drive’s manufacturer (such as Samsung Magician, Western Digital Dashboard, or Crucial Storage Executive) and look for the Secure Erase or Write Zeros feature.

The Verdict: Check CrystalDiskInfo Again

Once your Chkdsk scan or Zero-Fill erase is complete, open CrystalDiskInfo up again and look at the numbers:

  • If [C5] dropped to 0 and your health turned Blue: Congratulations! It was a soft/temporary error. Your drive is stable and completely fine to keep using as normal.

  • If [C5] dropped to 0 but [05] (Reallocated Sectors) went up: The drive successfully sequestered the broken sectors. If the reallocated number is low (under 10–20) and stops increasing, the drive is stable enough to use for casual gaming or secondary data storage, but keep an eye on it.

  • If the numbers keep going up every day: If you run the fixes and the counts continue to climb, your drive is actively degrading. No software wizardry can fix physical wear. Save your data and buy a replacement drive.

Reallocated Sectors Count: Is Your SSD Dying? (The Truth)

Reallocated Sectors Count: Is Your SSD Dying? (The Truth)

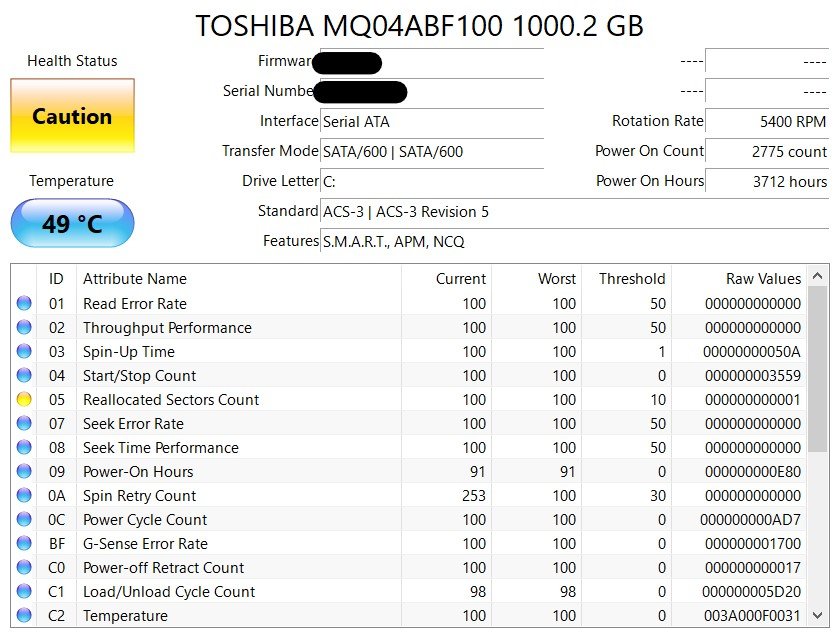
If you’ve opened CrystalDiskInfo and noticed a non-zero value for ID 05: Reallocated Sectors Count, you’re likely seeing a yellow “Caution” sign.

The short answer? Yes, your drive is beginning to fail physically, but it might not “die” today. Here is exactly what is happening inside your drive and what you need to do next.

What is a Reallocated Sector?

Every modern SSD and HDD is manufactured with a small “spare” area of storage that isn’t visible to Windows.

  • When the drive’s controller encounters a bad sector (a physical part of the disk that can no longer hold data), it permanently retires that sector.

  • It then “remaps” or reallocates the data to one of those spare sectors.

  • The Reallocated Sectors Count is simply a tally of how many times this has happened.

Is the Drive Dying? The “Rate of Change” Rule

A single reallocated sector isn’t an immediate death sentence. However, it is a sign of permanent physical degradation. To determine if your SSD is dying, you must monitor the Raw Value in CrystalDiskInfo over 24–48 hours.

Trend Risk Level Meaning
Stable (Value stays the same) Low/Medium The drive found a flaw, fixed it using spares, and the damage isn’t spreading.
Increasing (Value goes up) CRITICAL The drive is actively “rotting.” Each new reallocated sector means the physical hardware is crumbling.

Why SSDs are Different from HDDs

On an old-school Hard Drive (HDD), a reallocated sector often meant a physical scratch on the platter. On an SSD, it usually means the NAND flash cells are wearing out and can no longer maintain an electrical charge. Once an SSD starts reallocating sectors, it often snowballs quickly because the surrounding cells are under similar stress.

What Should You Do?

1. The “Zero-Increase” Test

If you see a count of, say, 10, write it down. Use your computer normally for a day. Re-check CrystalDiskInfo. If that 10 becomes 11 or 12, Shut down the PC immediately. Your drive is in an active failure state.

2. Check the “Health Percentage.”

In CrystalDiskInfo, look at the Percentage icon (e.g., 90% Good). If your Reallocated Sectors Count is high but the percentage is still high, the drive still has plenty of “spare” sectors left. If the percentage is dropping fast, the “spare pool” is empty.

3. Evacuate Critical Data

Don’t wait for the drive to hit 0%. SSDs, unlike HDDs, often fail “silently”—they don’t make noise; they just stop being recognized by the BIOS one morning.

  • Move: High-value photos, work documents, and crypto keys.

  • Leave: Games, OS files, and applications that can be re-downloaded.

Verdict: Replace or Keep?

  • If it’s your Boot Drive (C: Drive): Replace it. A failing OS drive causes blue screens (BSOD), file corruption, and “stuttering” in Windows.

  • If it’s a secondary Game Drive: You can keep using it until it dies, provided you don’t mind reinstalling your games later.

Pro Tip for crystalmarkinfo.com users: If your count is high, check your warranty. Many manufacturers like Samsung, Western Digital, and Crucial will honor an RMA (Replacement) if the S.M.A.R.T. data shows the drive is failing before the warranty period ends!