How to Fix S.M.A.R.T. Error [C5] Current Pending Sector Count (Without Panicking)
You open up CrystalDiskInfo just to check on your PC, and instead of that reassuring blue “Good” box, you are greeted by a bright yellow “Caution” status. You look down the list of technical attributes, and your eyes lock onto a yellow or red dot next to ID C5: Current Pending Sector Count.
Your first thought is probably: Is my hard drive about to explode? Is all my data gone?
Take a deep breath. While a [C5] error means your drive is experiencing a hiccup, it is the one S.M.A.R.T. error that you might actually be able to fix and return your drive’s status back to a healthy blue.
Here is a plain-English, step-by-step guide on what this error actually means, how to secure your files, and how to fix it.
What Actually is a “Current Pending Sector”?
Think of your hard drive or SSD like a massive grid of tiny storage blocks called sectors.
A Current Pending Sector is essentially an unstable sector that the drive’s internal controller has flagged as “suspicious”. The drive tried to read or write data to that specific spot and failed. However, the drive isn’t ready to give up on it just yet. It places that sector in “purgatory” (pending status) until it can test it again.
-
The Good News: The drive hasn’t declared the sector permanently dead yet.
-
The Bad News: If your system tries to read data sitting on that pending sector right now, your PC might freeze, stutter, or hit you with a Blue Screen of Death (BSOD).
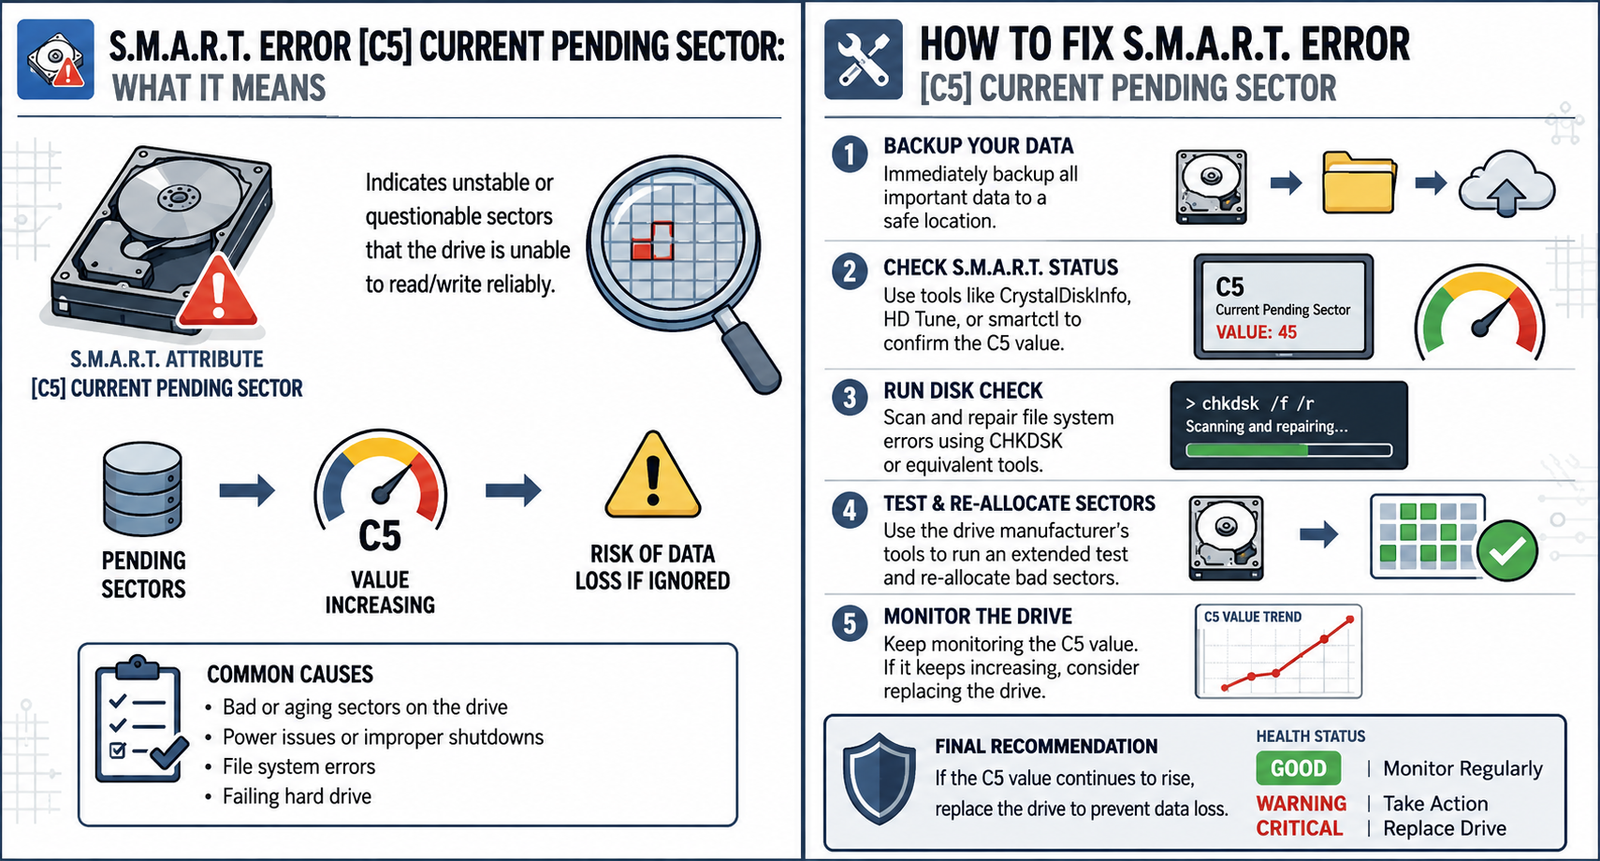
The image below shows exactly how this software warning connects directly to physical instability on your hardware components
Caption: Linking software alerts to physical reality. This technical overlay maps the digital [C5] Current Pending Sector Count error warning directly onto the physical, unstable data pathways of the drive storage hardware.
Step 1: The Golden Rule (Backup First!)
Before you attempt any fixes, back up your critical data immediately.
The process of fixing a [C5] error requires forcing your drive to deeply read and write data to test those unstable sectors. If your drive is genuinely on its deathbed, this intense testing can push it over the edge.
Grab an external drive, a thumb drive, or use cloud storage and save your irreplaceable photos, documents, and game saves. Do not worry about backing up easily downloadable games or your operating system files—just save the essentials.
Step 2: How to “Fix” the [C5] Error
To get rid of the pending count, we have to force the drive to make a final decision on those unstable sectors. When forced to rewrite data to a pending sector, one of two things will happen:
-
The sector passes the test: The drive successfully writes data to it, realizes it was just a temporary glitch, and clears it. Your [C5] count drops back to
0. (Best case scenario) -
The sector fails the test: The drive confirms the sector is physically broken. It permanently retires it and moves the data to a healthy “spare” sector (this will cause your ID 05: Reallocated Sectors Count to go up).
In both cases, the [C5] Pending count drops to zero, and your imminent warning is resolved. Here are the two best ways to force this test:
Method A: Use Windows Chkdsk (The Easiest Way)
Windows has a built-in tool designed to scan and repair drive sectors.
-
Type cmd into your Windows search bar.
-
Right-click Command Prompt and select Run as Administrator.
-
Type the following command and hit Enter (replace
C:with the letter of the drive you want to fix):Plaintext
chkdsk /f /r C: -
If it’s your main system drive, Windows will ask if you want to schedule the scan for the next restart. Type Y and hit Enter, then reboot your PC.
Windows will scan the entire drive. This can take anywhere from 30 minutes to several hours depending on your drive’s size. It will force the drive firmware to evaluate the pending sectors.
Method B: Perform a Full “Zero-Fill” Erase (The Most Effective Way)
If chkdsk doesn’t clear the error, you need a more aggressive approach. A Zero-Fill or Secure Erase completely wipes the drive, writing a binary 0 to every single microscopic block of storage. This forces the drive controller to test absolutely everything.
-
Note: This will completely delete everything on the drive.
-
How to do it: Use the official software provided by your drive’s manufacturer (such as Samsung Magician, Western Digital Dashboard, or Crucial Storage Executive) and look for the Secure Erase or Write Zeros feature.
The Verdict: Check CrystalDiskInfo Again
Once your Chkdsk scan or Zero-Fill erase is complete, open CrystalDiskInfo up again and look at the numbers:
-
If [C5] dropped to 0 and your health turned Blue: Congratulations! It was a soft/temporary error. Your drive is stable and completely fine to keep using as normal.
-
If [C5] dropped to 0 but [05] (Reallocated Sectors) went up: The drive successfully sequestered the broken sectors. If the reallocated number is low (under 10–20) and stops increasing, the drive is stable enough to use for casual gaming or secondary data storage, but keep an eye on it.
-
If the numbers keep going up every day: If you run the fixes and the counts continue to climb, your drive is actively degrading. No software wizardry can fix physical wear. Save your data and buy a replacement drive.